Belt And Disc Sander Home Depot Yogurt,Furniture Hardware Pulls And Handles Excel,Modern Woodworking Chapter 10 Answers Image - Videos Download

Clamp the paddle securely. Plane down the blades with an electric planer. Flex the paddle and heft it. Keep shaving it down until it's light but not too flexible. Trust your intuition about this. Really great for carving wood. Great for carving human flesh also, so be careful. It also flings crap in all directions and will fill your lungs with dust. War all your safety gear. They tell you to only use it with their backing plate, but it seems to work fine with a regular stiff backing pad from a disk sander.
Wear safety glasses and dust mask. Clamp and shape the blades. Smooth out all the marks from the planer. Round the corners of the handle. I like to leave my handles mostly rectangular like a hockey stick.
Switch to a finer grit sanding disk and smooth out the gouges from the carbide chip wheel. Hand sand with finer grits of sandpaper until you're satisfied with the finish. Use epoxy mixed with wood dust to fill any cracks or glue back any chips that broke off during shaping.
Finish the paddle with linseed oil, varnish, or whatever you prefer. Some people leave the part your hands will grip unfinished. I like linseed oil because I can soak it in, wipe it dry, and Go paddling! More paddle and oar making projects: Here's the quickest way I know to make a paddle.
Reply 8 years ago on Introduction. Reply 9 years ago on Introduction. No, Inuit and Eskimo are one and the same. Inuitt means more or less "The People". Eskimo is an Algonquin word meaning "Eater of Flesh". Tim, I made my paddle even simpler, but it still works quite well.
I'm tall and broad shouldered so i wanted a 90" paddle. With a rasp I rounded off the 2x2 at my grip locations, slopped on some spar varnish, and was good to go. These are fun to build, and fantastic to paddle with, though I am not sure of the "beginner" comment. I modify mine have built several by using a 2x6 stock of wood, Have used solid ash, but prefer a laminate of cedar and pine, with a core 'backbone' of doug fir.
Make sure to use marine epoxy to glue the laminates, I buy all my materials at Home Depot. Also, I finish mine with fine sanding, and an acrylic or poly coat. If you are addicted to rolling, these are fantastic to work with.
Thanks for the comments. Dave, in Florida. The deck will require an extra layer of fiberglass, I like using 6 oz deck patch with a 4 oz cloth on top that wraps the rails. The reason for using the 4 oz on top is it has a smaller and lighter weave and the epoxy will smooth out better but the 6 oz cloth could be on top as well, it's not a big deal.
In the previous step we removed the cut lap material, we need to to either sand down the cut fiberglass line around the deck of the surfboard or using a piece of wood push down on the edge so it indents in to the foam. The smoother this line is to the deck the better results for laminating the deck.
Running your hand over line should not catch at any point. I am repeating a cut lap on the bottom so, repeat the tape method as mentioned in the previous step, trace out an outline and tape it. Take the first piece of fiberglass I'm using 6 oz cloth and roll it out over the deck of the board.
Cut out an outline so the deck patch covers the deck but does not over hang onto the rail. Ideally it would meet around where the cut lap stopped. Next roll out the next layer of fiberglass and repeat with the same method of cutting as the previous step for laminating the bottom so that it covers the tape on the bottom. Mix up the epoxy and since there is an extra layer of fiberglass, the deck will require more epoxy resin.
The cut lap on the bottom needs to be sanded flush and feathered into the bottom of the board. I like using a oscillating sanding tool to do it as it lets me work on small sections and vacuum to keep the dust down. A palm sander works great and so does hand sanding with a block.
The reason I like to vacuum while sanding is the dust from sanding fiberglass can really make you itch, so I like to keep the dust to a minimum. Also pro-tip: when washing your hands after sanding fiberglass make sure to wash in cold water; as hot water will open up the pores of your skin causing the fiberglass particles to get deep into your skin and make you itch even more!
At this point the surfboard is laminated, from this point onward, avoid touching the surfboard with bare hands. The oil from your hands can cause issues in later steps. There are a few different ways to install fins, the first way is to use fin boxes and the second way is to fiberglass fins directly on the surfboard. I am opting to glass them on to the surfboard.
In my previous surfboard Instructable I installed Future Fins boxes. Fin boxes are easier and you can switch out the fins if you want to try different fins or add and remove fins depending on how you like to surf.
However fin boxes sometimes need special tooling router and templates to install. Also FCS fins use a plug system where all you need is a jig and a hole drill and they can be installed, although they have a newer fin system that snaps in place, regardless it's still a fin box..
There are other systems out there but these two are the ones I am familiar with besides the traditional longboard fin boxes. So to glass on fins, first we need fins. I am going to just trace off of an existing set of Future Fins and use them as my template to make my own wooden fins. You can go as fancy as you like when making wooden fins, gluing different exotic woods and then shaping them into a fin.
The setup with be tri-fin system in a thruster set up. I like having the tri-fin as it pivots more off the tail but it really depends on what you like. The middle fin was shaped with both sides rounded and foiled. My suggestion is to look at an existing set of fins and see what works and copy. Another option is to just buy a set of ready to glass on fins. My tool of choice for foiling the fins is a angle grinder with a flap disc.
I skip this step as it adds extra work for minimal value in my opinion. I just like to glass the wooden fins directly on the board and reinforce with fiberglass when they are glassed onto the board.
Once your have your fins shaped, next it is time to layout the where the fins should be setup. My suggestion is to copy an existing board but my layout will be a typical thruster layout. So the fin placement is very important and I won't go into detail about this, what I will show is how to actually glassing the fins onto the surfboard. A few things that need to be decided is the toe and cant of the side fins.
The toe is the angle of the fin that turns inward from the front of the fin toward the stringer, generally speaking the more toe the more drag but better turning and responsiveness. The fin cant is the angle the Belt And Disc Sander Home Depot 70 fin is tilted outward towards the rails of the surfboard, generally the more cant the more responsive the board will be. There are online templates you can find to help with laying out the fins.
I'm no expert in this so I defer you to doing your own research. At this point the surfboard is glassed but it needs additional epoxy resin to fill in all the voids and bumps of the fiberglass. This step is called hotcoating and is just simply a coat of epoxy brushed on the board. Before we hotcoat, a tape dam needs to be put in place. Start with the surfboard bottom facing upward. Using some high quality masking tape, I like using 3M, don't cheap out on your masking tape tape around the middle of surfboard rail.
Let the tape over hang so any epoxy that will drip off will not end up on the other parts of the surfboard. Near the tail where the hard edge is, apply tape to create a dam so the epoxy will not flow over the hard rail. Also again super important to hotcoat when it is above 15C. Anything below that temp the epoxy will not flow well. Once you have your epoxy mixed, dump the epoxy on the surfboard, don't let it sit in the container too long or else it will start heating up and hardening quicker than you want because it is undergoing a chemical reaction.
Use a 3" soft bristle paint brush, coat the bottom of the surfboard, make sure to cover every last bit of surfboard. Drag the paint brush in long strokes across the board then the length of the board. Brush the rails to clean up any thick spots. If you find you are getting fish eyes, it could be because of contaminates on the board or not enough epoxy is being used. Let the epoxy set up until it is just starting to harden, hours, depending on temperature remove the tape.
Removing the tape before the epoxy full hardens makes it much easier. Let harden for 24 hours. To hotcoat the deck of the surfboard is exactly the same, run a line of tape around the middle of the surfboard but this time let it overlap the epoxy by 1mm. Repeat the steps for hotcoating just like for the surfboard bottom.
If you did glass on fins, flip the board on edge and hotcoat them one side at a time. It is possible to hot coat them when coating the bottom of the surfboard but I like to do them separately so i make sure to get a thick coat on them. So at this point a decision needs to be made. The surfboard can be sanded and then considered finished or it can be sanded and then paint and art work can be applied and a clearcoat can be sprayed on the surfboard or a gloss coat of epoxy can be applied.
Also if paint was applied to the foam you could stop here as you might be happy with the way the board looks. Since I had to glue two sheets of foam together and can see the glue line, I am opting to paint the hotcoat to hide that, not to mention the foam is pink in color. Reasons for stopping after sanding the hotcoat is if you are concerned with performance and want a light surfboard. I am sanding the hotcoat, painting the surfboard then gloss coating it.
I prefer a surfboard to last longer than go for all our performance. To sand the surfboard there are a few methods, you can hand sand it, palm sand it or power sand it with a polisher outfitted with a disc.
Hand sanding is slow but totally possible and typically the rails are hand sanded anyways. Palm sanding is the method I recommend for a beginner board builder as it is much more forgiving and most people will have a palm sander or at least they are very inexpensive.
Power sanding with a automotive polisher is the way the pros do it and if you are not careful you can sand a hole in the board in a hurry. I will use a combination power sanding with a polisher and palm sanding and hand sanding for the rails. Also sanding with a polisher will require special pads that have different hardness.
So I will only refer to sanding with the palm sander from here forward. If you are interested in seeing how to power sand watch the video. If your hotcoat is fairly smooth then you can start off with a finer grit grit , if the hotcoat isn't smooth to start with use a rougher grit and remove any ridges or bumps.
Move around on the board and don't stay in one spot too long or you risk sanding through and exposing the weave of the fiberglass. If you do then you will have to fix it later by coating it with epoxy and feathering in the edges.
Hand sand the rails and make sure to use long even strokes so you don't sand in once spot and create an uneven surface. Sand all the larger surfaces of the bottom and deck, until smooth, take it to a grit if you plan on painting the board. If not then keep sanding going through the various grits , , , , , , each finer grit will take out the sanding marks from the previous grits.
Once you get past the grit, it is best to wet sand by hand with a sanding block or else the dust will really clog the sand paper. A grit makes for a nice satin finish. Depending on the type of leash plug, there are different methods for install them.
Some are installed during the lamination step and then sanded open, some are installed after the hotcoat or glosscoat. Drill a hole that fits the leash plug, if it is being installed where the stringer is, it might need to be routered out as the plywood stringer can be difficult to remove. Some people suggest to use some fiberglass cloth between the plug and foam or add some chopped fiberglass into the epoxy for added strength.
Once set, sand the overlapping epoxy and feather into the rest of the board. If you are doing a gloss coat you can wait on this step. This step is optional as technically the surfboard is ready for the water. This step is really up to the builder on how they want the artwork or color but the only really important rule is use only water based paints, as oil based ones will leave a residue that can cause adhesion problems with the gloss coat.
I like to even wash the board with dish detergent after painting to remove any oils that could be part of water based paints. There are paint pens that can be used to draw on the board, I like using the water based craft paints that are available at the Dollarstores, Walmart or Micheals.
I have even used latex house paint mixed to a color I wanted. Just as a precaution make sure to test the paint on a surface and make sure that it's waterproof when dry. Some paints will absorb water even after it dries and will peel off. Technically artwork should be done before laminating but because the glue seam is visible in the foam I opted to do this after the hotcoat.
There is more than one way to build a surfboard! The gloss coat is an additional coat of epoxy resin applied after the hot coat or in my case after the artwork and paint to protect it. A gloss coat is exactly as it sounds it's like a clear coat on a car.
Apply the clear coat just like the hot coat: tape the rail, apply gloss coat to one side, let set, tape the rail then gloss coat the other side. Also automotive clear coat can be sprayed on for a gloss coat and is much easier than applying epoxy.
I have done this in the past but my preference is to just to use an additional layer of epoxy. The reasoning is spraying automotive clear coats is very toxic and takes a booth to spray properly. You can drop it off and see if an auto repair shop will spray the board for you when they paint a car. The gloss coat will never be completely smooth since it is brushed on, so the final step to really make the surfboard pop visually is to sand and polish.
Depending on how smooth the gloss coat is, start with a grit paper if there are a lot of bumps or waves in the finish. I recommend power sanding the flats of the board if they are rough but I generally hand sand the whole board. Typically I wet sand the board as it keeps the dust down and paper from clogging up. Once all the ridges are sanded out, switch to a finer grit to polish out the marks from the previous grits, I like switching directions between grits so I can see if I sanded out the marks.
Keep repeating this until the board is smooth. Once the board is wet sanded to the higher grits, it will still have a dull look to it.
The final step is to hit the with some polishing compound, I like using Meguiar's Ultimate Polish. The use of the power polisher with a buffing pad will really save some elbow grease for this step. The surfboard should really start to pop at this step. Stand back and look it over and re-sand any spots you missed and polish as needed. The surfboard is almost ready for the water at this point!
It's best to wait at least 7 days, up to a few weeks depending on the temperature to give lots of time for the epoxy to fully cure.
While the epoxy may seem very hard, it can still be damaged much more easily if it's not cured. Hope you enjoyed this Instructable and consider subscribing to my here and on youTube, I make various different projects. Question 5 months ago. Question 1 year ago on Step 7. I am planning on making a XPS kayak soon, you have some great information here, going to start watching your youtube videos, subscribed already to them both.
Thanks for your info!!! Great job! Tip 3 years ago on Step 4. I make Hot Knives with a cheap stick welder from Harbor Freight or an auto parts store. And I normally twist 2 or 3 strands of NiCrome together, this reduces the sag and lets it get hotter with less chance of breaking.
Question 3 years ago on Introduction. You have made a beautiful surf board. An XPS surf board is intriguing to me as the waves on Lake Michigan 30 miles from me can get pretty big. Question 3 years ago on Step Could you give a ballpark price for all the materials? Also about how much time did it take to complete? This seems like an awesome project.
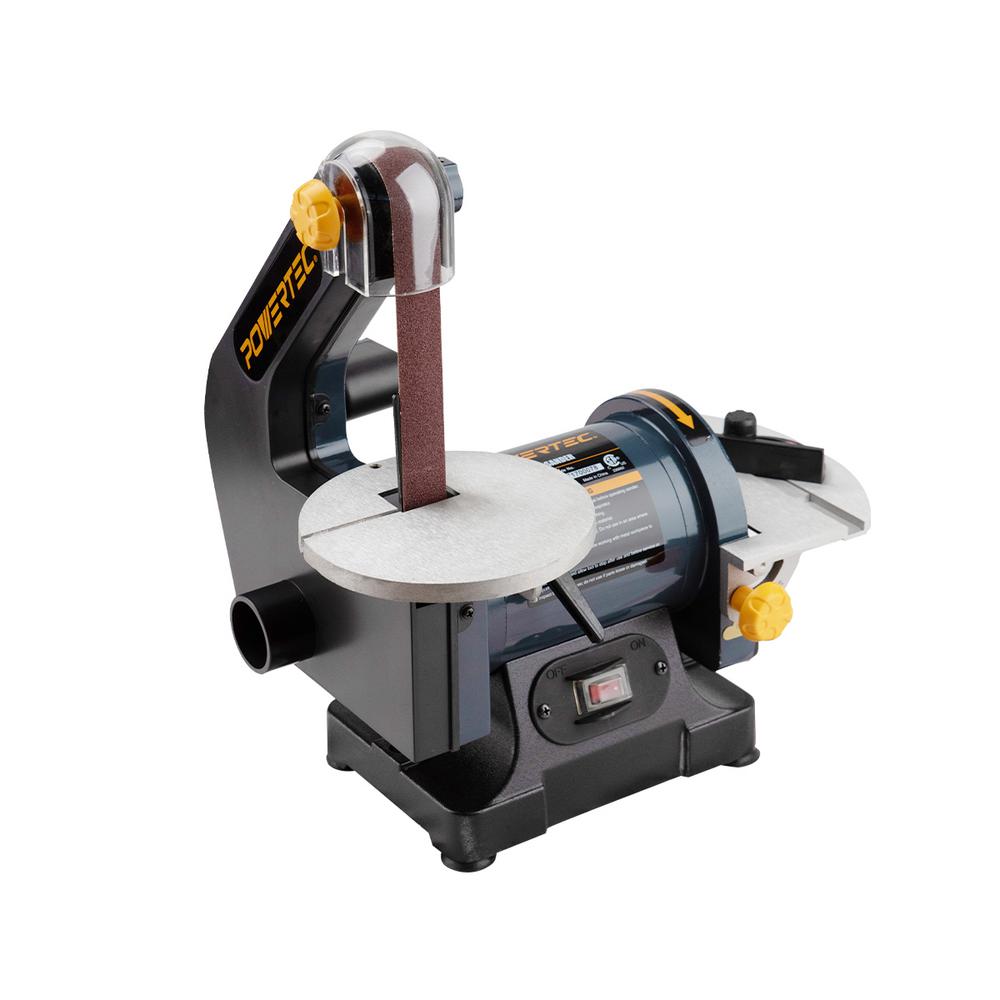
The disc, on the other hand, is larger than most discs on belt disc sanders. The belt moves at 3, SFPM. This is different from most combination sanders that have faster discs and slower belts.
The best part of this sander is that it comes with a removable platen. This is perfect for anyone looking to sand, grind, or finish odd-shaped pieces of work on the belt.
Rikon We wanted to include this product in our belt sander reviews because of its impressive size. You will need to have plenty of space available in your workshop for the Rikon It is a large, heavy-duty belt disc sander.
We had to include this in our list of favorites because of its size and durability. You will notice that the disc is a whopping ten inches in diameter. This makes it the largest disc size in its class. It only makes sense that the product would also have an exceptionally large belt sander.
As with most belt sanders, you still have the versatility of tilting the belt of up to 90 degrees. Our favorite part of this behemoth of a sander is the dust port. With as much power, speed, and surface area that this sander provides, you will certainly have a dusty mess when you are finished.
However, the dust port is molded to collect dust from both sanders, so you can keep your work area clear. Xtremepower The Xtremepower is a very affordable, plain belt disc sander. It is on the small side, so it is better suited for small projects. The disc on this combination sander is only five inches in diameter, and it moves at 3, RPM.
On the other hand, the belt can reach up to 2, SFPM. Since this is a budget option, it does not offer any belt angle adjustments. For the price, you will have a harder time finding a better sander.
It will get the job done without Belt And Disc Sander Home Depot 2020 all of the extra bells and whistles you would get on a high-end belt disc sander. If you are just looking to do some casual sanding or woodwork, you will be able to do just that with this affordable product.
The disc on this sander measures six inches in diameter, and it can reach speeds up to 1, without a load. The belt is another one of the largest in this belt sander review. You also have the ability to adjust the belt angle between 0 and 90 degrees.
Our favorite part of this sander is that it is made to last. Not only is it made with a heavy-duty base, but it also has sealed ball bearings and steel plates. The ball bearings will reduce friction, and the platen will reduce the risk of heat damage. Inside where the motor is kept, a fan is enclosed to keep the powerful motor from overheating.
This is the perfect sander for serious woodworkers looking to make an investment in a solid tool. The best part of having a standalone sander is that you can easily move it around. It is impressively large sander. The belt can be adjusted between 0 and 90 degrees. The body of the sander is made from the same sturdy cast iron. If you need to make adjustments, you can easily use the tension release lever, which will make changes to the sandpaper belt grits.
It also includes a miter gauge and two dust ports. By now, you should realize the importance of the dust ports and working in clean space. With this sander you get a disc that is six inches in diameter. As you can see, this is a mid-sized combination saw, and it has an appropriately powered motor. If you need to sand any precise angles, you can make adjustments between 0 and 90 degrees.
We think that this belt disc sander would be perfect for anyone looking for a compact sander.


|
Hand Plane Power Jointer Woodwork Projects 2020 Build A Door Frame Exterior 5g |

NINJA
26.06.2021 at 22:46:31
POLAT
26.06.2021 at 17:41:54