Rockler Circle Cutting Jig Instructions,Delta Belt And Disc Sander 31 460 Ebay,Making Fine Wooden Boxes Qq - Plans Download

We looked forever to find a tool that helps you cut perfect circles, but everything is extremely small or VERY expensive.
This was affordable and worked very, very well. This circle guide kit is so easy to use and makes the perfect circle. Definitely worth the buy! Worked better than I expected. The instructions were easy to understand and the actual working process was amazing.
Thank you. I toyed with the idea of making a circle cutting jig. I am very happy w the Milescraft jig. It is easy to use, is well made, and does the job.
I have used both the large and small circle cutting configurations and, while the accompanying scales might be a little off, basic shop methods will get accurate work done. The customer service has been terrific on what really was a minor issue. This is a great product. Very easy to set up. First time out of the box, I made a perfect circle. Instructions are very clear with useful tips. Buy with confidence and you will not be disappointed.
As an added bonus, their customer service is the best of any company I have ever dealt with. The answer questions very fast and are there if you need them. Makes routing precise circles and arcs very easy. Will be used a bunch. Have a friend that is purchasing one now.
Beams can be custom cut to the desired length. Please contact Milescraft Customer Service by phone or email, and we would be happy to assist you with your custom beams. Some Ryobi routers require special screws which will be supplied upon request at no charge to you.
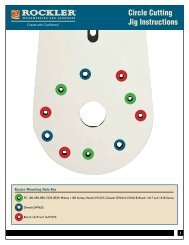
To acquire these special screws please contact Milescraft Customer Service via email, info milescraft. If your router comes with a dust deflector, we recommend installing this before routing. This Ryobi router does not require special screws. Need Help? Contact Us Today! Phone: Fax: Monday - Friday a. Using your router, you can cut circles from 1. Circle Guide Head Sub Assembly quantity. Out of stock. Offset Base Sub Assembly quantity.
Universal Base Plate quantity. Slide Parts Knob quantity. Center Pivot Slide Sub Assembly quantity. T-Slot Bolt quantity. Base Plate Mounting Screws quantity. Brad Point Drill Bit 10 quantity. Average Review: 5. Join the Milescraft community and write a review for this product!
Worked great. Very good quality and and finished. Absolutely the most perfect circles! Excellent value too. Using the straight edge as a guide, route a slot between the mark 1" from the baseplate, and the mark 1" from the other end of the base.
If as you look at it, the fence is to the left of the router, start at the end closest to you. If the fence is to the right of the router, start on the end furthest from you. This will pull the router into the fence, which not only makes it easier to make a perfect slot, but is also safer. With the fence still in place, rout the smaller slot the in the same way as the first one. Drill holes for the mounting screws, making them just a little bigger than the diameter of your screws.
Flip the base over, and using the holes as a guide, trace the baseplate on this side too. Choose which side you want to moun the router on, and chamfer the mounting holes on the opposite side.
You want the chamfers just deep enough that the screws will sit beneath the surace. Drill or rout out the center hole.
It just has to be slightly bigger than the largest router bit you might use. A hole saw is probably best for larger holes, but I used a twist bit, and it caught and made a pretty messy hole. It won't really effect anything other than aesthetics, but next time I'll take the time to get the correct bit out. I did clean up the hole a little with the router later. The mounting screws are most likely much too short to reach all the way through the base material.
We could buy longer mounting screws, but unless you have a set of really long router bits, the thickness of the base may limit the depth of cuts you can make with the finished jig. To solve both problems, I reccomend routing a recess in the base for the router to sit down in. After clamping the base to a work surface with the router mounting side up, rout out the baseplate area, using the line you traced as a guide. It's easiest to start at the center and work around the the hole clockwise, sneaking up on the final size with a few light passes.
Now the baseplate can be removed from the router, and the router can be installed in the jig using the baseplate screws. Make sure all the screws sit flush with the bottom suface of the jig so that they won't catch on anything. While the easiest thing to do is buy a t-handle or star handle for jigs, but I'm too cheap to do that, so I make my own.
It takes a piece of scrap wood, a t-nut which costs just a few cents, and takes just a few minutes to make. I make them in bulk to use in all of my jigs, and I won't go into the process here. It's easy enough to simply cut out a shape you like, drill a hole in the center to accept the t-nut, and hammer it in place. I didn't have any threaded rod, so I just cut the head off of a 3" Rockler Circle Cutting Jig Kit bolt.
Screw the nut onto the center of the threaded rod, and then place the washer on. Slide the portion above the washer up throught the slot in the base, and then screw the handle on to the top.
Alternatively, if you have access to a metal lathe as I do, you can cut the threads off one end of the threaded rod, making a smooth post of a specific size. That way you can use a drill bit that matches the specific size, and always be sure to have a nice tight fit. The threaded rod with an appropriate sized drill bit should work well enough for most applications though. This step is entirely optional, but I thought it might make it slightly easier to use.
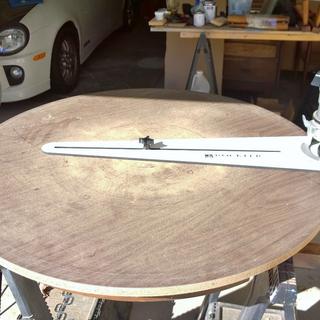
The base had quite a bit of uneccesary wood, so I decided to cut it off, and round the corners. I also slightly beveled the edges on the bottom side with some sandpaper so that they wouldn't catch on anything as they slide around the circle. The first step to using it is setting the post height. Measure the thickness of the material you'll be cutting a circle in. Adjust the nut on the post so that it sticks out slightly less than the material is thick.
Mark the center of the planned circle, and drill a hole that the threaded rod post will fit in snugly. Set the post at the desired distance from the router bit, and tighten the handle on top to lock it in place. If you are cutting all the way through your material, make sure to hang the portion being cut off the table, and keep rotating the material periodically during the cut to keep from cutting the table.
You could also put a sacrificial piece of scrap underneath the material instead. It's generally safer and easier to cut outer edges of circles in a counter-clockwise direction, and inside edges clockwise.
If you don't want a small hole in the cener of whatever you're cutting, you can use a sacrificial piece on top. Drill a hole in a piece of scrap, and use doublesided tape to secure it to the workpiece with the hole at the center of where you want to cut the circle. Then just increase the depth of cut by the thickness of the sacrificial piece, and cut as usual. Alternatively, if a hole would be acceptable on the underside, but not on top, you can drill the hole only part way through the material, and cut from the bottom.
Have fun, and be safe! I have the same fixed-base Porter Cable router and made a circle-routing jig for it. What I'm trying to sort out is how to start the cuttingdo you have to loosen the router height adjustment while it's running and rotate it down to the depth you want and re-tighten?
I probably should just use my plunge router, I guess! Reply 7 months ago. Reply 2 years ago. Don't ever loosen or attempt to adjust the depth while it's plugged in, let alone running.
A plunge router is safer, but it can be done easily without one. Set the depth with the router un-plugged, plug it in, turn it on while holding it securely it will jump a bit when you turn it on , then slowly lower the bit into the workpiece while keeping the side of the baseplate against the fence. Tip 2 years ago. One very important thing to remember is to take into account the thickness of the cutter bit you are using, and compensate for half of that in your finished circle diameter.
This is great!
|
Hand Carved Dresser Side Mount Drawer Slides Home Depot 50 Blade And Sorcery Free |

DelPiero
02.05.2021 at 10:54:23
KAMILLO
02.05.2021 at 12:45:41