Rail And Stile Coping Sled,Ikea Dresser Drawer Supports Limited,Plane Bench Press 60 - Good Point
Classifieds Exchange. Notify Me Of New Listings. Request A Quote. Recent Listings At All Exchanges. Recent Images At All Exchanges. Recent Posts At All Forums. Recent Images At All Forums.
Architectural Woodworking. Business and Management. Cabinet and Millwork Installation. Commercial Kiln Drying. Dust Collection, Safety and Plant Operation.
Professional Finishing. Professional Furniture Making. Sawing and Drying. Shop Built Equipment. Value Added Wood Processing. Project Gallery. Sawmill Gallery. Shop Gallery. Shopbuilt Equipment Gallery. Recent Images Gallery. Product Directory General. It can help make the cope cut much more efficient, accurate and safe.
The coping sled has but one purpose but it's an important one! Helping the woodworker make a cut across the end grain short end of a work piece to create a joint that allows you to build frame and panel also called rail and stile doors. This is a precarious cut at best and without support to back up the cut, you can easily hurt yourself or at the very least ruin your work piece.
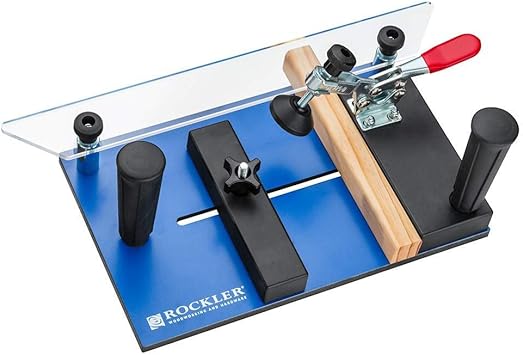
The basic anatomy of a coping sled is as follows: A base or "sled" for the work piece to ride on across the router bit, a stationary fence on the right hand side to provide sturdy support for the work piece. Then there is a "sliding" fence on the left hand side that can lock in place to clamp the work piece horizontally and a clamp to hold the work piece down vertically.
The base is 10"x 12", the stationary fence is 3" x 10" and the sliding fence is 2"x10". A good sled will also have two handles allowing the operator to safely move the sled and a "guide", usually made of clear plastic that provides a straight edge to reference against the router table fence.
The guide ensures that the work piece maintains the correct distance from the bit while making the coping cut.
We need two tee nuts for the guide standoffs, two for the handles and two for the stationary fence. Next we drill through holes in the counterbores to allow the tee nuts to be accessed from the top side. I press the tee nuts into the counterbores using a clamp. Just a few turns of the clamp easily presses them into place.
The base of the sled is now complete and we can begin assembly. Before I move on, one note I did have to counterbore the spot where the handles go because the threaded stem of the handle wouldn't reach the tee nut.
Before you fully tighten the fence down ensure that the fence is squared to the sled. Add a washer here if you want I didn't but it can make things slide better sometimes.
Add a washer to this side. Next add the 2" hex standoffs. These little guys have a threaded "male" side and a threaded "female side". Male side goes down to connect to the tee nut.
First I need to cut it in half lengthwise to make a 3"x 12" piece. This is easily done at the table saw. I then peel off the protective film and chamfer the very sharp edges of the polycarbonate. This will prevent annoying cuts to the knuckles down the road. I then installed the guide on top of the standoffs using hex drive cap screws. To successfully tighten everything down without cracking the polycarbonate, you should leave the cap screws loose and tighten the standoffs all the way, then go back with a hex wrench and tighten the cap screws snugly in place.
I need to add the toggle clamp to the stationary fence. This will allow me to clamp down on the work piece to keep it from moving as I make the cope cut. You can see here how it will secure the work piece and can be adjusted for thicker material if needed, just adjust the clamping bolt. That's it! The plywood sled is complete. If you need more, just make the base wider! Easy peasy. You can see here the coping sled in action. The woodworker holds the guide against the fence and from right to left smoothly guides the work piece across the router bit.
A small scrap of wood can also be used to "back up" the cut between the work piece and the stationary fence. This helps eliminate blowout that can occur as the router bit exits the cut. This is what my cope cut looks like. You have two parts, the "tongue" that will mate with the groove on the stile and the "cope" that will fit the contour of the inner edge of the stile.
Here's the view from the back of the work piece where you can see these two elements more clearly. What if you don't have the plywood scraps to make this jig? Before you fully tighten the fence down ensure that the fence is squared to the sled. Add a washer to this side. Male side goes down to connect to the tee nut. This is easily done at the table saw. I then peel off the protective film and chamfer the very sharp edges of the polycarbonate.
This will prevent annoying cuts to the knuckles down the road. I then installed the guide on top of the standoffs using hex drive cap screws. To successfully tighten everything down without cracking the polycarbonate, you should leave the cap screws loose and tighten the standoffs all the way, then go back with a hex wrench and tighten the cap screws snugly in place. I need to add the toggle clamp to the stationary fence.
This will allow me to clamp down on the work piece to keep it from moving as I make the cope cut. You can see here how it will secure the work piece and can be adjusted for thicker material if needed, just adjust the clamping bolt. The plywood sled is complete. If you need more, just make the base wider! Easy peasy. You probably wont want to buy an entire sheet just to make one small jig. You can use aluminum extrusions to form the base and the two fences.
Note that I purchased these from a company called Misumi links above and the great part is they have tracks built right into them for fastening all the hardware! For simplicity, I used all the same hardware as I did for the plywood sled handles, standoffs, toggle clamp and polycarbonate.
The only difference was that I swapped out the tee nuts for sliding tee nuts more below on that. You really just need to drill the holes in the fences to allow bolts to reach the base. You want to mark the hole locations right over the two outside tracks in the base. Do this for both the stationary rail and the sliding rail. Did you know that you can cut aluminum with regular woodworking blades and drill bits? Its true and that makes this an easy job!
You can use a handheld drill for this but a drill press will help you be more accurate. NOTE: the sliding fence really only needs one hole in the center. OK, everything will be attached using sliding tee nuts.


|
Mounting Jet Air Filtration Systems 9 Sanding Discs For Wood 05 Woodwork 413 60 |

FASHION_GIRL
31.05.2021 at 21:22:21
agentka
31.05.2021 at 21:45:41