Openwrt 80211s Hardware,Aqua Coat Wood Grain Filler On,Bandsaw Blade Reviews Qt - Step 1
Forgot your password? Get help. Home Gear. How to set-up and install VPN on your router. How to build a Smart home using open source and Raspberry…. Material guidelines for building smart home. Smart Displays: The new touchscreen in your face. How to extend your Wi-Fi outdoors. How to Create a secure internet while traveling. How to build a weather station using Raspberry Pi Pico.
How to Setup Raspberry Pi Pico. How to use Nord VPN. Table of Contents. How to build a Smart home using open source and Raspberry Pi. Connect with. I allow to create an account. When you login first time using a Social Login button, we collect your account public profile information shared by Social Login provider, based on your privacy settings. We also get your email address to automatically create an account for you in our website. Once your account is created, you'll be logged-in to this account.
Disagree Agree. Notify of. Oldest Newest Most Voted. Inline Feedbacks. Fred Feinbein. Mesh networks are very, very easy to scale but planning is key. Eli the Computer Guy Openwrt Recommended Hardware 2020 has an old video about mesh networks that goes into things like high availability and bottlenecks.
If that matters to you, take a look. The relevant content starts at and ends at , approximately. The examples in this tutorial are simple by design —they were created to illustrate different scenarios in a way that makes it easy to understand what is going on. The idea is to use the examples as templates for more complex implementations.
Now that you have the hardware, the first thing to do is to install OpenWrt. At the very least, do the following:. Instead, we will access our device and configure it using only SSH. So, open a terminal and ssh into your OpenWrt device, as follows. You can do that by typing. To find out the latter, type. Optional : Configure key-based authentication and disable password login. Reboot and check that ssh access methods are correctly configured.
From this point forward, we will start editing files using vi. For reference, I usually go over the following:. Take note of it; understand what is going on in the config files; play with them; then, continue. Only experienced users : If you used a default image, this is a good opportunity to remove unnecessary packages.
If this is your first time playing with mesh, leave any unmentioned pkg alone until you get everything working as intended. In order to update and install packages, you need to give your device temporary access to the Internet. You can check that the device has access to the Internet by ping ing google. Upgrade all installed packages. Type opkg list-upgradable to find which packages can be upgraded and then opkg upgrade PKG , in which PKG is the package name.
You might end up even bricking your device. First, remove wpad-basic with. Remove the connection that gave your device temporary access to the Internet.
In brief, if you have issues running the mesh with encryption, then you have to enable the nohwcrypt parameter of the ath9k module. It is time to configure the basics of our mesh network and nodes. If this radio device will be used for the mesh traffic, make sure all mesh nodes use the same channel.
However, if the radio will be used as an access point for non-mesh clients, use a different channel than the mesh channel. Finally, remember to edit the country code before enabling the radio. Comment out any config wifi-iface automatically generated after a fresh install by adding a at the beginning of each line, as follows. The comments are just for educational purpose. Because all mesh nodes must operate on the same channel, use the same authentication, etc.
So, keep that in mind when configuring your mesh nodes. To do so, edit the network file, as follows. For more details, refer to the Protocol Documentation and more specifically, the Tweaking section. To do so, type. Similarly, we can use batctl to show us all active interfaces, as follows.
Afterwards, ssh into one of the configured mesh nodes and type. Copy the MAC address e. Go ahead and configure all your mesh nodes the same way as before and only then move on to bridges, gateways, and VLAN configs, as described next. Optional : This is a good time to tweak the mesh configuration as well. Try rebooting both nodes before doing anything else. A more powerful tool to see what is going on in the mesh network is the tcpdump utility for batman-adv.
To use it, connect to a mesh node and type. Depending on the scale of your mesh network, you might need to filter the output because things can get wild with tcpdump really fast.
For more details, see the batctl man page. Here, we will see how to turn one or two of our configured mesh nodes into either a mesh bridge or a mesh gateway. To avoid repetition, the configuration of bridges and gateways is described in more detail in the first example , and only a few small differences and observations are highlighted afterwards.
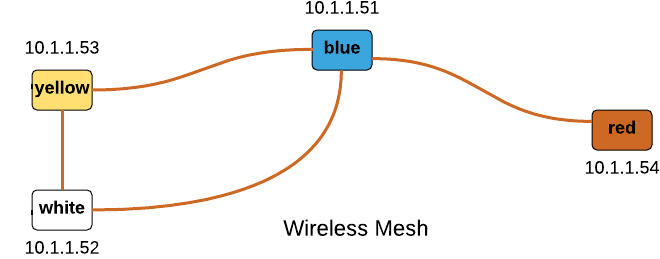
In addition, only IPv4 addresses and configurations were used but nothing prohibits the use of IPv6 in a mesh network. More specifically, the mesh has access to the WAN Network A via a gateway device and has a single, private network defined in the The latter is enabled by a bridge device that works as an access point for non-mesh clients. This, of course, is not required for a gateway device because there are multiple ways to connect to WAN but having separate physical ports makes the explanation much simpler to follow.
If that is not your case, just adapt to whatever interfaces you have configured that play the role of default lan and wan. At the beginning of the file, there should a bunch of config interface for loopback , lan , and wan , for example, and at the end, there should be the mesh interfaces we previously created for the mesh node, namely bat0 and mesh.
There are at least two options at this point:. While the latter option is much easier than the former, we will choose the first here i. Later on, we will see how to bridge the default lan with any bat0 VLAN, for example, so the default lan becomes accessible to the mesh as well. For now, keep it simple. That is, anything that has lan we will. Start by editing the firewall config file with vi , as follows.
Feel free to play around with them once you get everything up and running. Once the device comes back online, ssh into it. First, type. In addition, because we preserved the default lan configuration, the device will continue to have the static IP In fact, both services will be disabled in a mesh bridge and instead, the ony thing we will do is join interfaces to make them look like a single one to any connected device.
As before, get one of the other pre-configured mesh nodes and to start things off, we will configure it as a dumb access point. Follow the instructions in the OpenWrt documentation, except for the following when configuring the default lan interface. Alternatively you can try to install the mtd for a specific OpenWrt release the firmware is based on.
This method is not as certain to work as starting from the 3. Stock firmware usually also includes a new bootloader. Check the md5 of the installed bootloader to confirm it has also been downgraded to the 3. Other versions may not work properly with OpenWrt. If the bootloader partition md5 is not as above, re-flash 3. That should only be necessary if you used TFTP recovery. Though originally an ar71xx target, these models have been ported to ath79 and ath79 is recommended for these models.
Notice that there are different builds for the different models Lite, Mesh, Pro, etc. Original firmware uses a flip-flop flash layout where two complete copies of firmware exist in the flash, one being an older version as a backup in case the new one fails to boot. The bootloader checks the bs partition to determine whether to boot kernel0 or kernel1.
If one partition holds a signed image and the other does not it will always prefer the signed one. If the selected partition is corrupted unable to decompress kernel or blank it will boot the other one.
Thus we will erase the kernel1 partition to ensure that nothing can boot from there. Connect to the device at ubnt The zero byte will direct the bootloader to try kernel0 first. A byte of 0x80 will attempt to boot kernel1, but since that partition is erased, the bootloader will revert to kernel0 anyway.
The device is now ready to boot into OpenWrt. Issue the reboot command and wait about 2 minutes until the LED lights steady white. As is conventional, it will have a LAN network at One can can simply use these instructions: Note that it's always a good idea to backup your flash before proceeding. Another way to install OpenWrt is using the serial console, U-Boot and a tftp-server.
Enter U-Boot by hitting a key to interrupt autoboot. Then enter the following commands. This will wipe the primary firmware partition and install OpenWrt there. Please note how many bytes in hexadecimal were copied over e. It is stated after the file transfer is complete. The OEM firmware, which is still on the secondary firmware partition can be later booted either automatically as failover, or manually in U-Boot:.
Since the UniFi series by design have no webserver- GUI at all, there won't be way to upload the file to the device in a browser. The usual Ubiquiti upgrade procedure using syswrapper. Pushing and holding down the reset button either on the device itself or on the PoE injector while powering up the device leads to following behaviour:.
This means that at the moment the only way of installing OpenWrt to the device without access to the serial console is by using the mtd method as described above. OpenWrt cannot be flashed this way since the firmware must be signed. Any version of the official firmware should work though. Thus if you intend to continue use of Unifi firmware it is recommended to log into the new firmware and flash the same version again using fwupdate.
When OpenWrt has been installed according to the directions above, this partition will be blank, as is necessary to prevent it from booting. Depending on where you get the images you may have to install kmod-ath10k and ath10k-firmware-qcax afterwards. Port 2 on the switch corresponds to the primary Ethernet connector, Port 3 to the secondary. And add the vlan's to the switch like so. In the example use case the openwrt access point is mearly that, DHCP is served from another device.
If you wish to use VLAN 2, one would normally use eth0. Now you can use lan. If you wish to use WLANs as well, simply bridge them as one normally would.

|
Latches For Boxes Review Best Easy Diy Wood Projects Us Jet 1221 Wood Lathe 7th Edition Hobby Belt And Disc Sander 2019 |

VirtualBaki
02.02.2021 at 22:12:16
AQSIN_FATEH
02.02.2021 at 10:20:21