Kitchen Hutch Plans Woodworking Free 01,Cnc Router Machine Project Report 90,Multi Tool Makita Bunnings 90 - Review
One of my favorite parts of the hutch is the wood inside and painted outside. I love the way it turned out and gives the entire thing a modern farmhouse look. The entire hutch was built out of knotty alder, which is a great budget friendly hardwood option. The knots in the wood and plywood show through the paint and really pop on the raw wood center. So high end and gorgeous! Because I used hard wood and very solid alder plywood for the build, this complete hutch was not the cheapest piece I have made.
But this is a piece that I know I will be passing down to my kids and hopefully they will pass it down to theirs. Creating memories of baking and entertaining in the kitchen like their mom did! If you are ready to build your own dining room hutch, I am sharing the free build plans at BuildSomething. Click here for the complete plans. Thank you to Kreg Tools for sponsoring this post.
This site uses Akismet to reduce spam. Learn how your comment data is processed. Going to try to modify it a bit to add a few inches here and there. But I have a question about the finishing work you did. I like the two tone a lot, and hope to do that. My guess is that you finished the components individually, and then assembled, then just needed to do touch up work?
Also, the plywood that you used for the hutch back looks like its finished face looks like multiple vertical boards. I really like that look but have only seen the good plywood at the store that is a single piece of top lamination. Did you by chance rip out plywood and reattach together to give it that look?
Thanks so much! Kati, thank Free Woodworking Plans For Kitchen Island Uk you! I live in the DC metro area and our lumber yards are incredibly hard to come by if you can believe that. I'm currently hand painting doors and drawers for our built in bookcase so I was hoping to spray this piece because its such a better finish that way, but we will see.
Appreciate the response :. Hi Meghan! For the finish, I didn't finish before assembly. Instead I used tape to block off the area I wanted painted and sealed the wood with a coats of wipe on polyurethane I think 3 on the walls and 4 on the top of the cabinet. The plywood on the hutch came that way. I bought it at a lumber yard where they have more options, it is an alder plywood.
It's a little crazy with 2 kids, a dog, a project in progress in every room, plus something cooking in the kitchen, but it's home. This is my story of our fun, and a little crazy, DIY life. Join us as we inspire you to tackle your own DIYs too. Free Digital Backgrounds for November. Click here to cancel reply. Meghan Monday 18th of January Mark the cut lines with great care on the slats and get the job done with a proper jigsaw.
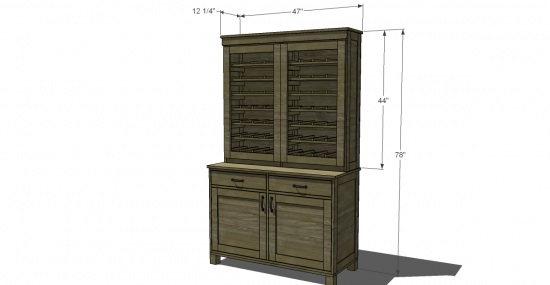
Smooth the edges with fine-grit sandpaper and remove the residues with a damp cloth before continuing the project. Next, attach the top and bottom supports to the structure. Make sure the corners are square and there are no gaps between the components.
Drill pocket holes at both ends of the supports before attaching them to the structure. In addition, drive a few brad nails through the shelves into the supports, in order to add extra rigidity to the structure.
Building the partitions for the kitchen hutch is a straight-forward process, but you need to mark the cut lines with attention before making the cuts. Smooth the cut edges with fine-grit sandpaper and remove the residues with a damp cloth. Use a circular saw to make the notches and remove the excess material with a chisel.
Smooth the recess before assembling the partitions together tightly. Drill pocket holes to the ends of the partitions. Fit the partitions to the opening, making sure the edges are aligned with great care. Add glue to the joints and make sure the corners are square. Secure them to the structure using brad nails and glue. Alternatively, you could use a hole saw drill bit and make holes on both sides of the structure, in order to create a proper bond between the components.
Last but not least, we recommend you to take care of the finishing touches. Fill the holes with wood filler and let it to dry out for several hours. Afterwards, smooth the wooden surface with fine-grit sandpaper and vacuum the residues.
Locate the studs and drive a few pilot holes through the top support, in order to secure the hutch to the wall. Get PDF Plans.


|
Free Woodworking Projects Plans Pdf 2020 Open Hardware X86 Error 10 Table Saw Blade For Laminate Flooring Li Cabinet Door Lock Latch With |

PIONERKA
09.08.2020 at 20:20:48
dj_maryo
09.08.2020 at 17:47:23
raxul
09.08.2020 at 10:48:11
BABNIK
09.08.2020 at 16:10:50