Diy Wood Bike Rack Plans Zip,Titebond Liquid Hide Glue Home Depot Data,Rockler Pro Router Lift On - For Begninners
Another cool and at the same time space-efficient idea is to hang the bike from the ceiling. That sounds like it could be very fun and, as the tutorial from homemade-modern shows us, very easy to put together and super user-friendly.
To make a ceiling-mounted bike rack like this one you need copper T fittings, a copper pipe, felt, steel wool and epoxy. You can improve or modify the design if you want to.
A bike rack made out of recycled bike parts, how cool is that? Check out these amazing things that we found on behance. You can use them not just as hangers for your bike but also for coats, gloves, helmets, even umbrellas. This DIY bike rack design is a bit on the bulky side compared to others but it only takes a few minutes to put it all together which makes up for everything else.
All you need is a few pieces of wood, a few screws and a drill or a screwdriver. Check out the tutorial on twelveonmain for more details. This design from instructables is super practical if you have several bikes that need to be stored and organized rather than just one.
It allows you to place them up on the wall vertically and to offset them so you can fit more on a single wall. Even two bikes can take up lots of space, especially if you have to keep them indoors. A practical storage solution is required and that usually comes in the form of a wall-mounted bike rack. You can get pretty creative with your DIY bike rack designs and try to create hybrids like this one from instructables.
The bikes are attached to the side of the bookcase which is strong and sturdy enough to support them. It can also be stained or painted to match the wall or to look in a specific way and you can have several of this installed side by side for as many bikes as you have. Adding more is always an option.
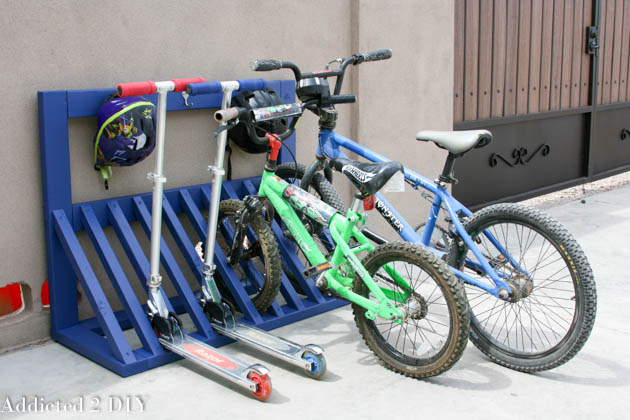
DIY bike racks can be super cheap, especially if you use reclaimed materials. A pallet bike rack like the one featured on landscapemagazine is both very practical and super inexpensive to make.
You can use the little ledge at the top to display a few little flower pots or as a storage shelf. Outdoor Plans Jun 30, Outdoor Plans Mar 3, 0. Outdoor Plans Mar 16, 0. Featured Wood Plans Mar 15, 2. Featured Wood Plans Jul 13, 9. Children's Wood Plans Apr 20, 0. Featured Wood Plans Mar 13, 0. Children's Wood Plans Dec 4, 0. Children's Wood Plans May 9, 2. Children's Wood Plans Aug 17, 1.
Recreation Plans Feb 12, 0. Recreation Plans Jan 29, 0. Recreation Plans Jan 26, 0. Recreation Plans Dec 19, 0. Recreation Plans Dec 2, 0. Workshop Plans Aug 18, 0. Workshop Plans Mar 8, 0. Featured Wood Plans Sep 2, 0. Featured Wood Plans Jun 3, 2. Featured Wood Plans May 20, Workshop Plans Apr 23, 0. Workshop Plans Apr 23, 2. Outdoor Plans August 15, WoodworkCity 0.
If you have a garage that is getting out of control, you will probably find that one of the items taking up most of the floor space are the bicycles. To get your bicycles under control, you should use a simple rack that keeps them in a fixed place along with keeping the bike vertical so that the lean when on a kickstand is not taking up an extra few square feet of floor space. Our first free bike rack plan is inspired by a plan found at eHow.
The picture was terrible grainy below , so we decided to create a 3d version of the plan using Sketchup. We liked the style so much that we felt it needed a better view. This bike rack can be moved to any space that it is needed. In fact, when not in use, this rack can be leaned against a wall or hung from the wall to make room.
Our plan is going to help you build a bike rack that is suitable for three bikes. If you need more, you could modify the plan, or do what I do and simply make a second bike rack. It is easier to story 2 small pieces rather than 1 large one. Feel free to alter this based on your needs. Step 4 Sand all rough edges with a grit sand paper. Paint, varnish, or finish if you are going to do so. You could opt to leave things unfinished if this will not be exposed to weather, or if you material is suitable for weather pressure treated, cedar, redwood, etc.
Step 5 Assemble your rack. This should give you more than enough stability. This plan might be lacking a bit of detail. You can adjust the size of the project to suit your needs. We recommend you to invest in the best materials you could afford.
Therefore, you should buy weather-resistant lumber, such as pine or cedar. Always take accurate measurements before adjusting the size of the components at the proper size. Drill pilot holes trough the components before inserting the wood screws, to prevent the wood from splitting. Mark the cut lines on the beams and get the job done with a circular saw. Check if the corners are square before inserting the screws.


|
Sign Router Machine Tool Slot Pci 32 Bit Small Circular Saw For Wood 10 |

SeNSiZiM_KaLPSiZ
26.07.2021 at 19:57:51
killer_girl
26.07.2021 at 12:27:49