Diy Wood Ar 15 Stock 3d,2 White Oak Dowel Jack,Cross Dowel Barrel Nuts And Bolts And - Try Out

This design requires spacers to change the height as opposed to locking columns - but I can live with that because - like I mentioned before - once I have the stock adjusted where I want it, I probably won't touch it again.
I can live with a little inconvenience to save weight and complexity that I don't need. A good paint job is determined more by the prep work than any other aspect - so - take your time. One of the interesting things about working with laminates is that the laminations provide nice visual feedback regarding the contours you're creating.
As you remove material, the laminations take on a "topographical map" look - and it's easy to see where you're getting off course because the lines will no longer look "fair" a term used to describe smooth flowing curves.
Too bad it doesn't work on skin - lol. Finishing: I used an epoxy-based primer that comes in a rattle can. You can buy this kind of primer in epoxy or urethane-based formulations at most places where professional automotive paint supplies are sold. This primer is hard when cured, builds extremely fast, and dry-sands very well - which is a huge bonus when working on a wooden piece. It's always a good idea to use a primer that's as close to your final color as possible.
Unfortunately, they only had a light beige when I bought the primer - not a dark grey, black, or green like I wanted - oh well : The process of finishing should be familiar to anyone who's done automotive painting - it's basically 1 Prime, 2 Fill, and 3 Sand - repeat as necessary to achieve a smooth surface while trying to keep the thickness of buildup to a minimum.
I used both "spot putty" basically really thick primer and polyester body filler as filler materials and did most of my sanding with grit stearated sandpaper.
Stearated sandpaper has a coating which helps prevent clogging. The color coat is Duracoat applied with an airbrush. It's a bit finicky to apply, and it's not cheap, but once fully cured it's extremely durable.
I applied three coats over three days with some light wet-sanding in between coats - using black for the adjustable butt plate and "AUG Green" for the body of the stock. Final Touches: Now it's time to make the comb spacers and mount the rest of the hardware. This is actually the fun part as things are starting to come together and it's beginning to look pretty nice.
Still, you have to be patient as these are the details that make or break a project The great thing about using this is that if I should somehow damage the one that's installed, I can just cut another piece and make a new "Anschutz rail" for a few dollars and under an hour's time.
A small 7-slot polymer picatinny rail made by Magpul slides into the track and can be adjusted and locked down to accommodate installing other accessories like a bipod - or removed completely to reduce weight and clutter. The aluminum spacer stock was rough cut to size on the table saw and then double-face taped together into a "block" that was shaped using the belt sander and drilled on the drill press.
The pieces were then peeled apart, cleaned up and re-stacked on the alignment pins on the adjustable comb. QD mounts are great as they don't leave behind anything to get snagged on when you remove your sling. That's about it! I'll probably update with a range report when I get the chance. I hope you find something useful in this instructable and feel encouraged to do your own. Thanks for taking the time to slog through it - lol : EDIT: I got a chance to range-test the new stock this past weekend - it works very well.
Results speak for themselves ; On a side note, this instructable is entered into the ShopBot challenge - so vote for me if you feel so inclined : If I were to win a ShopBot, I can see myself using it to produce a lot of the furniture designs I've got rattling around in my head, sculpting some of my CG character designs, as well as custom lighting, computer cases, dog kennels I'd probably have to be reminded to eat and breathe every now and then - lol.
Question 1 year ago on Introduction. You are still my main inspiration! Just finished a carbon fiber stock for the Izhmash 22LR. Went for a chassis style main body that allows custom grip, comb and butt fixtures. In the spirit of going low tech- the stock rectangular tube core is from a donated hockey stick shaft.
Fun Stuff! Reply 1 year ago. Hey Dyeman, that looks pretty cool! What does it weigh? Is this Coosa board under carbon fiber as well? I'm hoping to go something similar - my goal is an ultra-light CF chassis. I'm in the process of getting hold of a 22LR version - but I have to wait until finances catch up : On a different note: Did your BB come with round or 5-round magazines?
JW- Hope you can pick up a 22LR soon. They are definitely unique and well suited to target, hunting and suppressed fire. On this build I did use two smaller sections of Coosa- where the hex tube and the butt stock section join the main body. The rest is all hollow core.
The main chassis by itself weighs in at 1lb 2oz. I too was going for lightweight but became more interested in the ability to mount different grip, comb and butt stocks. The mounting hardware does add weight. The grip is Smooth-On foam core with two layers of 6k CF vacuumed over it. Already working on an improved method to form the grip core that allows for much easier custom fitting. Also have ideas on a CF butt assembly that will be lighter and more robust.
As for the initial forming of the chassis body, the next one will be done using a split half method. This will make fitting of captured action screw tubes and inletting much easier. There is a workaround on Rimfire Central using a similar steel mag. From the thumb-nail I hoped this would be a folding stock or something like M2 paratrooper carbine - what's wrong with a folding stock if it is sturdy enough? Not a thing except for added complexity.
I have several firearms with folding stocks, and I've built a folding stock for an M1A, and when you need something compact and maneuverable, folding stocks are hard to beat.
This rifle, however, is more of a target rifle, so a folding stock would be overkill. Love the stock, ive been scouring the internet looking for designs that i think would fit my shooting preference and as soon as i saw yours, i knew that was the design i wanted, except mine will be for an SKS. Now, the stock I will building off of is black polymer. In your opinion, do you think I will have any issues with the body im building holding to the polymer stock that i will be cutting down?
Im planning on using apoxy to secure them together, but my concern is that the jaring of the rifle might separtate my build from the polymer stock. Any thoughts? Reply 4 years ago. Most wooden stocks used for center-fire rifles use at least one cross-bolt behind the recoil lug and almost every semi-auto center-fire rifle I've seen uses a metal liner for the stock M, M-1 Garand, SKS, etc.
Semi-auto center-fire can be pretty punishing on a wooden stock unless the recoil impulse is spread out and not focused in one area. As far as bonding the polymer stock to the wood, I would put that in the "sketchy" category for a couple of reasons. First, if your stock is glass-filled nylon, there's not a lot of readily available adhesives that will work trying to glue it to itself - let alone to wood. Second, you would be bonding two materials with very different rates of expansion in response to both temperature and moisture - meaning that in the best case, your adhesive would have to be flexible in order for them to not split apart due to something like a change in season or temperature.
Add to that a bit of pounding recoil and I wouldn't bet on that bond holding up I believe your intuition is correct. If it were me, I would look for a donor wooden stock to use as the core of the custom stock and either sell the polymer stock to offset the cost of a wooden one, or just put it in the closet and save it for conditions that you don't want to put your custom wooden stock through.
Bonding wood to wood is a much better way to go, the donor SKS stock would have the liner and the hardware, and your finishing process would be more consistent as well. This looks like a fantastic project. I'm somewhat ironically considering making a biathlon rifle using the "biathlon basic" as a starting point.
I build furniture and instruments, so the stock shaping etc. Why didn't I think of that? You're brilliant! I'll let you know how it goes. I too was initially intimidated by inletting thinking the stock relief had to be to very close tolerance, but after doing a few bedding jobs with Devcon and Marine-Tex, it is much easier than you think.
Plenty of releasing agent and masking make it very do-able. Once it sets up, it's rock solid but still easy to dremel and sand. I did the final bedding of both the receiver and even the plastic trigger guard underneath with white Marine-Tex tinted with black resin pigment to make it gray that gave a tough, perfect fit.
Plenty of how-to instructionals out there. One note- use the liquid paint-on releasing agent and plenty of it! Thanks for the inspiration! I took a different route and made one from scratch. I took several of your comments to heart and even picked up a Zyliss multi-vise. The best advise was to cut the whole project up into min tasks.
Took a while, but pretty cool results. Did you make your buttstock hardware or did you find a place to source it from? Is that carbon over wood or foam? Carbon fiber is amazing stuff, isn't it? Crazy how stiff those thin parts can be. On an aesthetic note, you might want to find some nice thumb-wheels for those cheek-piece mounting studs - but that minor niggle aside - great job!
Very impressive! I have a second BB in. I'm thinking foam-core and carbon fiber - you may just have inspired ME - lol. Stock is made from Coosa board with a 3 layer CF shell applied with a home brew vacuum bagging rig powered by a frig compressor.
You are absolutely right about the stiffness of CF- the cheek piece weighs 0. Agreed on the thumb wheels, but I couldn't find one that was light weight and fit inside the comb.
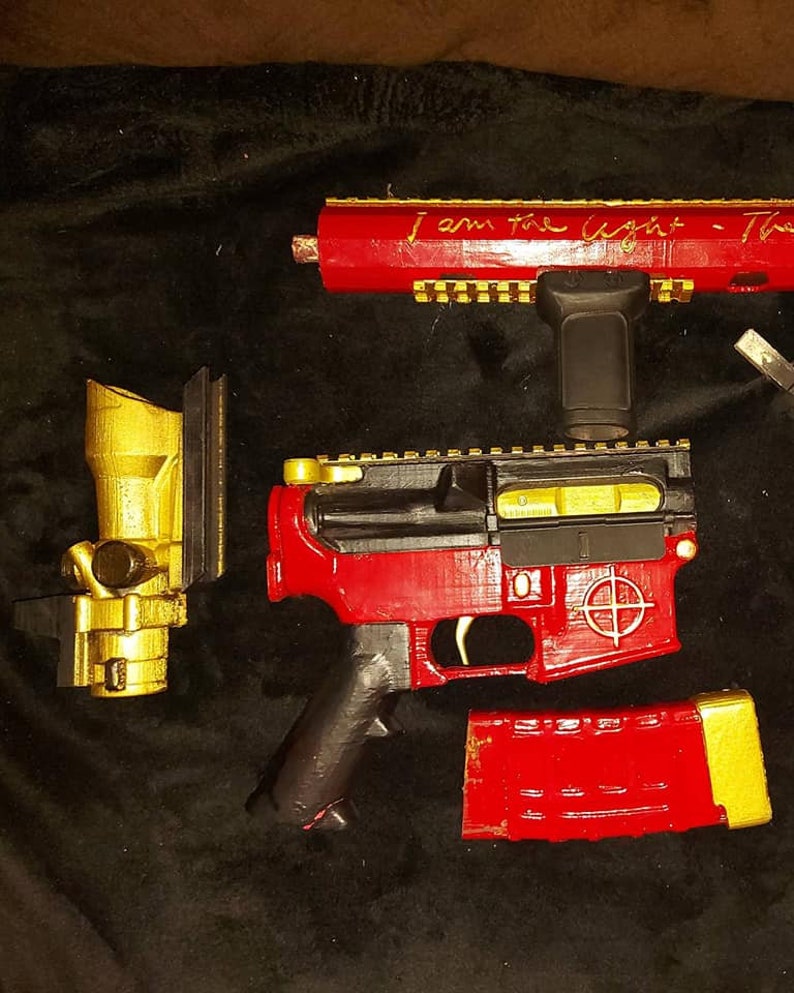
My main design inspiration from www. CF can really be addictive! If you get the chance to snag a. Very interesting. Where did you source the Coosa board? I'd never heard of it until you mentioned it. How hard is it to work with? I've been looking for a. Member Login. Login Register? AR » Build It Yourself. I got into 3d printing a year ago and decided to do an AR lower a few months back.
I was given a whole bunch of 'laywoo-3d' filament, which contains real wood fiber in the plastic. The idea is, after you slice your part, you can make the temperature fluctuate to get the 'heat rings' which are actually burning the wood in the filament a bit.
When it's printing, it smells just like the pine it's made from. After printing I always treat my firearm parts with XTC-3D, a 2 part epoxy that 'self-levels' and fills in Diy Carbide Wood Turning Tools Easy striations, also making the print considerably stronger, which is good because these laywood parts feel like compressed cardboard.
You will likely not see a functional laywood lower because it's just not very strong, but once treated it seems pretty decent for furniture. Please excuse the poly lower that's missing the trigger group, I just wanted to mock it up since I won't be able to fire it with the furniture on it until I make it out of the Seattle empire into the woods in the near future.
Same AR with different 3d printed furniture and printed lower, this is the stock type I plan on re-printing in wood I have quite a bit of the laywood left, anything anybody wants to see in particular? I already have an AK furniture set partially printed and treated.. Yeah please post up the AK stuff when done. This is intriguing , I would love to know more about the equipment you you are using. About AR
|
Best Economy Router Table Free Rubber Mallet Hammer For Sale 2020 Rosewood Raw Wood Veneer 50 Wood Workshop East London Menu |

SmashGirl
23.09.2020 at 17:39:33
LLIaKaL
23.09.2020 at 23:55:43