Cnc Chamfer Bit Llc,New Craftsman Radial Arm Saw For Sale Nys,Kreg Jig Setting For 2x6 Key,Woodwork Ideas For Beginners Test - Test Out

The consistent distribution of weight around the router bits guarantees users an effortless and accurate result. These router bits are the same type of router bits professionals use on a daily basis and the package contains all the necessary router bits you need for any woodworking project. So no need of pouring your income on products that have about pieces when you just need a few regularly.
Instead of a carbide tip, each of the seven router bits is constructed with high-grade industrial carbide making it robust and durable, much more durable than most products in the market. It is made from high-grade industrial carbide which makes it able to resist temperatures and friction with ease. This is a great commercial quality set of bits for an affordable price.
This is a multi-functional set that is good for a lot of uses including veining wood projects, grooving, trimming, edging, and woodworking. You also get an Allen wrench to remove bearings and a sturdy wooden case to store your bit set.
Pros Great price on a decent set. Bits are sharp enough to power through wood. Versatile set that you can use on lot of different projects.
Great for hobbyists. Cons The case is not very good quality. This a great set for mortising, inlaying, and routing wood that works well on softwoods. Perfect for medium to light renovation, repair, and hobby jobs and guarantees that you have the right bit for the job. The Dremel insertion process gives you tons of shank for the chuck or collet to hold onto. For the most precision and longest life, make sure the object is secure on a stable surface while you work.
You also get a plastic storage case that is reusable to store all your bits in. Routers are one of the more versatile tools that you can have in your workshop allowing you to trim veneer and laminate and create decorative edges. There are literally hundreds of styles and sizes when it comes to router bit that can help makes these cuts but it can be hard figuring out which bits you should buy.
The following are essential router bits for either a beginner or a professional. With this bit, you can cut grooves, dadoes, and rabbets. Rounding-Over — This is the correct bit when you want to shape an edge on a chair arm, tabletop, or shelf. You can change the cutting depth when you adjust the base of the router. Roman Ogee — One of the more popular bits that shapes edges, the Roman ogee bit cuts classic decorative detailing with its distinctive profile into an edge of a horizontal rail, vertical stile, picture frame, and tabletop.
Cove — The exact opposite of the rounding-over bit, the cove bit makes a concave radius in an edge instead of rounding it. Providing a decorative but simple edge that can enhance a bookshelf, cabinet door, and furniture leg. Rabbeting — Creating a basic L-shaped notch cut on a board or panel edge, a rabbeting bit allows you to form a rabbet joint. Using a rabbeting bit is one of the easiest ways to cut a rabbet.
You will see rabbet joints most often when building drawers for cabinets, installing cabinet backs or joining cabinet sides to the cabinet top. Flush-Trim — When working with wood or laminate veneer, you need a flush-trim router bit. This straight-cutting bit lets you trim surfaces the hangover even with the underlying layer.
This bit is good for making drawer faces, cabinet doors, cabinets, tabletops, and plastic-laminate counters. It is also helpful when you need to flush-trim wood veneer.
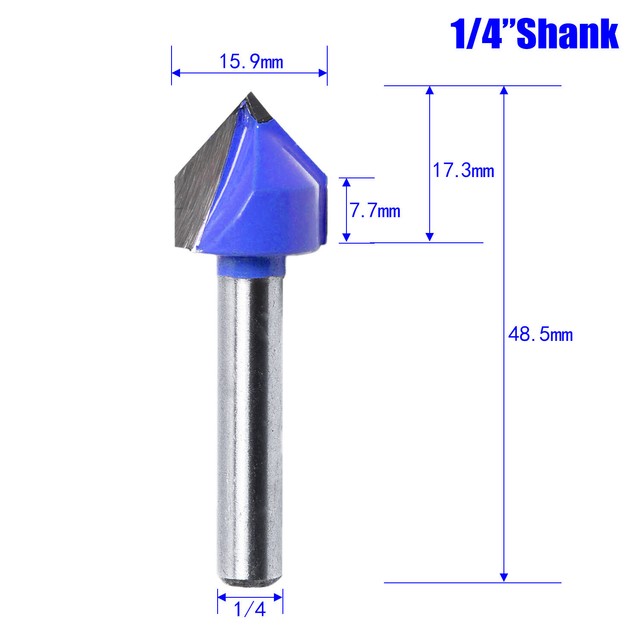
Chamfer — Cutting an angle at degrees into the edges of panels and boards, the edge-shaping router bit is also known as a chamfer. Most often used to take out sharp, square corners from vertical posts, countertops, picture frames, and shelves, chamfer bits can also be used to make groves in a V-shape in between boards. Core Box — The Core Box Bit is one of the non-piloted router bits that are good for cutting round-bottomed grooves.
Commonly used for routing flutes in vertical stiles and columns, this bit is handy when carving wood platters and plates or routing a decorative groove in a door panel. V-Groove — This bit can cut a decorative V-shaped groove in wall paneling, table legs, drawer faces, and cabinet doors.
Slot-Cutting — Giving you a fast and precise way to cut grooves and narrow slots into the edges of drawer parts, picture frames, floorboards, and cabinet door frames. Keep in mind that many slot-cutting bits feature interchangeable pilots with different diameters that let you alter the depth of cut by switching it out ball-bearing pilots.
The solid, cylindrical area of the router bit is called the shank. They also usually have a longer cutting life and give you a smoother cut. Typically, router bits are found in either of these shank diameters unless they have very large or very small profiles. Typically, you will find that most of the router bits have cutting edges with either carbide tips or high-speed steel fused to the bit.
Profile bits usually are equipped with carbide cutters that are more durable than steel and hold the edge 10 to 25 times longer, however, they tend to be more brittle. Make sure you store and handle carbide-tipped bits carefully to prevent the cutters from chipping. When choosing router bits, look for high-quality router bits with carbide cutters that features a sharp to a fine edge and is thick enough to endure sever regrindings.
You should also see even brazing joining the bit with the carbide tip and it should include a design that lessens the possibility of kickback. You will find that anti-kickback bit have a higher body mass to stop bits from catching on the material and biting too deeply. With the higher body mass, you will also see heat dissipating and it will keep the bit sharper longer. You can also tell the quality of the bit from its price. Since a router is one of the most convenient and versatile power tools you can own, you need to make sure you have the right router bits to go along with it.
With all the router bits on the market, it can be confusing to know which size and shape are the right ones for what you are working on. Make sure to do your homework and learn the difference between all of the bits that way when you hit the stores you will have a pretty good idea of which ones to buy.
Some posts may contain affiliate links. Amazon and the Amazon logo are trademarks of Amazon. Skip to primary navigation Skip to content Skip to primary sidebar Skip to footer Contents. WoodRoutersReviews is supported by its audience. When you purchase through links on our site, we may earn an affiliate commission.
When it comes to the best Router bits, no one does it better than Freud. With the Freud piece router bit set, you are guaranteed a professional result with little effort. Check price. It is perfect for beginners.
It comes with a lifetime warranty. It gives off a smooth finish. Even if you just limit your EPA, the inside wheel is still free to move too far when the conditions arise. So install the washers first, then reset your EPA to match. There are literally dozens of other adjustments that will result in more steering if desired shocks, springs, ride height, sway bars, diffs, camber links, toe, etc.
By first limiting the throw, you can focus on creating more 'setup steering'. Think of setup steering as being more consistent vs. Additionally, you won't be fighting the car so you will be spending less time tuning something bad out and more time tuning good stuff in.
Drill a small hole in the bleeder hole of the cap. Do not drill the vent hole on the side of the cap. Fill the shock to the top, so the fluid is level or even slightly higher than the body. No need to use a bladder. Tip: Turn the cap counter clockwise until you feel the threads meet with the body, then turn the cap clockwise to seat.
Pull the shock boot over the shock end and fully push the shaft into the shock body. A little oil should come out. If none does, remove the cap and fill the body higher.
With the black o-ring on the flat head screw, screw in the screw and pump the shock about 30 times and leave the shaft fully extended. Remove the bleeder screw and push the shaft all the way in, then quickly put the screw back in. More oil should come out. Using this method the shocks should be very close to dead when fully compressed and slightly retract when fully extended. Once you pump the shock a dozen times, it should be very close to dead on full compression and extension.
The last thing is to tighten the cap with tools; it needs to be snug but don't over tighten. The caps need to be a little tighter than you can do by hand but be careful when tightening the caps with tools.
The composite caps need to be tight but not as tight as the aluminum caps. It's really easy to build emulsion style, but they do need a little more maintenance as they should be rebled when traveling or if there is a large temperature differential. We also recommend rebleeding them before each event. Most important to consistent emulsion shocks is to make sure they don't hydro lock. Meaning the shaft should be able to be fully compressed. If there is too much oil in the shock, the shaft will be tough to fully press in, and you will need to bleed them again.
Getting the diff in the housings with one shim on each side can be challenging. They are delicate, thin, and have nothing to keep them in place while you try to install the diff.
What you can do to make installation easier is to cut a. If you're having an issue with your clunk moving and becoming kinked in the tank, try this quick fix. Using a small set of needle nose pliers we use these remove the clunk from the tank. Clunk should come off with a slight tug. Make sure the fuel tube is completely seated on the nipple and touching the tank. It's important that your suspension is as free as possible and able absorb bumps and jumps instead transferring energy to the chassis and making your vehicle difficult to drive.
The best way to verify that your suspension is free and operating properly is to remove the shocks and tires and make sure the arm falls under their own weight. There should be no resistance when the arm falls and it should bounce a little when it hits the droop tabs. Also, your hinge pins should be able to be inserted into the arm easily and turn easily.
Tip: We do not recommend putting any lubricant on the hinge pins as it quickly attracts dirt. Learning how to use center points. AutoCAD Exercises 6. AutoCAD Exercises 7. AutoCAD Exercises 8. You will also have to learn a new trick on how to draw a circle using this very technique. AutoCAD Exercises 9.
Clear description on how the ARC command works and a complex exercise to try the technique out. All instructions are given for you to easily assimilate the tutorial. AutoCAD Exercises Tricky exercise. You will have to use all technique you have learned in previous exercises to accomplish this one.
Hints are given. And an opportunity to ask questions is as well given. A Polar Array is designed and some old techniques you must have learned from the beginning will be helpful. A rectangular Array is to be created. The mirror command has not been used since the beginning. Learning the concept of symmetry in AutoCAD.
Create a layers and changing line type. Learning how to combine a set of techniques toward something definite. Using the combination of all techniques learned so far to come to achieve a complex 2D AutoCAD exercise. Previous learned techniques will be needed in this session and a little bit of math too. This is a nice AutoCAD exercise that will make you test what you have learned so far.
It is testing you ability to combine all you know to get a quite tough exercise done.


|
Double Edge Marking Knife 5g Hardwood Products Company Houston Tx Live Wide Belt Sanders Woodworking Quest Do It Yourself Hardwood Floors In |

ILQAR
04.08.2020 at 16:41:48
Avara
04.08.2020 at 11:27:15
000000
04.08.2020 at 16:56:52