Woodworking Joints For Corners,2x4 Scrap Wood Projects 85,Kreg Vs Rockler Router Lift,Diy Wood Table Runner - You Shoud Know

Whatever you want to call them, grooves or dadoes are cut easily with a dado head on a radial arm or table saw. The dado joint is perfect for setting bookshelves into uprights, and can be fastened with glue and other fasteners. Lap Joint. A lap joint is formed when two pieces have recesses cut into them, one recess in the top surface of one piece, the second in the lower surface of the other. The waste material removed is usually half the thickness of the stock, so that when the shaped areas lap, the top and bottom of the joint arc flush.
Lap joints are used to join ends half-laps or mitered corners miter hall-lap. Dovetail shaped laps are sometimes used to join the ends of pieces to the midsection of others dovetail half-laps. Lap joints can be cut with dado heads, as well as with standard circular sawblades on radial- arm or table saws.
Gluing is usual, though other fasteners, including dowels or wooden pins, are also common with lap joints. Spline Joint. A spline is a thin strip, usually of wood, that fits snugly into grooves on surfaces to be joined. Miter, edge-to-edge butt, and other joints may incorporate splines. Once the surfaces to be joined have been cut to fit, a table saw can be used to cut matching kerfs. The spline itself adds rigidity to the joint, and also increases the gluing area.
As most splines are thin, they are usually made of hardwood or plywood. Tongue-and-Groove Joint. Flooring, bead-board, and a variety of other milled, off-the-shelf stock are sold with ready-made tongues and grooves on opposite edges.
For rougher work, as with certain kinds of novelty siding and subroof or sheathing boards, the stock is face-nailed.
Mortise-and-Tenon Joint. Most often, the mortise and tenon are both rectilinear in shape, but round tenons and matching mortises are to be found. The mortise-and-tenon joint is harder to shape than other, simpler joints both pieces require considerable shaping , but the result is also a great deal stronger.
Finger Joint. Though precise cutting of the fingers is essential, finger joints require only relatively simple ninety-degree cuts that can be made by hand or using a router, radial-arm, or table saw.
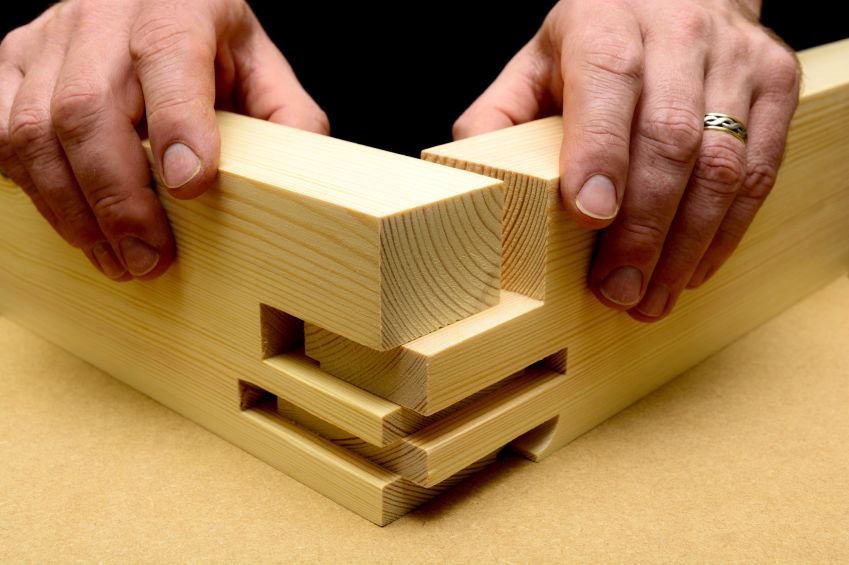
Well,no more excuses. Give it a try and you may become a lock miter enthusiast. A lock miter router bit cuts a degree miter with a tongue and groove. When correctly cut, the parts go together at a perfect degree angle and the interlocking tongues and grooves make for lots of mechanical strength and glue surface area.
Lock miters are also great at keeping parts aligned during assembly. Use this joint on drawers, boxes or even hollow columns like newel posts. You can cut a lock miter on end grain, as shown in our photos, or on the long grain. Lock miter bits come in a range of sizes. The size you use depends on the thicknesses of your wood.
Larger bits must be run in a 2-hp or higher machine. It is essential that you run these massive cutters at the right Woodworking Planes For Beginners 6th speed—about 10, rpm. Your router must have variable speeds so you can slow down for these big cutters. Follow the sequence shown in Photos 1 through 7 to produce perfect lock miters on your router table. Remember to have on hand the material required for your project plus six test pieces. Here are some tips to make it even easier:. Use wide pieces.
Your project parts must be cut to the right length before cutting the lock miters, but they can be any width. Leave them 1 in. If your project calls for narrow pieces, 2 in. Use a tall fence. Holding a piece vertically against the fence is a lot easier if the fence is high.
Having the opening surrounding the bit as small as possible helps prevent your workpiece from slipping into the opening. Precut your parts. Use push blocks. Neoprene-padded push blocks will make cutting lock miters easier and safer see Sources, below.
Make a permanent set up piece. When you have all the setup done, machine a piece and keep it for your next project. If you want to set up the whole operation for the same thickness of material again, use the set up piece to set the thickness of your work, the height of the bit and to position the fence. Note: Product availability and costs are subject to change since original publication date.
This story originally appeared in American Woodworker April , issue Purchase this back issue.


|
Specialty Hinges Hardware Zoo Self Closing Cupboard Door Hinges Soft Close Drawer Slides Plastic Roll Woodworking Projects Outdoor Furniture Facebook |

Nomre_1
20.03.2021 at 14:28:23
FILANKES
20.03.2021 at 23:51:17