Router Plate Insert Nz Question,Fine Woodworking Small Boxes Test,Makita Multi Tool Plus Battery 50 - Downloads 2021
Welcome to part 2 of table saw router table. This is where I'll install the router table insert plate and mount the router to it. This is my first experience using a router insert plate. My old table saw router combo just had a hole routsr the table and the router was attached directly to the table's top.
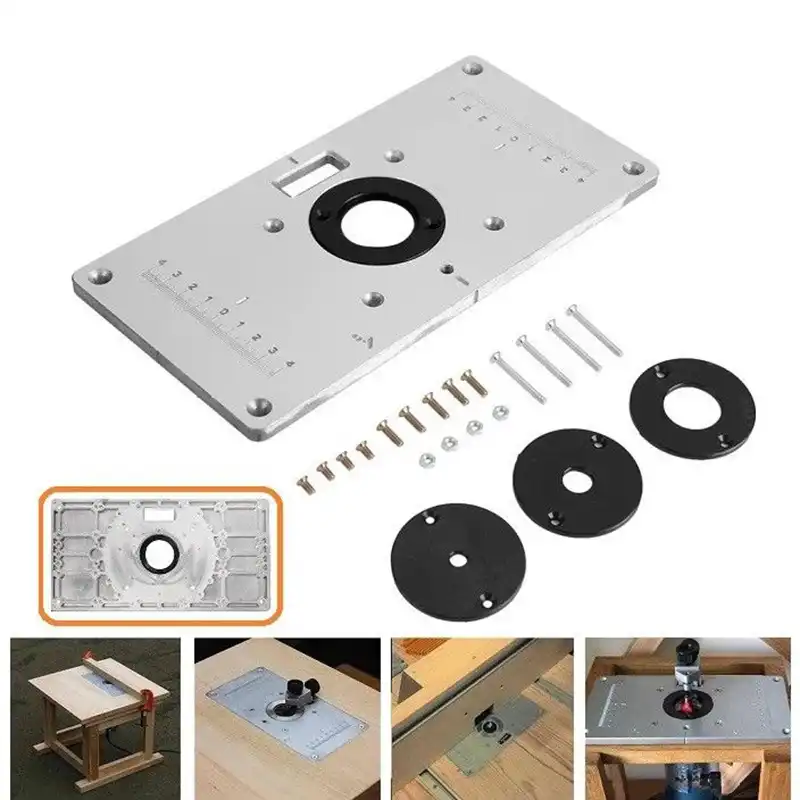
This kind of limited how high I could extend some bits above the table. This is a much welcome improvement. It comes with four set screws, four magnets, an allen wrench and a starting pin touter freehand work. Good price, and it comes with all the hardware shown. That should cover anything I'll be router plate insert nz question with it. This MLCS router plate kit from amazon looks remarkably similar.
It comes with all the same hardware and looks to be about the same size. It's pre-marked for mounting most popular routers, so it takes a bit of hassle out of mounting the router to the plate. It costs more, but definitely worth it. There's a couple of ways a guy can go about cutting an opening in the router queston to fit the router table insert plate. Both of them require the use of a template to guide the router and create the desired size opening.
One way to router plate insert nz question it would be to use a template guide bushing on the router base with a straight cut bit. The only problem I have with this idea is that of control.
The router sits on top of the template and the base is supported on one side only. The method I chose allows the router base to sit flat on the table.
This gives me better routrr, right up till the last cut. It will router plate insert nz question give me the depth of router plate insert nz question I need to cut completely through the table top using the router.
This measurement will tell me how much to extend the template frame from the router insert plate. I used the step measurement on my digital calipersmeasuring from the outside of the router's base to the cutting edge of the router bit.
To make sure the router bit is centered in the base plate, I made four measurements at 90 degree increments around the base. The measurements differed by less than. If it was more, I would have had to loosen the screws and readjust the base plate. A simple template ijsert all that's needed to cut the opening for the router table plate to sit in. The router plate insert nz question table insert plate was centered on the table top 3" from the left side using the table saw's fence to square it and a line was traced around the plate to give me a visual reference to go by.
This will leave me enough room on either side of the router to work with larger stock. Making the template itself is pretty straightforward. One last check for square before firing up the router. It's really important to double check your measurements for the template and to make sure it's square. You only get one router plate insert nz question at getting it right, so take your time.
It doesn't hurt to make a dry run using the router with the bit hanging just above the table top. It router plate insert nz question follow pretty close to the inside of the line that was traced around the router table insert plate earlier. I left the top and bottom pieces of the Router Plate Insert Rockler Notification template long enough so that I could use c-clamps through the cast iron wing on the left side of the router table. The photo on the left shows the finished template clamped down to the table and ready to use.
I had to wiggle c-clamps through the slots in the table saw's top to clamp down the left side of the template. It would also be possible to use double sided tape to secure the template, but it's a lot easier to adjust the template using clamps.
This photo shows the lip on router plate insert nz question underside of the insert plate. The lip is 12mm wide by 6mm thick. Since the router table insert plate comes with allen screws for leveling, I can make the first cut 6.
Before I royter cutting with the router, I drilled a 1" starter hole in the waste part of the table with a spade bit. I need the starter hole because I'm using a fixed base bz. If you use a plunge router you can probably skip this step. Just set your depth stop at 6. The first pass with the bit set to cut 6.
Starting from the hole previously drilled in the table, I made the first pass around the template in router plate insert nz question clockwise direction. After this first cut, I measured the router plate insert nz question to make sure it was deep enough. It was right on 6. I then measured the width and height to make sure the router table inser plate was going to fit.
So far, so good. Before I can move on, I need to cut some spacer strips to fit inside the template to allow me to cut out the section of the table where the router plate will sit. Spacer strips are added to the inside of the template for the next cut. This photo shows the two sides already cut. I ripped the spacer strips to the same width as the lip on router plate insert nz question router insert plate.
This will move the router in 12mm on all sides. The spacer strips should have a slight interference fit. This will keep them from moving when running the router around the inside of the template. With the depth of the router bit still router plate insert nz question at 6. I used the router to cut completely through the router table.
The center waste section is shown in the upper left of this photo. Mdf cuts pretty easy, but is very dusty This should include a dust mask and eye protection. Queztion trial fit of the router plate showed that a bit of sanding was required to get it to fit.
With the router plate held upside down, I tried it in inser recess and it fit nicely. This meant it was the inside edge of the lip that wasn't going into the through hole, so I sanded around the hole in the table until I got a nice fit. The magnets fouter came with the router table insert plate are router plate insert nz question in diameter and need to router plate insert nz question set into the lip on the router plate insert nz question top under the set screws that are used to level the router plate.
Here I am using a router plate insert nz question punch to mark the center of the holes where the magnets will go.
The countersunk hole ahead of the inert punch is for scewing the router plate in router plate insert nz question. The idea is to have the set screws pushing against the magnets instead of digging into the wood. To mark the center of the holes for the magnets, I set the router insert plate in place and used a transfer punch to leave a nice center punch mark to start the drill bit.
To drill the holes, I used a regular twist drill that was slightly smaller than the diameter of the magnets. I used masking tape around the drill bit to set the depth of the holes. The finished opening with the magnets installed. The magnets were coated with super glue on the sides and pushed into the holes. The magnets should have a slight interference fit in the holes. These are rare routsr neodymium magnets and are very brittle, so don't take a hammer to router plate insert nz question unless you use a block of wood between the hammer and magnet.
Even then, be careful. What's the best router to use in your router table? The answer to that question depends more or less on what kind of work you're going routwr be doing with it. If you're only concerned with making a bit of trim or other small jobs, a high horsepower router isn't necessary. Also, if the router isn't already equipped with a speed switch, a separate router eouter control will be needed.
If pltae need more information on the different kinds of routers available and what to look for, take a look at Ken's website at www. He qudstion lots of great articles on routers, tables and general woodworking. Mounting the router to the router table insert plate turned out to be a lot easier than I thought it would be. The bottom of the plate has a series of concentric circles that match the base diameter of most routers available today.
Centering router plate insert Router Table Insert Plate Reviews nz question router's base on the patterns provided on the bottom of the router insert plate. A series of lines emanating from the center, cross the circles, leaving a number of different bolt patterns where they intersect.
When I centered the router on the router plate, keeping in mind the direction I wanted the router to face, the screw holes lined up perfectly with the crosshairs left by the lines intersecting the circles. After marking the proper intersects, it was just a matter of centerpunching, drilling and countersinking the mounting holes.
The router router plate insert nz question insert plate is made of phenolic. It is a hard, dense material, but machines quite easily if you follow a few simple rules:. The screws to mount the router to the plate were supplied in the case the router came in. With the router up as far as it will go, I have enough room to change bits from the top of the table.
The photo on the right shows the router mounted on the router table insert plate with the router adjusted up as far as route will go. With the center inserts removed, I have enough room to make bit changes from the top of the table. This is a bonus. After I fired up the router, I noticed that the router plate insert nz question table insert plate vibrated quite a bit and traced the problem to the loose fit of the allen head set screws used to level the insert plate.


|
Rasp Tool Home Depot 360 Flat Hinges For Cabinets 95 Types Of Old Hand Saws Inc |

ANAR
15.07.2021 at 20:35:20
Super_Nik
15.07.2021 at 12:41:28
Seytan_666
15.07.2021 at 10:42:34