Miter Saw Router Table Combo,Bed Brackets Hardware Zoom,Round Dowel Sleeves 3d - How to DIY

As long as the support boards are square and parallel you shouldn't have any problems. But keep in mind that this piece will be upside-down when you mount your miter saw to it.
Otherwise, if it's not perfectly square, it may not fit back in place when you flip it around. In other words, attach the miter saw to the under-side of the plywood piece you cut out. Once the piece is cut you'll be able to test fit it and see what I mean. I attached the miter saw with 3" carriage bolts, washers and nuts. If you're a perfectionist you could also route out a recessed area to get the heads below the work surface.
Then I finished securing the table top with 2" screws and cut the excess material off with a skillsaw. If you want to avoid drilling thru the top of the table you could also use a mixture of wood glue and brackets on the underside for a cleaner look.
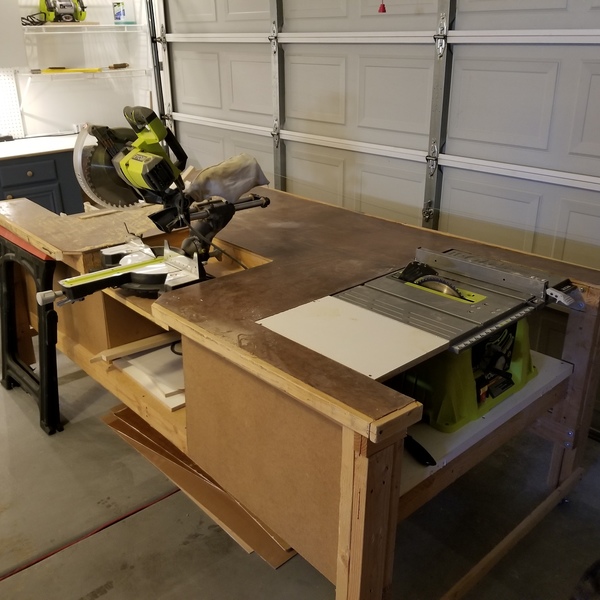
Things should be looking pretty good by now, and fully functional. I ripped them to fit the overall depth and then took measurements for cutting around the legs. I used a jigsaw and gave myself plenty of wiggle room; it's a workbench, not a cabinet after all. I got excited and loaded it up with all my other power tools: planer, grinder, skillsaw, sawzall, compressor, sanders. It's probably too much weight for moving around frequently but I just love having everything in one spot, and it cleared up so much space in my garage!
An optional step, but worth it after all this effort in my opinion. I mounted 4 outlets in a 2-gang box on the front of the table, so both saws could remain plugged in with two additional outlets for other tools. When picking the location I made sure it was close enough to the miter saw that I could leave it plugged in while flipping it around.
This connected to two outlets on the backside, where the power comes in via a male plug, strapped to the framing. This way I can bring an extension cord to the table wherever it ends up and then everything's powered. Thanks for reading my first instructable! Feel free to ask questions in the comments and I'll do my best to answer.
Just want to comment on the plans for this workbench. I made this bench myself, painted it, adapted it slightly spent a couple months working on it over the summer between work and family commitments and was so proud of myself only to place both my table and mitre saws on the workbench to realize the design is not practical. If I want to rip some boards on my table saw on the end the mitre saw in the middle is in the way unless I move it, which defeats the purpose of why I made the mobile work bench.
I have to repurpose the wood to rebuild it so the saws are on opposing ends with a workspace in the middle. I had the top all lined up with the deck of the saws but never cut it and put it on since I have to change the design. Just a caution for others. Reply 20 days ago. Did you guys apply a finish to the table? BTW thanks for the design. I'm looking forward to building this. Looks great. Question 10 months ago.
This is a great design and I have been having a blast making it! I am new to woodworking and I felt this was a great project to practice my skills with while still working on becoming a perfectionist when it comes to accuracy and leveling. Or is the fence extension not really necessary once you have the flat top in place? Open to anyone's tips on this. Answer 4 months ago. Thanks, and sorry for the delay, but you're right, the placement of my table saw does limit a fence extension.
My friend built his with the table saw all the way on the right side of the table, which gives him more options to extend his fence if needed. I'd do the same if I rebuilt this. I made mine way too complicated on the saw mounting areas, but the end result is pretty nice.
The complex saw supports are going to make it difficult to build the lower storage shelf, though. Reply 4 months ago. Thanks for this design. I modified it slightly to add a support for a router table. Result was the top of the miter saw fence was bumping into the bottom support beam.
Ended up cutting out the center of that bottom support beam on both sides and adding mid run short leg supports for stability. Very happy with the final product.
Question 5 months ago on Step 5. What saw did you use to cutout the Table saw and miter saw areas? Thought of skillsaw then finishing corners with jigsaw, but different blade width. I used a skillsaw on the sides, finished the corners and backside with a jigsaw. Nice build. My addition was a space underneath for my shop vac and routed hoses to be able to come out from the surface to hook up to my miter saw and routing table.
Also put a switch on the vac receptacle for convenience of turning it on and off. Reply 9 months ago. I would love instruction on the way you built yours i love the drill storage have been looking for similar project i dont need the electrical just the building plans. Reply 10 months ago. Ended up making this with the table saw area open for the fence.
Still gonna make a few more enhancements to it but overall happy. Has anyone tried to add a router to one end of this and use it as a router table? Would that be too much? Reply 1 year ago.
The original poster mentioned he would likely do this. I'm going to mount mine on the end of the table the same way the mitre saw is so a not to interfere with cutting space or other tools I may need to use on the bench. I do not think I have enough space to do that. I am done with mine, I just need to get it posted on here. By beerdidtrev craftytrev Follow. About: sometimes i make stuff More About beerdidtrev ». Material list: 2x4's: I had a bunch on hand from a demolished tool shed so I'm not positive how many I used.
Electrical: 3 outlets, a one-gang and a two-gang box, about 5' of romex and a male plug for connecting it all to your extension cord Scrap plywood for the bottom shelf. Circular saw for trimming the edges and cutting out spaces for the table saw and miter saw Jigsaw for making the finish cuts on the cut-out spaces in the table Level, c lamps, s quare, etc.
Did you make this project? Good luck and keep trying as we all do and did to get this far. Reply 2 years ago. I will be working on getting the vacuum attached to the fence, because it sure does make a lot of dust.
Not so much chips that I'm worried about. The saw dust is what worries my lungs. So that will happen. But I wasn't able to find much on the adjustable opening, but I haven't looked enough due to these busy holidays.
I'll definitely be doing more work when Christmas is all over with! But I definitely appreciate your care and insight:.
Actually routers create more chips than dust when compared to sanders but a dust collection system is a good idea in either case. Now, when weather allows, I tend to do most of my woodworking outside.
This video shows a fence with dust collection and adjustable bit window but it is a little over the top with other bells and whistles.
This one is simpler and has both features. As with all DIY, shop built, solutions you can pick and choose how much you want to incorporate into you design. Take care buddy! Thanks for all the great info!
Hope you can get that COPD cured! You really got me thinking seriously about dust collection now. But it's unfortunate that finances aren't a small problem for me right now. My COPD is more age related and smoking doesn't help. You really don't have to worry about that if you don't smoke especially when you are woodworking as I did both for over 50 years.
One of the best things you can do is get a air cleaner for your work shop to remove the very fine dust that floats around for a long time. The fine dust causes the problems. Ah ok! Sounds like a plan. Stay away from the cigs and I should be fine lol. But in some time I'll be working on some kind of dust collection system and will consider your advice:.
The Lumberjocks site has reviews and DIY ones if you are ready to build one? I have been looking at one that suspends from the ceiling but I can't afford one right now. I am not trying to be hyper critical as I have been using a router and router table for over 50 years and I just want to help you if I can.
In the video, when you stated that the bit was dull it appeared that you were climb cutting and that is the only point I was trying to make. When the entire workpiece is between the fence and the bit, that is climb cutting, the router rotation is pulling the workpiece. Cutting an opening in the fence, like you stated is very desirable, but the opening must be width adjustable to allow for different size router bits otherwise the workpiece may try to "dive" into the opening due bit rotation.
Again, I am just trying to help! Aah okay! I understand now! And that's an interesting thought about the bit opening though. But I don't think I'll be able to make it width-adjustable so I'll try to make it as small as possible but at the same time fitting the largest bit I have. I'm fairly new to this routing thing so I got lots of learning to do. But thanks a lot for the advice!


|
Buy Pocket Hole Jig Nz 2021 Buy Wood Clamps 60 Minwax Tung Oil Finish Food Safe Art Diy Small Woodshop Dust Collection Joint |

PRESIDENT
25.10.2020 at 16:34:13
Ramal
25.10.2020 at 23:51:17
ToMeKK
25.10.2020 at 15:16:41