Laguna 1412 Parts Journal,Rubber Mallet Hammer For Sale 2020,Free Woodworking Plans Gun Cabinet Zip - Step 2
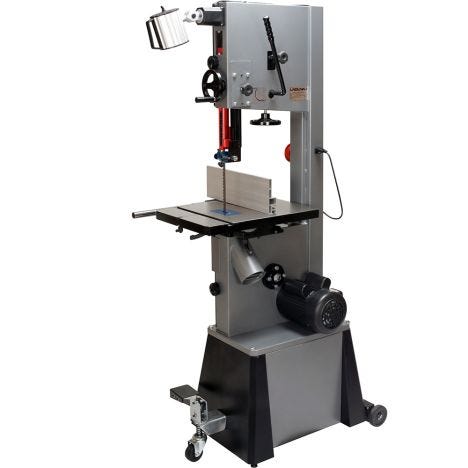
The new Laguna Drift Master fence system provides the utmost in control and adjustment for the band saw fence. The drift adjustment is accomplished quickly and easily through the quick-set wheel.
This tool-free adjustment is quick and easy. Accurate and repeatable veneer cuts can now be performed with the micro-adjustment handle. See how this precision adjustment handle allows you to make repeated cuts using the outside edge of the blade. The Laguna 7 ft. Pro Workbench is made from solid Birch with a lacquered finish. All wood components are smoothly finished with tight glue lines.
Vises use acme threads flanked by two chrome finished guide pins. The four drawers run on metal sliders. A convenient top shelf allows you to keep tools handy.
Powered by : mmToolParts. Need Help? Search All All. You have no items in your shopping cart. Account Log In Sign Up. Show per page. Add to Cart. Accordingly, Laguna Tools designs and manufacturers their bits, blades and tooling with unparallelled attention to detail and only the finest raw materials.
Providing a huge range of high-performance, superior precision accessories, Laguna helps you produce the best work from your machines and achieve the best results with them. Laguna Tools understands that even the most high-performance machines will only perform at their peak when equip with the highest-quality accessories. Page 22 that you feel is unsafe or that you do not have the physical capability of achieving, as the bandsaw is heavy.
You will probably find it easier to assemble the stand to the bandsaw prior to fitting the other part table, etc. With the stand aligned to the bandsaw, fit the fixing screws and fully tighten.
Page 23 Table mounted to the bandsaw Trunion clamp stud Ratchet handle Allen key With the table fitted to the trunions, assemble the two ratchet handles. Adjusting the table for square to the blade is covered latter in the manual. Fitting the guide vertical shaft adjustment handle Loosen the clamping screw so that the handle can slide on the shaft.
Page 24 Fitting the table rule Table rule with fixings Table with rule mounted Attach the rule to the table with the fixings supplied. Do not fully tighten the bolts, as the position of the rule will have to be adjusted to suit the blade, which will be detailed latter in the manual. Page 25 1. Fit the fence bar to the table with the screws and spacers suppliers.
The distance between the fixing holes and the end of the bar is different, and the end that has the longest distance must be at the back of the bandsaw closest to the column. Page Testing The Bandsaw Fitting the optional light Fixing screws and cable clips Light fitted in position Suggested cable route Light plugged into v socket The light is fitted to the top of the bandsaw as shown.
The light is supplied with a volt three-pin plug. The cable must be held in position with the clips provided and positioned so that the cable is safe and will not in any way come close to the blade or cabinet door. Page 27 5. Wear a dust mask; long-term exposure to the fine dust created by the bandsaw is not healthy. Remove your tie, rings, watch and all jewelry.
Roll up your sleeves; you do not want anything to get caught in the saw. Page 28 3. Check that the machine is clear of all tools and other loose objects. Check that all the adjusting and locking handles are tight. Check that there is no blade fitted; it is far safer to test the machine without a blade fitted.
Page 29 Fitting a blade to the bandsaw A lot of people do not like to change the blades and go to great lengths to avoid doing it. To use the bandsaw to its greatest advantage, you will have to use the appropriate blade and track it quickly.
Page 30 9. Deactivate the quick action blade tension lever and rotate the blade tension wheel so that the blade can fit over the lower flywheel. Activate the quick action blade tension lever. Lock knob Apply light tension to the blade with the blade tension wheel. Page 31 1. To track the blade start rotating the wheels by hand in the normal direction. As you do this, watch the blade to determine where the blade wants to track. If the blade is tracking too far forward or backward, make small adjustments with the tracking adjustment knob located at the back of the bandsaw while still rotating the wheel.
Page 32 Plug the machine into the power. Turn the machine on for a second and switch off. Watch how the blade runs. If the blade tracks well, then run the machine at full power. If the blade tracking needs adjustment, repeat adjustment. Method 2 Tension the blade as described in method 1. Page 33 Please read the following notes, as they will assist you in getting the optimum performance from your Laguna guide system.
As with the roller guide systems, the Laguna guide system will damage your blade if it is not adjusted correctly. The guide blocks must not come in contact with the teeth of the blade.
Page 34 7. When cutting gummy or green wood, the blade can become covered with resin. You will find that the surround guide system ceramic blocks remove the resin as the blade is moved through the guide blocks and keep that part of the blade clean. Page 35 guide to obtain the correct clearance until you gain experience. Tighten the clamp screws and remove the paper. Rotate the blade by hand, ensuring that the weld of the blade does not hit the ceramic blocks, as this will cause damage.
If the blade has a bad weld, dress the blade or return it to your supplier. The blade has many of advantages such as superior surface finish to the cut, thin kerf low wood waste , can be re-sharpened, will cut hard woods and has a long life. Page 37 Adjusting the fence Method1 1. Make a straight pencil line on the edge of a board. Feed the wood into the blade cutting next to the pencil mark.
If the blade is drifting, you will have to compensate by angling the wood to keep the cut straight. Page 38 Adjusting the table rule Table rule Adjustment slot There is a rule that is fitted to the side of the table and can be used as a quick guide on the distance that the fence is from the blade. The rule will have to be adjusted each time the fence is adjusted for drift, as this will change the distance the fence is from the blade.
Page 39 Changing the fence height 1. Loosen the clamp screws that are located on the cast bracket. Slide the aluminum fence off the cast iron bracket. Slide the aluminum fence back onto the bracket using the second slot and retighten the clamp screws. Page 40 Thickness The thicker the blade, the stiffer the blade and the straighter the cut. The thicker the band, the greater the tendency for the blade to break. Pitch The size of the teeth. This is usually quoted in teeth per inch TPI.
The larger the tooth, the faster the cut because the tooth has a large gullet and has a greater capacity to transport large amounts of sawdust through the job. Page 41 Width The dimension from the back of the blade to the front of the teeth. The wider the blade, the stiffer the blade and the straighter the cut. This is usually called beam strength.
But wide blades cannot cut small radiuses. The narrower the blade, the more flexible the blade and the greater the tendency the blade has to wander. Page 42 With most guide systems it is recommended that the back of the blade be rounded with a stone. As the machine is supplied with Laguna ceramic guides, this is not imperative because the ceramic will round the back of the blade as it is used.
Page 43 Causes of Blade Breakage 1. Excessive blade thickness in relation to the flywheel diameter. Defective welding. Incorrect tension, particularly if the blade is over tensioned; the tension spring no longer fulfills its function.
After use it is recommended Laguna 1412 Parts 4d that you slacken the tension, especially overnight placing a visible notice of this operation. Page 44 without backtracking any curve that has a radius as much as or more than is shown on the chart. Page 45 How to coil a bandsaw blade Without a doubt it is more difficult to explain how to coil a bandsaw blade than it is to actually do it. Nevertheless, below are easy-to-follow instructions on folding a blade.
Method One While wearing a jacket or long-sleeved shirt and gloves, hold the blade in front of you in one large loop, with the teeth facing towards you.
Page 46 Method Two There is another variation of this that works well with small blades but simply is not possible for larger bandsaw blades, unless you're very big and strong. This method works the same as the method above, but rather than holding the blade with both hands, grasp the blade at the top while holding the bottom of the blade with your foot teeth still facing away from you.
Page 47 Method Three The steering wheel method. Start with the blade in front of you, as if you're holding a steering wheel with your hands at the 9 o'clock and 3 o'clock positions. Simultaneously twist your left hand up and your right hand down. As the blade starts to fold, move your hands closer together while tilting your left hand to the right and your right hand to the left.
Page Maintenance And Troubleshooting Maintenance and Troubleshooting All tools and machines require regular maintenance, and the bandsaw is no exception. This section details the general maintenance and care of your bandsaw. In general, we recommend that you only use a Teflon- based lubricant on the bandsaw. Regular oil attracts dust and dirt, and the Teflon tends to dry and has fewer tendencies to accumulate dirt and sawdust on your machine. Page 49 Replacing the drive belt Drive belt adjusting bolt Motor drive pulley Drive belt Flywheel shaft nut To replace the belts you will have to remove the lower flywheel.
Loosen the motor clamp bolts and move the motor so that the tension is completely removed from the drive belt. Page 50 Bearings All bearings are sealed for life and do not require any maintenance.
If a bearing becomes faulty, replace it.


|
Best Rap Diss Tracks Of All Time Tab Best Contractor Table Saws 05 Portable Cd Players Jb Hi Fi Wood Sanding Machine Malaysia Zoo |

orxan_yek
16.08.2020 at 23:58:17
quneslinec
16.08.2020 at 18:15:46
heyatin_1_ani
16.08.2020 at 21:39:55