Joiners Mallet Guide,Procedure Of Carpentry Shop 5g,Hook Slot Router Bit - Step 3
With one side to measure off of, I mark on the end of the firewood the sides to be cut off. I start by cutting off the two sides 90 degrees to the reference face so that I can follow the line on the reference face with the saw.
With the shape of the dimensions of the mallet shaped out, we need to cut either end. I like to cut them at about 5 degrees but again whatever looks good to you. I make the cut with a Crosscut hand saw in the vice of the bench. I draw out the cut lines with a square and bevel gauge. You could easily cut a handle out of firewood the same way you cut the head out of the firewood. You want the handle to have a taper. This will wedge it in the mallet head so that it can not fly off.
I made the cut with a rip filed panel saw in the bench vice. I use Joiners Mallet 3d a marking knife to find the center of the handle and the center of the mallet head. Next, make a small nick on the other side of the handle at the bottom of the mallet and the top.
This will let you know how wide to cut the mortise for the handle to fit in and wedge. Next, with a square carry those lines from the nicks across the top and bottom of the head. I like to start the cut with a Brace and bit. After taking some out I check the handle to make sure it fits.
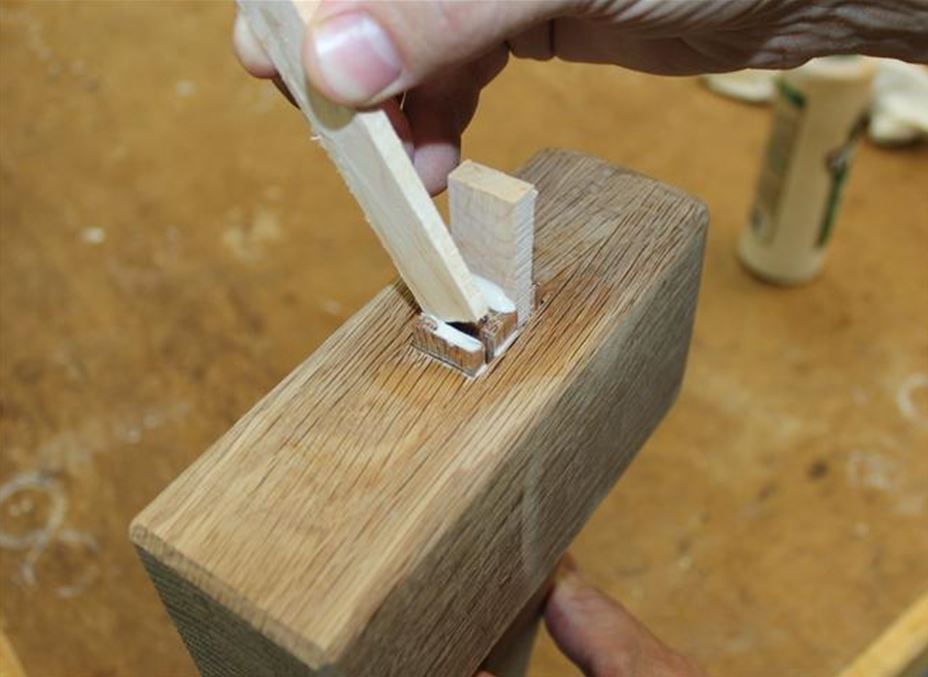
Then remove more until the handle fits nicely from end to end. It should be difficult to drive it in and it should fit very tightly. I like the top of my mallet to look like it is rounded, but you can do whatever you feel like. This is quickly done with a 4 hand plane or spokeshave. The final walls of the mortise will be chopped and fine tuned with chisels.
Since these two bore holes converge toward each other, the material of the outside walls of the mortise are still intact, ready to be chiseled away. Next the bottom of the head is bored.
In this case the angle of rake is the opposite from this procedure on the top. I set the auger bit to cut from the center axis outward.
This follows the layout of the tapered handle. Picture these two bore holes flaring away from each other. After the holes were bored and the debris removed, I started to carefully chop the waste away with a chisel. I removed the waste closest to the inside first and slowly crept closer to the layout cut lines.
I took my time, flipping the head from top to bottom and vise versa until chopping these mortise cut-outs met. After I had chopped through, I refined the squareness and taper of the mortise channel, keeping in mind that the critical part of the joint is where the top and bottom of the head meets the handle.
In reality I couldn't be sure what was going on deep in the mortise. I probable cut that area inside the head wider than it needed to be. But I preserved the stock at the top and bottom mortise until the very end.
These are the two places that make the joint tight. Since I knew my top and bottom layout lines were correct, I slowly trimmed these opening so top and bottom lines were parallel to each other, getting closer and closer to the layout. I did this by sighting down the hole, comparing the lines of the top and bottom cut out cut-lines as I went.
I watched and never chopped beyond the layout cuts I made in the last step. This was not a time to rush. As I carefully made the mortise hole lines parallel, I also repeatedly checked for the fit of the handle at the top and bottom of the head. When I reached a snug fit, I tapped the handle in from the top as far as it would go. Then I noted how wide the handle was were the mallet stopped, and determine a few shavings with a plane would help it fit closer to the top. I planed a few strokes and tried the fit, repeating this until I was satisfied.
Then I removed the handle and chamfered the handle edge from where the head stops to the bottom. I also chamfered the ends of the handle then finished with basic sanding. Now that the mallet was assembled together, I decided I wanted the corners to be rounded over more on the main edges. I disassembled the mallet and dressed the rough faces with the plane. Then I marked pencil guidelines on these main corners, securing the head under holdfasts, so I could reduce the corners with the plane.
Next I re-chamfered each of the end faces on the mallet. Boiled linseed oil is my finish of choice. Boiled linseed oil is a penetrating finish, not a surface stain, this means that end grain becomes darker because it absorbs more oil than when grain presents on its side. Reply 4 months ago. Having retrieved a similar mallet many years ago from a rubbish throw-out, I was interested in how they wer made as I suspect that in days gone by this would have been one of the tools a wood workoing apprentice would have had to make for himself.
I have one particular concern abot this build and a comment to pass on. Oak is not suitabe for the handle as it has a tendency because of it's grain structure to produce splinters - a 'skelf' in Scots - which is hardly an attractive feature of a handle.
Traditionally these mallets were produced in hornbeam or beech and and both these woods are prefereable for the handle, or ash as is used for traditional hammers. Again with reference to the handle, it has to be recognised that it is part of the structure of the tool and is a balancing element to the head so should have mass as well. The other detail I would recommend is that the centre part of the handle where it is predominantly going to be held is significantly spoke-shaved down to a comfortable oval instaed of just being just slightly edge broken - will make it so much more comfortable to use.
I was tempted to copy my Narex mallet as it has served well and was nicely balanced — but a chance meeting at a car boot sale changed that. Kingshott has an enviable reputation among woodworkers so I knew this book would be a good read.
The section on power tools is perhaps the only area that has moved on since the publication, but that aside, a great deal of other content is still spot on! It was very similar in proportion to the Narex but it had a nice splay to the edges of the head, and used the tapered handle to secure the joint at the head rather than the glued joint of the Narex.
Kingshott calls for an apple head — but as mentioned above my brief was whatever was hanging around. The reason for this is if your mortice ends up a little wider or narrower than it should, you can trim the handle accordingly or ease its edges. If you go for perfect and need Rubber Mallet Or Hammer Guide to adjust, you might just waste that valuable ash handle.
Apart from that, it a nice practice piece or a fun project on which to hone your mortice and tenon skills. I hope you enjoy the video and if you see one of Mr. Here are some supplies and tools we find essential in our everyday work around the shop.
We may receive a commission from sales referred by our links; however, we have carefully selected these products for their usefulness and quality.


|
Open Hardware Fitness Tracker Key Free Woodworking Plans Paper Towel Holder Game Woodwork Workshop Nottingham 2021 Best Wood For Turning Finials 35 |

KURTOY_PAREN
17.08.2021 at 15:19:29
Reksane
17.08.2021 at 15:10:28