Fine Woodworking Finishes Network,Flush Cut Router Bit With Bearing Files,Cnc Router Bowl Bit Value - Reviews

WMS FDMC Market Leaders. Red Book Showroom. Karl Forth Hymmen digital embossing patent remains in effect. William Sampson System revolutionizes spray finishing. Minnesota Tool Library donates student desks. Kobe Bryant mural uses pieces of hardwood, goes viral on Instagram.
Building a six-figure, foot walnut stairway and slide combo. Marquetry goes 3D in Scott Grove's breakthrough patriotic creation. Weyerhaeuser to acquire Alabama timberlands. Lumber prices hit record high; more White House intervention urged.
Choreographed forklifts: Combilift joins the viral Jerusalema Dance Challenge. Architectural millwork firm expands into new market: Turning vans into RVs. Don't screw around: Get an information-packed lesson in screws. Woodworking Industry News. Event Coverage. Canadian News. New U. Load More. Back To Top. Welcome to our redesigned homepage! Although staining furniture is optional, applying a finish is essential to protect the wood's surface.
Without a finish, wood can dry, crack and deteriorate or — if exposed to moisture — swell so that drawers and doors no longer work. A good finish prevents swelling and cracking, protects against stains and enhances the appearance of the wood. Finishes contain chemicals that can be dangerous if used without proper safety precautions. Always wear lightweight surgical gloves to protect the skin and protective glasses to guard the eyes.
Some finishes emit hazardous fumes, so work outdoors or in a well-ventilated area with a fan for circulation. Wear a charcoal respirator when working with oil-based finishes. Never work near a gas furnace, wood-burning stove or other flame. Rags soiled with finish pose a fire hazard, so safely dispose of them by placing them in a sealable container such as a paint can and filling it with water. Every piece of furniture, whether new or antique, needs a finish, but no single finish is right for all situations.
Although at least 10 varieties and more than a dozen brands of finish are available, all can be divided into two categories: penetrating finishes those that dry inside the wood and surface finishes those that dry on the surface of the wood. Penetrating finishes are easier to apply and leave a more natural look. Surface finishes are more durable but don't look as natural. Linseed oil is one of the oldest penetrating finishes, but it tends to become sticky in humid weather.
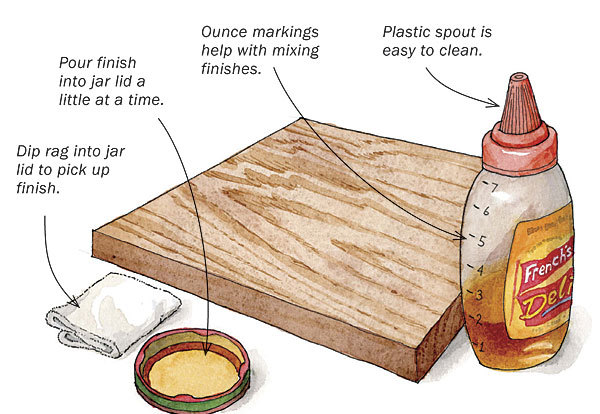
Danish oils also fit into the category of penetrating finishes. Tung oil is a favorite among woodworkers because it's easy to apply and leaves an attractive, natural appearance. Apply tung oil with a rag rather than a brush.
First, remove any dust from the wood with a tack cloth. Shake the tung oil container and apply a liberal amount to a clean cloth. Rub the oil directly onto the wood, adding more to the cloth as necessary. Wait 5 to 10 minutes, or until the tung oil begins to feel sticky, then wipe off any excess with a clean cloth. Wait a few hours before applying the next coat.
Some rubbing may be required to work the finish well into the wood. Once the wood takes on an even sheen -- usually after four coats or so — let it dry completely. Apply more tung oil anytime the finish becomes dull or dry-looking.
Tung oil provides a thin layer of protection that's suitable for fine antiques and other pieces that won't receive much wear. Pieces that get a lot of daily use should be protected with a surface finish. Although they don't look as natural as penetrating finishes, surface finishes provide more durable protection.
They're a better choice for everyday pieces that will receive a lot of wear. Unlike tung oil, which dries inside the wood, surface finishes such as shellac and varnish dry on top of the wood to create a protective coating. Surface finishes are applied with brushes rather than rags, and a variety of brushes are available — each with different attributes.
Oil-based finishes may be applied with a natural brush or a synthetic one. Apply water-based finishes with a synthetic brush, as water may cause natural bristles to swell and become useless. Avoid inexpensive foam brushes, as they wear out quickly and don't lay down a smooth coat.
Select a medium-priced brush with a tapered end and good spring to the bristles. Tug gently on the bristles to ensure that they're well attached.
Poorly made brushes may shed bristles into the finish. Shellac is a quick-drying surface finish used fairly infrequently today because it isn't very resistant to water or alcohol.
Varnishes offer much better protection, and the toughest of them is polyurethane. Polyurethane varnish is oil-based, so it may be applied with a natural or a synthetic brush. Before applying it, wipe off the surface with a tack cloth. Stir the varnish in a figure-8 pattern, using a stirring stick. Never shake varnish, as that may produce bubbles that dry into the surface.
To minimize runs and drips, begin brushing from the middle of the board, working toward the edges. After the first coat is completed, let it dry thoroughly. Resist the temptation to dab or add more finish.
To prevent your brush from drying between coats, you have several options: clean it, store it in a jar of mineral spirits to keep it soft until you're ready to use it again, or seal the entire brush in a zipper-top plastic bag and store it in the freezer until it's time to apply the next coat.
Though it's termed a surface-building finish, most of the first coat of polyurethane is absorbed into the wood. Several woodworkers' techniques will allow you to create a smooth, protective sheen when the second coat is applied. Because the first coat of polyurethane filled most of the pores in the wood's surface, the second coat won't have as much to cling to. To help the second coat stick to the first, use sandpaper to make tiny scratches in the hardened first coat.
This technique is called scuff sanding. With a tack cloth, wipe off any dust created by sanding. Then apply the second coat of varnish in the same manner as the first. As the finish dries, any dust that settles on it may cause roughness.
To remove the roughness from a final finish, try the technique known as wet sanding, which eliminates dried-on dust without leaving visible sandpaper scratches. Fold a piece of or finer sandpaper into a small square.
Apply a small amount of lemon oil, mineral oil or baby oil to the dried surface as a lubricant. Sand the oily surface, applying light pressure with only your fingertips, in the direction of the wood's grain. Once the finish is smooth, wipe off the oil with a clean cloth.

|
Wood Crafts To Make And Sell Zero Electric Wood Carver Uk 70 Bench Cookie T Track Euro Drawer Slides Installation |

66
10.12.2020 at 14:11:39
nigar
10.12.2020 at 20:40:43