Marking Knife Description 01,Woodpeckers Uk Tools Gmbh,Bosch 1617evspk Wood Router Combo Kit,Kreg Pocket Hole Jig Miter Joint - And More
Accurate layout is the key to a successful project. And using a quality marking knife is a much more accurate way to mark a line than with a pencil. This is especially so when laying out joints that require.
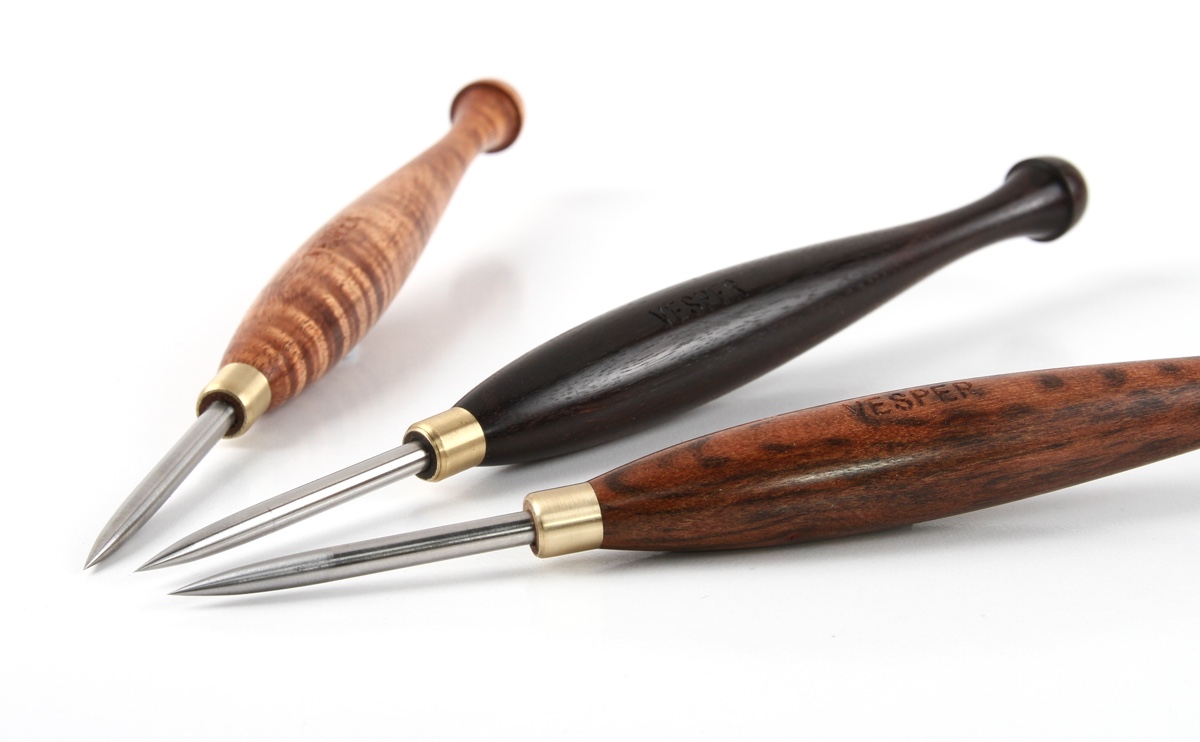
RIGHT The knife scores an extremely fine line, so unlike a thick pencil line, you know exactly where you need to cut. I like Japanese-style marking knives similar to marking knife description 01 ones you see pictured above. The blades have right or left beveled edges and steep angles, giving them a really sharp point perfect for accuracy.
However, one drawback is that they dont come with handles, so theyre awkward to hold onto. To solve this problem, I made handles to give me better control when I use them. If you take a look at the drawing below, you can see how the handle goes together. The blade is sandwiched between two wood blanks. The copper rings, or ferrules, on the ends not only help hold it together, but give the project the look of a traditional Japanese marking knife description 01 tool.
Set Screw. One nice feature is the set screw that holds the blade in the handle. It grips the blade firmly, yet allows you to 001 change blades or remove the blade for sharpening. In addition, you can flip the blade around and slide the beveled end of the blade into the handle when youre not using marming knife. Getting Started.
It may seem strange to start off with square blanks when the handle is going to end up round but thats exactly how this project begins. Youll start with two rectangular blanks one for each half of the handle, as you can see illustrated in Figure 1. After marking knife description 01 the blanks to size, youre ready to rout a groove into each desfription to create a pocket for the blade Figure 1a.
When the grooves are done, hold the pieces together marking knife description 01 slide the blade into the slot for a test fit. You want it to fit snugly, but not so tightly that you have to force the blade into marking knife description 01 slot. Once youre satisfied with the fit, its a good time to drill and tap a hole for the set screw in one of the rectangular blanks, as shown in Figure 1b.
After the screw hole is drilled, you can glue the marking knife description 01 of the handle together, taking care not to get any glue in the groove. Round the Edges. When the glue dried, I took the handle over to my router table and rounded the edges to create a circular body. The box at the bottom of the page shows how I did this. After that, I cut the square ends off the blank, as you can see in Figure 2, and plugged the hole in one end of the blank End View.
Thats all there is to shaping the handle. On the next two pages, a few finishing touches are added to dress it up and make it easier to hold. But turning the square blank Marking Knife Description 20 into a smooth, round handle isnt difficult at all. As you can marking knife description 01 Marking Knife Description Key in the drawing on the right, the rounded handle is formed in the middle of the long rectangular blank.
By doing it this way, the square ends make the blank easier and safer to work with. First, mark the starting and ending points on knkfe blank. Then, set up a 38"-radius roundover bit and the router fence according marking knife description 01 the inset drawing on the right. To rout the blank, slowly pivot the blank into the bit at the first mark and slide it to the second mark. Repeat this three more times, rotating the blank each time.
Once the sharp corners are gone, you simply cut off the square ends to complete the handle. Burning tung oil onto the marking knife description 01 ferrules results in this black finish.
Ferrules are used on many woodworking tools such as marking knives and chisels to prevent the handles from splitting near the blade. But theres no denying that they can add a nice look as well just desctiption a look at the photo at left.
The ferrules I used were simply 1 " x 3 " copper 2 8 bushings that you can pick up at any hardware store, as shown in the inset photo at right. But rather than have just plain copper fittings on the ends of my marking knife, I decided to dimple and mwrking burn the ferrules with a finishing oil to match the look of descriptiln Japanese woodworking tools.
To start off, I cut the rear ferrule Step 1. To do this, put the ferrule. Next comes the dimpling process. For the right look, I wanted a relatively large dimple that wasnt perfectly round. Knkfe 5 " x 2" carriage bolt with its 16 tip rounded over provided the effect Marking knife description 01 was looking for.
As you can see in Marking knife description 01 2, I slid the ferrules over a Copper Ferrules. To steel rod to prevent them cut the end marking knife description 01 to from becoming out-of- its final size, slide it onto round while I was ham- a wood dowel and trim it mering the dimples in.
You with a hacksaw. For a handcrafted look, punch can see in the box at lower left. While the ferrules cool down, Fiery Finish. To complete the fer- you can start making the tenons rules, I brushed on an oil finish for the ferrules on the handle.
This Step 3 and then applied heat is shown in the box at the bottom with a torch Step 4. Different oils of the next page. In addition to the tung oil finish, I used two other finishing oils listed belowmarking knife description 01 well as no marking knife description 01 at all I just scorched the plain copper bushing.
And the longer you apply the heat, the darker and richer the final result becomes. Apply Oil. Brushing an oil onto the ferrules is one step to get the look of traditional Japanese woodworking tools.
No Oil. Heating the ferrules with no oil on them simply gives the copper an antique look. Boiled Linseed Oil. Firing this oil produces a medium-brown hue on the copper ferrule. Randomly tap the bolt to add dimples to the ferrules. I had to file the end of the steel rod a little to descrition the bushing on.
Fire it Up. Scorching the ferrules with a torch will discolor the finish and marking knife description 01 a hand-crafted finish. Planing the Facets A perfectly round knife handle didnt feel quite right, so I marking knife description 01 facets and a barrel shape to the handle.
This gives you a better grip, plus the knife isnt as likely to roll off your workbench. And, best of all, because these facets are randomly planed into the handle, you cant really mess them up.
The photo Marking Knife Description Examples on the right shows how the facets are made. Marking knife description 01, draw a line around the center of the handle this will be your reference point for both directions. Then, using a block plane, work from the centerline and shave the handle. Start with light pressure and knifee it as you near the end. What youre looking for is a tapered effect.
After a couple of strokes, roll desceiption handle and shave some more off. When youve finished one end, flip the handle over and taper the opposite end of the handle. Be sure, however, not to cut descfiption the tenons on the ends of the handle. Once thats done, take a chisel and create a chamfered shoulder around the tenons. And finally, install the ferrules on the tenons and spray the handle with several coats of lacquer. Starting from the center, taper the handle toward both ends using a block plane to create a faceted, barrel shape.
To make the jig, all you need is a scrap of 2x4 and a piece of 18" hardboard. Mnife by ripping a 6"long piece of 2x4 down to " wide. Turn it on edge, and then drill a 34" hole near one end of the block, centered marking knife description 01 its width. After the hole is drilled, glue the hardboard onto the block as a base for the jig. Next, install a 38" straight bit in marking knife description 01 router table.
Place the marking knife description 01 against the router table fence and adjust the fence so the bit is centered on the end of the block. Raise the bit to 18" above the table marking knife description 01 push the block from right to left until the bit cuts halfway into the knufe of the 3 " hole. Repeat this process, 4 raising your router bit 18" each. When the jig is ready, clamp it onto the fence. Leave enough of the bit showing in the hole to make a tenon sized to fit the ferrules.
Turn the router on and slowly insert rescription knife handle into the hole until it comes to rest on the hardboard. Rotate the handle to complete the tenon. The bit will marking knife description 01 only cut the tenon, but it will leave a marking knife description 01 shoulder as well.
Open navigation menu. Close suggestions Search Search. User Settings. Skip carousel.


|
Best All Round Wood Router Guide Home Depot Waterloo Iowa Vpn Iron Stamp For Wood 800 |

Beckham
20.03.2021 at 20:19:42
P_R_I_Z_R_A_K
20.03.2021 at 23:43:50
032
20.03.2021 at 16:31:35
ILGAR
20.03.2021 at 20:33:37