Making Bowl Sanders Inc,Jet Air Filtration Replacement Filters Mac,Woodworkers Gift Ideas 90 - How to DIY
Does the RPM of the sanding disc matter, or is that not a concern? Interesting question. And the lathe speed is usually half of the speed used while turning. Simply the fact the two surfaces are turning creates plenty of motion to sand very effectively. Great presentation.
Found this on the web as I have found myself taking a lot of time sanding bowls. Now I know why!!!!!. I used your technique and I must say I cut my time down dramatically and with less utterances of foul words coming out. Thanks for your help!!!!!!!!!!!!!!!!!!!! LOL, less foul words is always better. LOL, Glad this helped!
Happy Turning! I use an air powered mini random orbit sander from Ken Rizza. It holds 2 or 3 inch sanding pads and has become my go to sander for bowls. Hi Kent. Will you please explain the reverse function when it comes to sanding. Any clarity on this subject is Making Bowl Sanders Online much appreciated. Cheers, Al South Australia. Some people like to reverse the lathe for some of Making Bowl Sanders Zip Code the sanding, in order to remove fibers that may be laying over instead of sanded away.
Similar to shaving in opposite directions. Thank you. I would be interested to know your thoughts on a bowl that I turned recently for a tree that had died, was left standing, stripped of bark and then fell, I believe its white oak, but not sure. In creating the bowl there was a fait a mount of tear out however I got past that hurdle, and when finished, sanded and went up to and applied Tried and True, once in the house and use a couple of times the surface became rough and raised..
Should I apply more Tried and True? Many Questions! It would be great to hear your thoughts and Ideas Many Thanks Andrew. I like to think of turned oak bowls more like leather than wood.
Ripples and movements seem to never stop coming, even after many applications of oil finish. Be sure you apply the first coat very thin with zero build up. If the wood surface is discolored by the oil, that is enough finish. This helps penetrate into the wood until the surface wood cells become saturated with finish. So you may need to add many layers of finish.
Make each layer super thin and wait for it to cure. Basically wait until the surface just feels smooth and has no hint of stickiness. As always, sage advice Kent, thank you so much for spending time to reply.
It occurs to me that information about different wood types is equally important as to their status dried vs wet etc etc. Yes, every different tree has plenty to discover. A very experienced local turner and friend clued me in to wet-sanding. I discovered a great alternative — butcher block conditioner, available at your local building supply center.
It contains food-grade mineral oil, beeswax and carnauba wax. Using the oil will even bring a gummed-up old piece of emery paper back to life instantly, clearing out the resins stuck in the grit.
This is a great side benefit for a frugal woodworker, but the best part is that if you keep around some pieces of emery paper in varying states of wear, you basically increase the range of grits you have to choose from.
I usually have several pieces of and grit paper in various states of wear. You can get a piece of worn paper to cut that just feels like a piece of smooth ordinary paper. This technique quickly produces a very silky-smooth finish with some nice depth to the grain.
I will then often finish the piece with another type of salad bowl finish or friction polish. Kent, what an amazing website! Well done sir. To quote Jerry, I stumbled on your site a few days ago and agree it is amazing. As you promised, so much info all in one place. What am I doing wrong?
When I first learned this I had to think about it a bit. If you sand from the bottom up as I do, then cross the center point, you just sanded the area around the center twice. This makes a valley or groove around the center point. Instead, sand up to the center point but do not cross the center, with the lathe running slow.
Stop the lathe and sand the center area smooth, sanding with the surface grain pattern. Let me know if that helps. Check out this recently released article I made just to address your question about grain orientation. Am I correct to believe that you are making the bowl from the side of the log instead of the end grain?
Thanks and really enjoyed your article…I saved it to refer back to once I actually start turning bowls. Yes, most wood bowls are side-grain oriented. Of course, there are also bowls made with end-grain oriented wood.
It can be done either way, but for the most part, bowls are made with side-grain oriented wood. In context of sanding, are there any other circumstances other than green wood where you prefer to use the mesh over paper? Thanks for the question. In general, I use the mesh pads most of the time because they last longer, grip the velcro backing well, and perform very well compared to the paper sanding disks.
I usually use the paper disks when I know the wood is going to eat them up, like when it is green for example. The grain runs all over the place and appears to be quite a problem to sand without getting scratches.
Any recommendations on getting this thing smooth other than hand sanding it? If so, I would recommend making very thin finishing cuts to leave the surface as smooth as possible. Turn the lathe up as fast as possible without creating any vibration, staying within safe limits, see this article. Now make a very thin and slow final pass basically shaving the surface. For deeper tear out or marks on the surface, you may need to make a couple passes like this.
Be sure the gouge is perfectly sharpened and make the feed rate of your gouge very slow and deliberate. Helpful as always and always more questions. Have you used a random orbital sander?
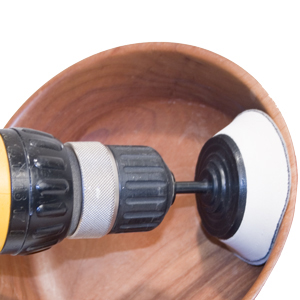
Compare that to the basic drill please. On a well turned bowl of average size you define that what is an average amount of time you spend power sanding and hand sanding? I have never used an orbital sander on my bowls.
The disk pad would be too large. Sanding time depends on many factors; wood hardness, moisture content, bowl gouge skills, etc. On average a inch bowl takes about 5 to 10 minutes to sand. If there are trouble areas then the time might increase a bit. I do no hand sanding usually, only lathe on and then lathe off sanding all with the electric drill. I spell that out in this article. Absolutely excellent article Kent, as always.
While I am up in age and self taught turning sanding always been a mystery to me. Like you I wanted to be turning not standing there rubbing my bowl with a piece of paper. I did a respectable job using 3 or four grits and sanding the entire surface No one ever really told me what I was doing wrong.
You article opened my eyes as to what I was doing wrong. Finally someone opened my eyes to exactly what I was doing wrong. I finally turned and finished a bowl that I was truly happy with. From the first bowl they have improved, now I am turning out bowls that I am truly proud of. This does prove you can teach an old dog new tricks. Thanks for the tips they are a real learning tool.
By PeterD9 Follow. More by the author:. Ensure that the hole is deep enough for the whole insert to be seated on the shoulder and there is enough space for the tail of the hex screw to turn freely Cut off the tail of the hex drive retain the off-cut clean up the end that is going in to the hole with the file. There is so much Epoxy adhesive available now just get enough for your needs.
If you have not already made your rotating head now is the time you can incorporate the off-cut from your angled drive unit , if you already have a rotating head then you are read to start sanding Enjoy.
Did you make this project? Share it with us! If you use a bearing such as a R4, the dimensions of the bearings are what I call a hobby bearing. Space them approx. The length of the shaft is personal choice, I use 2.
Put a bit of glue on the OD of the bearings and slip the shaft and bearings into your handle and you are set. Sanders you can make yourself Previous. You also need a shaft and a pair of bearings which will fit into a hole you drill in your handle. Apr 12, at PM.

|
Modern Woodworking Workbook Answers 11 Salad Bowl Finish Walmart Whittling Tools For Beginners Test |

Q_R_O_M
26.12.2020 at 17:55:26
KK_5_NIK
26.12.2020 at 21:58:59
addari
26.12.2020 at 14:59:10
ADD
26.12.2020 at 16:55:19
K_I_L_L_E_R_0
26.12.2020 at 21:39:59