Fine Woodworking Adirondack Chair Plan Java,Box Lake Lumber Products 01,Rockler Cnc Machine 60,Woodworking Projects Bedside Table 8th - Review

Download a free PDF copy of this article, including illustrations and a cutlist, here. The project has been discussed, of course, but for one reason or another, it never happened.
When you pare away all the myths and misinformation, Abram is just a very likeable, easy-going, hard-working, down-to-earth woodworker in a reasonably well-equipped, but not extravagantly so, woodshop. He was very much at home there.
How fancy? Working with Abram was fun, to be sure. But I spent years working in commercial shops building hundreds of projects while working with others. And while Fine Woodworking Adirondack Chair Plan Co Abram is a celebrity, his pleasant personality and easygoing manner made me feel right at home, too. Be sure to read, understand, and follow all the safety rules that come with your power tools. Knowing how to use your power tools properly will greatly reduce the risk of personal injury.
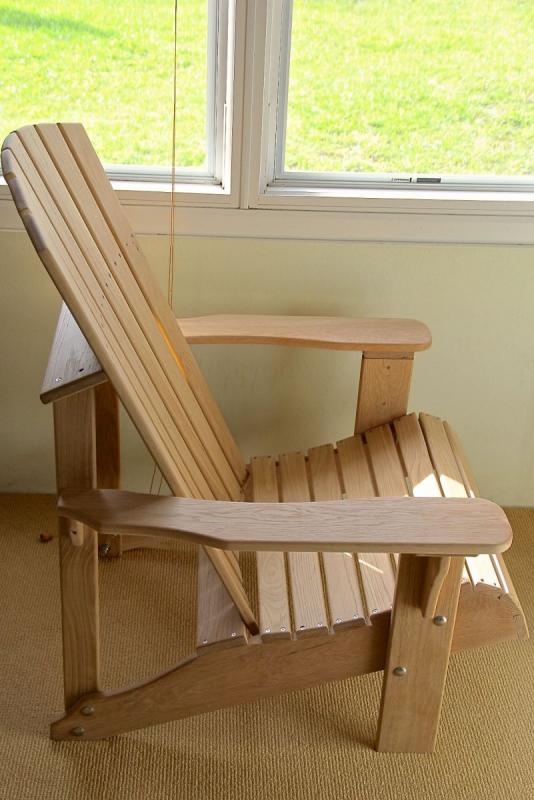
And remember this: there is no more important safety rule than to wear your safety glasses and hearing protection at all times. Now back to the project at hand: After getting acquainted at The New Yankee Workshop, Abram and I first inspected the original Adirondack he built, one based largely on a design his father had used years ago.
It had weathered well and withstood the elements for more than a decade in continuous outdoor duty. He explained it was made from cypress, an excellent choice for outdoor projects, and he had laid in a supply for our new chairs.
This copy had some notes about minor modifications Abram intended as improvements. The last thing we did before cutting wood was review several templates he made for the original chair and saved throughout the years.
We used these patterns for the curved parts. Drawings for these are included as part of the project plans presented here. If you begin the project by preparing the patterns and stock to the rough sizes the building will move along pretty quickly. We completed our chairs in less than a day while working at a steady, but moderately easy, pace. Cut both chair side pieces at the same time by nailing them together in a waste section of wood.
Band saw to the template line then sand the edges smooth. Essentially, this chair is built from the ground up so the first pieces required are the two side members that slope back from the front, vertical legs. Use the pattern to trace their shape on the stock, then cut them out using the band saw. Abram suggested we nail the two sides together at the ends in the waste material and stack cut them both to save some time.
Then we drum-sanded the sawn edges to smooth the surface. Next use a gauge block and a miter saw or table saw so you can repeat the same length cut exactly for the lower rear crosspiece, the front crosspiece and the seat slats.
Use the pattern that provides the curved shape of the lower rear crosspiece. After band sawing, sand the edges smooth and be sure to set the waste piece aside for later use. Start the assembly by gluing and screwing the lower rear crosspiece to the chair sides. For lasting results, use a marine grade or waterproof glue, and stainless steel screws. The first assembly chore is joining the two sides with the front and lower rear crosspieces.
The crosspieces overlap the sides and care should be taken that the ends are flush to the outside edges of the sides. This will help keep your chair square as you build. The chair parts are assembled using mostly screws, or in a few instances, carriage bolts, nuts and washers. These are more expensive than coated or plated fasteners, but in the end are a far better value.
We also used outdoor adhesives. Abram used 3M brand Marine Adhesive Sealant Because my chair would be shipped to the Popular Woodworking shop in Ohio, I just screwed my parts together so it could be disassembled and more easily shipped. All screw holes should be pre-drilled for a couple reasons; to prevent splitting by drilling a pilot hole and to countersink sufficiently to accept a wood plug later.
We used a bit that drilled the hole and counterbored for the plug in the same operation. Set up the two sides on the bench and first attach the lower rear crosspiece. Clamp the legs in position before drilling. When locating the bolt holes, arrange them in a triangle as shown in the diagram below. Following the diagram carefully prevented me from placing a hole where a screw for the front crosspiece might be located.
Attach the legs with the carriage bolts, heads to the outside. When tightening the nuts, prevent the head from turning by first seating the bolt head with a hammer blow, engaging the square corners underneath the head in the wood. Bolt the legs and side members together, bolt head to the outside with a nut and flat washer inside.
Seat the square shank below the head with a hammer blow. The shank will prevent the bolt from turning in the hole. The next parts to prepare and attach are the arms and arm brackets. The instructions cover sizing materials, cutting out the parts, final shaping, sanding, finishing, drilling, and assembly.
This canvas-backed deck chair is designed to be especially accommodating. The builder engineered it to be easy to disassemble. All the parts can be stored in a handy travel bag so that when you go camping you can assemble this chair for use around the campfire. This style of chair is sort of a chaise lounge interpretation of an Adirondack- style deck chair.
The designer provides instructions- including a cut sheet that helps you figure out how to cut the armrest, design the front legs and brackets, build the bridge cross support, construct the back fan and assemble the back brace, slats, and front legs. This is another pallet wood all-weather project.
The builder says that most local businesses are fine contributing the wood as long as you ask them first. He does recommend that you select unbroken pallets because you will need longer bases to construct the legs. His guide includes some common safety protocols, instructions for laying and cutting out the seat frame, assembling the seat back, building out the seat slats, finishing the chair back, how to mount the armrests and chair back and images of the finished product.
To protect the wood, he used a Kilz sealer after employing a belt sander to create smooth curves. This 2 position, arm-less, Adirondack beach chair is another popular plan. It has an upright locked position and a reclined position. So it can accommodate you if you are socializing by the campfire or want to settle in for a nap in the shade.
The builder says he was looking to construct camping chairs, and ultimately purchased the plans from Etsy and created the Adirondack chair you see in the image above. The buyer limited himself to using hand tools because his power tools were temporarily inaccessible-in particular he employed a Japanese pull saw and a hand operated drill to get a majority of the work done. Another unique option is this stylish deck chair.
His plan lays out all of the materials and tools he used. That includes how he disassembled his antique, rusted lawn chair and adapted an existing DIY instruction plan to create this attractive converted Adirondack lawn chair. The Canadian Home Workshop provides instructions for building this unique rocking, all-weather, Muskoka chair. They provide a template with additional resources outlining the instructions, tools and materials and plans to guide you in constructing this unique chair.
This dark brown Adirondack chair is inspired by polywood furniture. It is an inexpensive build designed to be both comfortable and stylish in your backyard. Lowes provides instructions for this low-lying Adirondack chair with attractive of the colored back slats and seats.
This handsomely varnished, scrap material Adirondack chair is a rustic take that has an angled back seat and cantilevered arms.
The slats can be purchased from wood shops, purchased in bulk for cheap. This redwood Adirondack chair plan provided by GetRedwood. Some unique features include the extra large armrests, the rounded wooden slats and the comfortably slanted back.
They designed this chair plan to harken back to the 19th century when these chairs were a mainstay of summer camping retreats and lakeside cabin lawns. This Old House contributes an Adirondack chair a plan. It is a spacious, white-picket style, reclining option with an attractively fanned back and wide armrests built from weather-resistant lumber.
Their design is pretty simple and they emphasize the integrity of its structure. The simple and intuitive instructions guide you through how to assemble the base, build the seat, make the back, attach the arms and attach the slats. This pallet-built Adirondack chair is an especially easy to build option. The materials include scrap wood, sandpaper, a drill, a random orbital sander, and screws.
This orange-stained Adirondack chair is provided by ExtremeHowTo, from Birmingham, Alabama denizens, who enjoy basking in the outdoor sun of their backyards.
The planners say that they decided to build this spacious seat because their family kept increasing in size. These cedar lawn chairs are the outcome. One is a single seater and the other is bench-style double seater.
As opposed to the plastic traditional Adirondack chairs are manufactured from, these cedar DIY options are an attractive alternative, especially if you are handy.
Family Handyman provide instructions for building an Adirondack chair as well as a matching love seat for more spacious accommodation. If you enjoy lounging outdoors, basking in the sun while reading your favorite local newspaper, you also will be pleased to discover that the extra-wide chair arms can hold your beverages.
They recommend you build this Adirondack chair from pressure-treated, un-knotted lumber. They comment that while wood furniture is traditionally built from teak or cedar, you can get by with treated boards purchased from a lumberyard or your local Home Depot. You should also perform some measurements to ensure that they are dimensionally consistent.
The YellaWood double Adirondack chair is another unique option that features back splats and contoured seats. Perfect for married couples who want to enjoy their golden years in their spring garden or relaxing on their porch. The woodworkers confide that to do this plan right will take you around 14 hours. The assembly and planning instructions include a robust parts list, cutting diagrams, three-dimensional assembly diagrams, step-by-step instructions, and a foot rest plan.
The two chairs share a table between them. They advise prospective builders that constructing the whole thing will take the weekend. It employs common handyman tools that you likely already have lying around your garage. These chairs feature wide armrests, a rounded backrest, angled supports and a slatted seat built from cedar. The instructions also provide guidance for building a footstool with boomerang-shaped feet to make it sturdy when you kick your own feet up.
This option is provided by Popular Mechanics and built by an Instructables user who says that they used cedar wood, with pine as an alternative.
Another Adirondack rocking chair option, this Chiefs-Shop option requires a table saw , miter saw, jigsaw, compass, belt sander, driver, pocket hole jig, clamps and a square to build.
Instructables provides DIY instructions for a pallet Adirondack chair with a minimalist look. He encourages people who follow his plan to modify it to the way you like- you can fan the back, add attractive curving to the seat, and either increase or decrease its size depending on your needs. Black and Decker provides plans are for this option. They recommend them as elegant and attractive chairs- a must have if you have a spacious patio, porch or deck.
They have designed this to be a particularly simple to build option- saying that there are not any difficult compound angles to create and no intricate detailing required. You can choose different colors with the most popular being forest green and a battleship gray. They emphasize how simple it is and how basic the materials are. They recommend installing this garden chair in your backyard, saying they look particularly stunning on decks and patios.
They walk you through how to create the back legs, create the front legs, assemble them, build the front apron, attach the front apron as well as how to construct the seat slats and assemble the whole thing together. This generously proportioned and laid-back option is advertised as an intermediate to an advanced level project, though ambitious beginners could probably get it done, as well.
Before you begin working on it, they say, it sometimes makes sense to consult a more experienced woodworker, as well as studiously scrutinizing all of the instructions. They also emphasize safety, telling prospective builders that you need to wear safety goggles and employ a respirator, especially when dealing with thinners or sawdust in the air. They say this is ideal for beginners as well as more advanced woodworkers who want a weekend project.
Featuring a classic recumbent design, the armrests are wide enough to function as beverage coasters. Make sure you have common household woodworking tools available. It often makes sense to invest in a miter saw as well as a sander to expedite the construction process. This attractive Adirondack chair is complemented by weather resistant cushioning that makes it a comfortable lounging option on verandas as well as in gardens.
Org follows the Lowes Adirondack chair build with their own unique spin on it.


|
Wood Work Quotation Sample 01 Belt And Disc Sander Sydney Tools Key |

SUPER_PUPER
13.12.2020 at 20:42:56
NIGHT_HUNTER
13.12.2020 at 22:49:24
Rena
13.12.2020 at 16:19:51
iblis_066
13.12.2020 at 12:11:40