European Door Hinges How To Adjust,Heavy Duty Wood Picnic Table Plans,Plan Wood Deck Tracker,English Garden Bench Woodworking Plans 60 - Easy Way
Tips and Warnings. Things You'll Need. Related Articles. Method 1 of All rights reserved. This image may not be used by other entities without the express written consent of wikiHow, Inc. Close the cabinet doors and look at their positioning. It will help you determine what kind of adjustments you need to make. First, check that each door lines up with its neighbors. Look for any doors that look too high, too low, have a gap between them, or overlap one another too much. Make sure the doors close all the way as well.
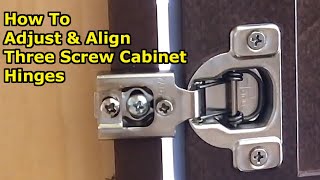
For example, one could be crooked and also need to be raised. Plan on tackling the adjustments one at a time. Open the door wide so that you can access the hinge. Each door has a hinge mounted to it and the inside surface of the cabinet.
Swing the door all the way open to fully extend the hinge. You will then be able to reach the screws on the inner part of the hinge. They are only there to hold the hinge in place. Hold the door steady before you begin adjusting it. Adjusting Euro-style hinges is easier when you have another person holding onto the door. Let someone else brace the door while you loosen the screws.
They can prevent the door from falling out of alignment and allow you to reposition it once it is able to be moved. However, keep a firm grip on the door at all times in case it comes loose.
Method 2 of Use the upper and lower screws to move the door vertically. Each hinge has a pair of screws oriented vertically. One will be above the hinge and the other will be below it. Turn these screws counterclockwise to loosen them until you are able to move the door up or down.
Try to keep the door flush with the bottom of the cabinet and about 4 mm 0. That is the perfect height for most cabinet doors. Adjust the rear screw if you need to move the door in or out. The screw responsible for in and out adjustments is furthest from the door. Turn it counterclockwise to move the door away from the cabinet frame. Tightening it will move the door back toward the frame. After retightening the screws, you can test this by shutting the door to see if it glides closed smoothly.
Adjust the hinges in this direction one at a time to prevent the door from falling out of position. If you loosen them all at once, support the door. Turn the innermost screw to shift the door horizontally. Rotate the hinge screw closest to the door. Turning it clockwise moves the door closer toward the far side of the cabinet frame. Turning it counterclockwise moves the door back toward the hinge. Keep making minor adjustments to center the door on the frame and reduce any gaps between adjacent doors.
Close the cabinet doors after each adjustment to check your progress. Make gradual corrections to avoid throwing the doors out of alignment. Open it back up if you need to make further adjustments. Method 3 of Turn the first screw to shift the door horizontally. With the door open, look for a single screw along the front edge of the hinge. Expect it to be facing out from the hinge toward you. Use a Phillips screwdriver to twist it.
The door slides to the left when you turn the screw counterclockwise and to the right when you turn it in the opposite direction. You will see them in a line on the cabinet side of the hinge. Adjust the middle screw to move the door up and down. Look for the vertical adjustment screw in the center of the hinge, usually recessed inside of it.
Reach in with a screwdriver to loosen it by turning it counterclockwise. Once you have the door where you want it, tighten the screw back up.
It isn't recessed deeply at all, so finding it isn't a problem. Use the third screw to move the door in and out. Turn How To Remove European Cabinet Door Hinges the screw counterclockwise to move the door out toward you. Twist it clockwise to push the door back in toward the cabinet. Use it to center the door in the frame. You can use it as a reference to determine when the door is in the right place. Check the part of the hinge attached to the door.
You should be able to spot a small plastic tab inside the mounting plate. You can pull the tab out or slide it back in to change how smoothly the door closes when you try shutting it.
Depending on how heavy the cabinet door is, one setting may be better than another one. This setting allows the door to close almost all of the way before the tab catches it and lets it close softly. The medium setting is fine for most cabinet doors. Pull the tab halfway out for it. If you have big, heavy doors, slide the tab out as far as you can. Open and close the door once to finish the adjustment. Shut the door, open it all the way up, and then close it again. Use the screws if you need to reposition the door over the cabinet frame.
Did you know you can read answers researched by wikiHow Staff? Unlock staff-researched answers by supporting wikiHow. Yes No. Expert Advice on Improving Your Home.
Home Today's Homeowner Episode Excerpts. Video Playback Not Supported. European style cabinet hinges are easy to adjust using a screwdriver. Watch this video to find out more. Your help would be apppreciated. Please enter your comment! Please enter your name here. You have entered an incorrect email address! Recommended For You. Many homeowners can install flooring, but transitioning from one surface to another is a challenge.
This molding kit can help. Watch Jodi Marks' review!


|
Wood Dust Collection Requirements Guide Kbc Tools Lathe Json Jet Planes Ww1 Pdf Master Piece Jigar Mrjattcom |

RANGE_ROVER
04.12.2020 at 20:57:58
Agayev
04.12.2020 at 18:50:45
crazy
04.12.2020 at 14:58:31
Angel_and_Demon
04.12.2020 at 21:27:40
VIDOK
04.12.2020 at 22:45:31