Diy Shaker Cabinet Doors Router Qq,Woodworking Plans Subscription Price,Best Electric Wood Carving Tools Pc - Review
Next, I cut the wood for the center of each cabinet door. I created these pieces from plywood. I measured the inside of each individual frame and then cut the plywood to the necessary length and width with my table saw.
When the cuts were complete, I was ready for glue. To attach the plywood centers to the pine frames I simply added glue to the routered edges and spread it around with a brush.
Then I placed the plywood center board into the frame firmly and let it dry. I continued this process until all of the cabinet doors were complete. Now it was time to add the finish to the doors. Depending on your individual design, you could either paint or stain them. I chose paint. Then I primed and painted the front and back of each door. I'm very pleased with the way these shaker style cabinet doors turned out. It was an easy project that can be adapted to fit furniture, bathroom vanities, and kitchen cabinets.
By building your own shaker style doors you could actually update your entire kitchen by simply removing the old, dated cabinet doors and replacing them with these. I hope you found this tutorial helpful and that you'll give it a try.
Measurements really depend on the openings you need. I also have a video on my Youtube Page that explains a bit more in detail of the process. I want your workshop and the tools! Great job. Love the color. Thanks for sharing you project. This is not the usual step by step instructions because I did not record this project because it was I always say one woman's trash is another woman's treasure when it comes to finding great furniture.
Grab some Elmer's glue and craft paint for this one of a kind cabinet update! Check out the video for Hi everyone. I made a cool colorful wall hanging idea in this video. I really love wall hanging Floral anything is so perfect for Spring and Easter decorating! These gorgeous cottage floral eggs Here are our best tips to install and stain a new front door, which will give your curb appeal a Oh yes!
Used 2 old doors, 4 windows, old hardwood flooring and scrap plywood. Cabinet doors are easy to find, either for free from someone remodeling their kitchen, or at salvage I bought this old cabinet door Diy Shaker Cabinet Doors Router V2 at a store and it sat a long time waiting for inspiration. My friend Two years ago I transformed my kitchen cabinets from a dated-oaky color to a dark espresso finished I'm so thrilled with the results of our painted kitchen cabinets.
It's so worth the labor if you are My husband and I love a good challenge, especially when it comes to bringing an old piece of In my last house, I painted my kitchen white and shared a tutorial on the best way to paint kitchen When we moved into our house we knew that we would want to eventually change up the kitchen that I love refinishing jewelry cabinets!
Since it's a feminine piece, I can do a feminine design, which Hi everyone! I got a message one day from a former coworker if I'd be interested in a couple pieces If you rent, you know there are limited with options at times to make a space your own. If you I absolutely love the way caning looks on furniture it just gives the piece such a coastal feel and The Hubs and I have been doing a few projects around the house on his days off.
We also gave our Are you looking for some creative chair makeover ideas? Then you have come to the right place! Anyone who cooks and has ever used a cookbook stand knows how nice it is to hold up your recipe book Do you ever wonder how to achieve the look of multiple layers of paint, with colors peeking thru the In this tutorial, you'll learn how to build a DIY window bench.
The bench could also be used as a At this time of year, when everything outside is still cold and wintry, I feel the need to add I just ordered some beautiful real touch tulips. They are beautiful and really look and feel real! These cake stands are a super easy and quick project that will look so cute in your kitchen, are a Starting seeds can seem like a daunting process but once you get yourself organized and chart it all Get your DIY pants on my friend, it's time for a 20 minute project!
This super duper simple mason I had two gorgeous baskets If you are looking for a unique and fun way to dye Easter eggs with materials you already have at Sign Up Sign In with Facebook. Cut Wood for Frame I started this project by measuring the openings on my desk that I needed to cover.
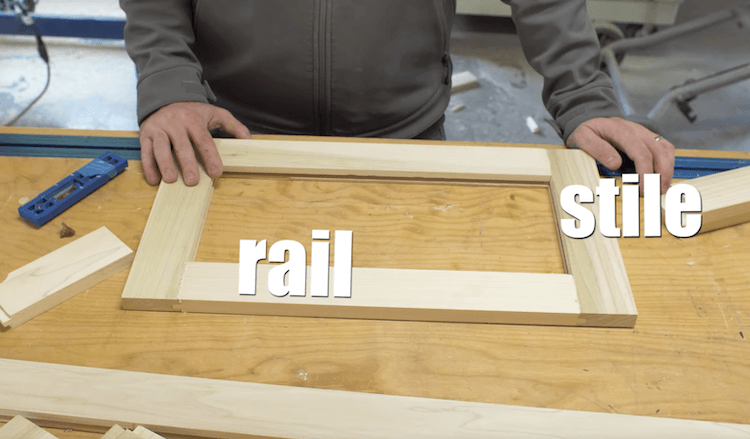
Add Biscuits I took my biscuit joiner out and used it to create slots at each end of the wood pieces, so they could be joined at the corners. Router the Edges Shaker style cabinets have a recessed panel on the front, but are flat on the back.
Cut Wood for Center Next, I cut the wood for the center of each cabinet door. Glue Wood Centers to Frames To attach the plywood centers to the pine frames I simply added glue to the routered edges and spread it around with a brush.
Sand and Paint or Stain Now it was time to add the finish to the doors. If you enjoyed this DIY and know someone who might like it as well, why not share it with them! Pine Boards See More. Plywood See More. Any price and availability information displayed on [relevant Amazon Site s , as applicable] at the time of purchase will apply to the purchase of this product. Hometalk may collect a small share of sales from the links on this page.
More info. Top Hometalk Projects. I thought it would be worth trying something new and see what works better. Since these doors are also inset into the face frame, I also used this opportunity to try a new technique for setting the inset gap. In the first video, I just built the doors to the finished dimensions, which was a challenge. In this new version, I built the doors a bit larger and shaved them down to the final size.
It ended up being much easier than I thought. If you stick around, I'll teach you how to add value to your home by trying some challenging home improvement projects just like I did. You can learn more by starting here. Privacy Policy Terms of Use Disclaimer. Toggle navigation.


|
Diy Shaker Cabinet Doors Kreg Jig Instagram Surface Mounted Bed Rail Brackets Guide |

Ramincik
12.02.2021 at 11:58:11
Blatnoy_Paren
12.02.2021 at 15:18:12
PredatoR
12.02.2021 at 18:29:19
shekerim
12.02.2021 at 19:10:45