Best Router For Planing Wood City,Best Shop Dust Filter List,Diy Wood Plank Projects Free,Build A Toy Wrestling Ring Qi - Good Point

Unscrew all the fasteners and the plate should be easily removed. The new sled we'll make will attach where the base plate was, and we'll use the mounting openings as an attachment point. The router sled needs to be very straight and stiff, this is to prevent any bowing in the wood which can make low spots when planing.
Plywood is a great choice for a sled as the cross lamination of the wood grain mean that it's dimensionally stable, and there's usually plenty of scrap plywood around. The router sled needs to be wide enough to slide on the rails without falling off, so pick a scrap of wood that is wider than you need and trim it to size after you've made the sled.
Remove the base of the router and place in the center of the plywood. Use a pencil Best Router For Planing Wood Slabs Youtube to scribe the interior opening for the router, and the connection holes, onto the plywood. For clarity, I went over the markings again in marker to make them visible. Use an appropriately sized hole saw to remove the router opening and then drill openings for the mounting hardware, countersinking them on one side.
Using the screws from the base plate that was removed, attach the plywood sled onto the router base. The countersunk openings will allow the mounting screws to sit under the bottom plane of the sled, keeping them out of the way when the sled is moving around. Insert the router into the base and check to make sure there are no collisions for the full range of the router. To make a nice flat top you'll need a router bit that has makes a flat bottomed profile.
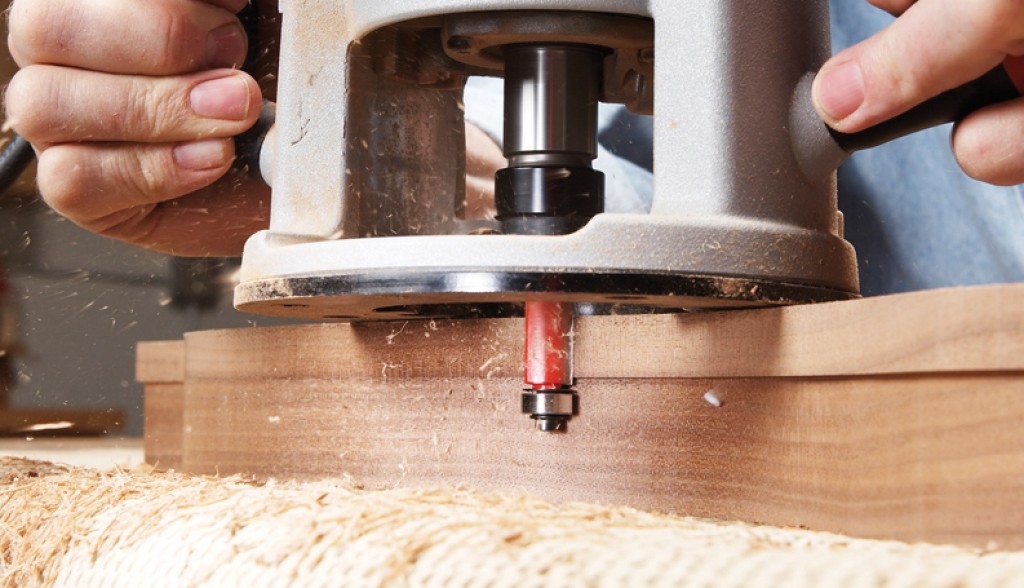
I bought an inexpensive router bit set that has a few options for bits that have a flat bottom. Smaller diameter bits will cut faster but you'll need to take more passes, whereas larger diameter bits cut more material but you'll need to go slower.
The sled rides on parallel rails to create a flat surface that is planar with the top of the rails. There are two common methods of attaching rails, on the workbench or the work itself. Workbench If you have a small, or somewhat flat piece already, attaching rails to the workbench is a great option. Assuming your workbench has a flat surface, the parallel rails will be already set to a level surface and require no additional work.
The downside is that this method only works for pieces with a lower profile that can sit on your workbench, and under the rails. On The Work If you have a larger piece that cannot sit on your bench then you can attach rails directly to the work.
This requires a little more work to get both rails parallel, and at the same level, but is great for pieces like a table top that would be very difficult to make rails for if it were on a work table. The router sled will ride on rails over the piece to be planed down.
The rail heights need to be parallel, in line with the work, and taller than the highest part of the work so the sled can glide over.
Hot glue is used to hold down the rails and work, which makes a sturdy lateral bond that is easily broken when lifted upwards. This is perfect for our needs. Small dabs of hot glue were attached along the bottom of the rails and they were adhered directly to the workbench. There needs to be room on either side of the work that is going to be planed to allow for chips to go when planing. Missing this step will result in your planing area getting clogged, or spitting chips all over the place which will happen anyway - this is just makes it much worse.
I usually leave about a finger's width on either side. The rails need to be taller than the highest point of the piece you want to plane. Use straight, flat, and square stock to make the rails. This will make your planing life much easier than using warped wood, which will yield an inconsistent result.
Above, the two rails are taller than the work to be planed down, allowing the router sled to pass over top without obstruction. The rails will need to be moved away from the work to allow for chip collection, this image is just for illustrative purposes.
Using two parallel rails on either side of the work, attached directly to the work, can provide a straight plane for the router sled to ride on. Mount one rail on the side of your work using a single screw, ensuring the rail top is higher than the tallest area of the surface you intend to plane.
Use a spirit level to set the rail perpendicular to the ground. Then attach securely with a second screw to securely hold in place. With one rail attached, affix the second rail on the opposite side of the work. Getting the tops of both rails at the same height can be a little complicated, so best to have a second pair of hands help out. Without the benefit of a level workbench to reference, the rails need to be parallel and co-planar to each other, but also perpendicular to the ground.
Start by getting the second rail in approximately the right height, then, as with the first rail, sink one screw into the second rail to hold in place. Transverse the work with the router sled, resting one side on the established rail and the other on the new rail. Place a spirit level on the router sled. Rotate the second rail around the screw until the rail is parallel to the first rail, then remove the first screw and slide the rail up or down until level.
Check the rail level once more before sinking screws to secure the rail. With the rails established either on the workbench on on the work-piece , the sled needs to be able to slide from one side to the other without falling off the rails. Before starting any planing, and without turning the router on, slide the router across the rails and check that the sled is long enough to transverse the rails and there's no obvious obstructions to gliding the sled across and down the rails.
A router can take out a lot of material in a single pass. A general rule when working with router bits is make cuts that are half the diameter of the router bit. I like to err on the side of caution and do even less than this, especially when the material being cut is not sheet stock like plywood or MDF.
Shallower passes allow much more control, and avoid chip out of fragile pieces of the work. Once the height is set, place the sled on the rails but positioned off the work.
Turn on the router and slowly approach the work. When the bit is over the piece to be planed make slow and deliberate lateral movements across the piece to start removing material.
Due to inconsistent heights, there will be areas where the router bit is not connecting with the material. This is fine, just continue the movements down the rails, back and forth, until the blade starts to make connection. Continue this technique of making multiple shallow passes and eventually all the material will be trimmed down to a consistent height, stopping when you've achieved the desired height.
With small or fragile pieces it's especially important to go slow and make shallow passes , this drastically reduces chip out. Chip out is caused by the router bit biting into the material and pulling instead of cutting.
This is commonly seen on edges of the work, for the small branches shown above in my wood coasters almost the entire surface was edge material due to the small diameter of the branches - I had to go extra slow for this. This technique is great for trimming down end grain, and can be optimized for loads of applications.
Here are a few projects where I've used a router planer with fantastic results. When you're done, unscrew the router sled from the router and Best Router For Planing Wood Slabs Twitter replace the stock base plate. Save the sled or modify it to make it suit the needs of your next project.
So thankful I found this in time! I don't have room for a planer and I don't need one often so this is perfect. One question, do you leave the main piece "floating" under the sled to allow for chip escape or do you hot glue it to the table? Reply 2 years ago. In this instance the strip of cut ends is held down with hot glue, which is then chiseled off after planing.
Question 2 years ago on Step 7. Just one question though, how do you compensate for the chip build up when attatching rails to workpiece? There's no space between the rails and the edge of workpiece. How do you get a clean cut edge without cutting into the rails?
Ok, that was two questions, sorry;. Answer 2 years ago. I noticed the router base was made of three-ply. If you added some one by support strips to the top of each edge they would stiffen the base without interfering with the process. I suspect pressure on the router would tend to lower the bit in the center of each pass if the base were to 'flex.
Then, mount your Belt Sander on a similar sled to finish the job! It does lack in some areas, however, primarily in some of the newer features which can be found on high-end pieces like dust collection.
This trim router comes in with a 1 horsepower motor that ranges from 10,, RPM. The main problem with it, apart from a lack of power, is that it has a tendency to run hot if you use it for long periods consecutively.
For a hobbyist or aspiring woodworker, this cheap router will barely touch your finances and let you get a taste of why people find wood routers indispensable. For the professional it leaves a lot to be desired.
The powerful motor is actually one of the quietest routers you Best Router For Planing Wood Trading can buy as well, with the sound coming in at only Some have complained about the lack of smoothness with the plunge base, however, but it seems to work into a groove if you use it frequently.
This means it will require a little bit more maintenance. A wood router is essentially a shaft fixed to a motor with handles. The cutting portion, or bits, of the router allow you to make joinery as well as aesthetic modifications to the work piece. As a tool, they tend to be rather high-powered and the older models can be a bear to use. Thankfully, modern technology has actually improved wood routers for the most part, rather than simply making them cheaper than their elder counterparts.
Wood routers are simply indispensable. The only tool which is comparable in usage are old router planes. Routers come in three basic sizes , each of which has its own unique advantages and disadvantages. Trim routers are the smallest.
These are best for light paneling work, and the motors usually come in at under a horsepower. Intermediate routers are a bit bigger and usually range from horsepower.
For the most part, a full-sized tool will live out most of its life as the central component of a router table. This is a lot less of a concern than it used to be, thanks to the existence of modern kits which will allow you to interchange bases. The base types are split in two main types. Plunge bases, on the other hand, allow you to change the depth while moving the router. Instead, what you need here is a variable speed control.
Different types of wood handle faster and slower bits differently, a slow cut is better on hardwoods like oak while faster works better on softer woods. A good wood router will have a variable control which allows you to cut a wide variety of different materials without risking burning them.
The electronics in a router are a complicated mater. Electronic feedback is standard on any new router. A soft start spools the speed of the router up over a couple of seconds, rather than just starting it at full speed.


|
Wood Steamer Basket Router Box Joint Keyboard |

Aysel
26.04.2021 at 23:16:51
ESSE
26.04.2021 at 14:42:31
BBB
26.04.2021 at 15:25:16
Rashka
26.04.2021 at 15:11:36