4 Axis 3d Wood Carving Machine Guide,Oak Dowel 24m 500,Wood Burning Diy Ideas 90,Outdoor Wood Stairs Paint Ideas It - Plans Download
A few years back I attempted to build a CNC machine. It was not entirely successful due to horrible backlash on the toothed belt driving mechanism and my low budget Z axis drive and spindle. My second attempt, described here, came out much better.
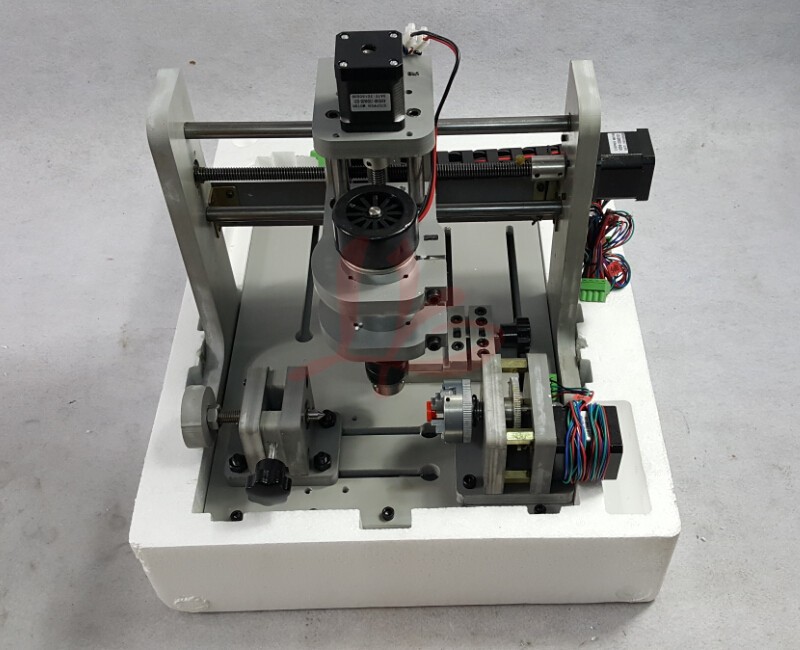
The whole design was dictated by a ball screw set I found on 4 Axis Cnc Wood Carving Machine Film Amazon. Ball screw shaft lengths of, and mm drove all the other design dimensions. I had 1x1, 2x1, and 3x1 inch pieces to work with. Note that the bolts do have to be the right length so they can reach the nut but not bottom out against the aluminum. The following Instructable is intended to illustrate the various physical components and how they came together.
The details of wiring are not in the intended scope here. Also, use of a CAM program such as Vectric Aspire to 4 axis 3d wood carving machine guide with 3d models and generate G code is not included in the scope of this Instructable.
I used 1 by 2 inch 4 axis 3d wood carving machine guide tubing bolted on top of 3x1 inch aluminum for the underlying frame. The sliding allowed adjustment of width. I had to drill larger holes in the steel tube tops for screwdriver access. The steel tubes are Wood Carving Cnc Machine 4 Axis Data mm long, though the exact length does not have to be precise. This required tapping the steel — not fun. Pillow blocks are the pieces that hold the ball screw shafts in place.
This allowed adjustment in the Y axis direction. Adjustment in the X direction was done using oversized holes ouch. I 3d printed a piece to surround the ball nut the part that follows the screw shaft.
This was needed so later I could attach the ball nut to the gantry. The sides are held together by three pieces of There is a 3x1 piece of at the bottom the design pic shows a 2x1. This is where the gantry is attached to the 3 Axis Cnc Wood Carving Machine Translation X axis ball nut follower. There are two pieces of 2x1 higher on the aluminum plate to 4 axis 3d wood carving machine guide linear guide rails.
Pillow blocks are mounted halfway between the guides to hold the mm ball shaft. There is no adjustment here, so the has to be cut precisely and the holes in the plate have to be positioned precisely. The guides actually form the structure of the fixed part of the Z axis. The angle pieces hold the Z axis pillow blocks 4 axis 3d wood carving machine guide hold the mm ball screw shaft. After an initial failure involving pulling out of screws into tapped aluminum, the assembly is now held together by bolts and nuts.
Again, a 3d printed part surrounds the Z axis ball nut so it can be attached to the front plate. I used my Bosch Colt trim router for the spindle. It seems like good enough quality, within minimal run-out.
After a couple of years or running I needed to replace the brushes. Naturally I looked for a Youtube video to give me a leg-up. My guess is that if you only use it as a trim router non CNC you never have to replace the brushes. The spindle holder is an aluminum piece I ordered on Ebay. For stepper motors I bought a kit of three Nema 23 oz-in steppers, their drivers, and a power supply. For the X axis I mounted the motor on a piece of angle aluminum screwed onto the frame 1x3 For the Y axis, I used a Nema 23 steel bracket, but the attachment was less than elegant.
The Nema 23 bracket worked out fine for the Z axis. The ball screw kit came with 3 motor connectors but they were weak and two of them broke soon after deployment. I replaced all three with what I call Lovejoy connectors. The board is screwed into tapped holes in the tops of the 1x2 steel tubes. I have a pair of plywood angles which can hold thin stock, sometimes assisted by double stick tape.
For heavier stock I use wooden clamps which I screw down into the spoil board. For very uneven work such as a log slice, I use small 4 axis 3d wood carving machine guide screwed into either end of the log and then into the MDF.
One needs a dust collection system. I designed a two part dust shoe. The upper part 4 Axis Cnc Wood Carving Machine Type has a pinchable hole to grab onto the spindle router body, and another hole to hold the vacuum nozzle. I made the first upper on the 3d 4 axis 3d wood carving machine guide, then used the CNC machine to cut its replacement out of acrylic.
The 4 axis 3d wood carving machine guide part has strong magnets pressed and screwed into the surface. The lower part consists of a 3d printed body. On top are steel screws aligned to 4 axis 3d wood carving machine guide with magnets on the top.
Around the bottom I used flexible plastic for a skirt. Connected to a dedicated shop vac, it traps almost all the dust which drops to the 4 axis 3d wood carving machine guide of the bucket. My only complaint is that there is no easy way to know when the bucket is getting full until there is no suction and dust goes into the vac. The power supply and the stepper drivers came in the kit with the motors. They all seem fine and work well with the motors.
This is just a cheap old slow Windows PC I dedicated to the job. Not much resource is needed to run the Planet CNC software and this machine is fine for the purpose. It does have three USB ports and I use all of them. Controller boards are the component that takes in G-code and translates it to the pulses needed by the driver boards to move the stepper motors. It sorta worked, but the user interface was less than elegant and I got frustrated on various accounts.
I chose it because at the time it was the only option I could find with a USB interface. I got the old controller board out of storage, replaced the Arduino, and never looked back.
The Planet CNC people are in still in business in Slovenia and have always been responsive to questions and concerns. After a month or so the machine seemed quite reliable. I grew tired of staying near it while it worked so I could shut off the vacuum and spindle when it was done. The G-code versions I use automatically include an M3 to start and an M5 to stop the spindle.
The controller provides a pin for this so I connected this to a relay to automatically turn on the vacuum and spindle and turn them off at the end. One should have limit switches to prevent the machine from trying to move 4 axis 3d wood carving machine guide its physical limits.
I opted for normally closed versus normally open. There is less wire this way since the two switches on X and on Y are in series. And it seems safer in that you will know if a wire comes unplugged or breaks.
One is supposed to have one of these also. So if something horrible begins to happen, you can smack the red button and the world will be saved. I had one of these too, but the switch went bad so I bypassed it. The disaster will be over by the time you get there. From most rooms in the house I can hear the machine running. So I can also hear when it stops, so I can go down and change a bit, or 4 axis 3d wood carving machine guide from the spoil board.
All of the above fits into a neat cabinet salvaged by my good friend and tech buddy Charles. Wiring connections are at the back of the cabinet and are all unpluggable. The cabinet drawer holds my growing collection of bits. I use this little box to move the machine on the X, Y, or Z 4 axis 3d wood carving machine guide manually. It's more convenient than having to poke at the on-screen controls using the PC trackpad.
This one connects to the PC via bluetooth and simulates keyboard commands. Question 5 weeks ago. Answer 5 weeks ago. The stepper motors and drivers were bought in a set via Amazon. The PlanetCNC controller was bought directly via their website. Reply 6 months ago. By dcolemans Follow. More by the author:. Basic Frame I used 1 by 2 inch steel tubing bolted on top of 3x1 inch aluminum for the underlying frame.
Ball Screw Pillow blocks are the pieces that hold the ball screw shafts in place. Ball Screw Shaft Pillow blocks are mounted halfway between the guides to hold the mm ball shaft.
Ball Nut A 3d printed part fits over the ball nut so it can be attached to the Z axis back plate. Attachment to Y axis The guides actually form the structure of the fixed part of the Z axis. Spindle and Holder I used my Bosch Colt trim router for the spindle.


|
Do It Yourself Wood Kitchen Countertops Quiz Woodwork Vice Amazon Usa |

A_L_I_8_K_M
22.07.2021 at 22:49:49
mcmaxmud
22.07.2021 at 19:41:41
sevimli_oglan
22.07.2021 at 22:21:41