Woodshop Design And Build,Best Wood For Turning Bowls Uk Llc,Mini Cnc Wood Engraving Machine 01,Miter Clamps For Countertops Inc - Step 1
When planning your workshop layout, be sure to leave space for these all-important products. Because workshops are rough and tumble places, the right fan for the job will have an industrial-strength motor and adjustable fan speeds. Easy-to-clean metal blades and a fully encased motor housing are also important features, especially if your shop tends to fill up with sawdust, wood chips and other fine debris.
That extra layer of protection will help the fan motor last for years instead of being damaged by particulates. High-velocity fans are also an important tool in their own right, particularly at your finishing station. Increased air flow will help dissipate fumes from paints and sprays for your safety, and you can train a fan on your project to help paint dry more quickly between coats on humid days.
To get the most out of your fan, look for floor fans that are easy to aim or wall-mounted fans that will save space in smaller shops. If you live where summers get hot and humid, you may need more than a fan to keep cool in your workshop.
Instead of a residential window unit, consider a freestanding portable air conditioner that you can use as needed on hot days. Instead, choose a model with a low profile that you can tuck under a table or against a wall when not in use — a model with casters for maximum maneuverability is ideal. Choose a high-powered unit that will condition at least square feet of space and move it where you need it for maximum comfort as you work.
A good portable air conditioner will also remove excess water from the air, which is critical for keeping your stockpile of wood in good shape. Other good features to consider include a thermostat and variable settings that allow you to set your workshop temperature to the perfect level for your comfort.
Just as a shed or garage can get stifling in the summer heat, winter cold can also make working conditions difficult — if not impossible. To prevent clumsy, stuff fingers from ruining your projects, you need a way to heat your workshop in even the most extremely frigid days of the year.
Enter the garage heater. A well designed garage heater will offer at least 5, watts of heating power — enough to warm square feet of space.
In addition to sheer power, look for a model with a built-in thermostat so you can set it and forget it. A good garage heater will mount to the wall or ceiling to save space and will come with a durable housing and full safety screen to keep dust and wood chips from reaching the heating elements and starting a fire.
A water cooler tucked away in the corner of your workshop will provide a big quality of life boost and allow you to keep at your projects without having to run to the kitchen for a glass of water every time you feel thirsty.
To make the most of your workshop oasis, look for a water dispenser that offers a choice between chilled and hot water. In the winter, the hot water tap will also you to make a cup of tea or a Small Woodshop Design School mug of instant coffee on the spot. No matter what your taste, a versatile drink dispenser will keep you hydrated and happy while you work. For the next step up in convenience, consider adding a dedicated beverage cooler to your workshop as well.
Though many people set up an old refrigerator in the garage for extra soda and beer, a dedicated mini-fridge will help you save on electricity, since new models are far more efficient than old ones. You can pack your beverage cooler with your favorite soft drinks for a pick-me-up while you work or use it to store a lunch to enjoy on a break —all without tracking dirt and or grease into your clean kitchen.
A great freestanding beverage cooler should come equipped with a thermostat that lets you control the temperature to your liking — the colder the better for carbonated drinks, which tend to taste best when served at a frosty 34 degrees.
If you plan to store adult beverages in your cooler, look for a model with a lock to keep your drinks away from children and teens. Add overhead lighting for general illumination and task lighting over your work stations so you can see your project clearly. Finally, think about the overall color and feel of your workshop. A fresh coat of bright white paint will help your lighting go farther, but you might also consider adding a splash of color for fun.
An accent wall or an epoxy floor coating are good ways to upgrade your workshop from drab to fab without adding fussy decorations that will get in the way of business. Ultimately, your workshop should be a place that inspires you to be creative and to do your best work.
No matter how you use your workshop, you should enjoy the time you get to work with your hands and make something brand new. So what are you waiting for? Get started designing your perfect workshop today. To create the tenons on the leg, I temporarily clamped two of the spacer blocks that I cut earlier from the top to the middle leg board.
I tried to make sure that the spacer blocks were flush with the top of the middle leg board to ensure a gap-free with the top later. To remove any any slight warping between the three leg pieces, I used a pair of parallel clamps to keep the sides flush.
To avoid having to use a dado blade later, I also cut the front board of the leg and used the spacer cut from the Ryobi Belt And Disc Sander Review Design long stretcher to create its corresponding lap joint. Once everything was in place and clamped down, I immediately removed all three spacer blocks and cleaned up any glue squeeze-out.
Finally, I cut all the legs to their final length at the miter saw and saved the odd shaped cut-offs for use later as spacers when laminating the mortises in the top.
I did end up with a very small gap between two of the boards in one leg. To fix this, I made a simple wood filler from some pine sawdust and glue mixed together. Note that this can be used for any of the laminations should you end up with a small gap in the top. Before moving back to the top, I went ahead and drilled a few holes for the linear bearing and leg vise screw at the drill press. I'll cover this as well as building the chop for the leg vise in more detail in our next Instructable.
To finish up the top sections, I started by cutting the left end of each laminated section at the miter saw. I then cut the boards that make up the row with the mortise into the pieces. To make sure that the matching front and back pieces were identical, I made one final cut at the miter saw trimming each pair of boards together.
This made it much easier to finish drilling the holes later with a regular spade bit. Next, working from left to right, I glued up the three pieces to form the two mortises using the spacer blocks from the legs.
And again, as soon as everything was clamped down I made sure to remove the spacers and clean up any excess glue. After the glue dried, I finished up the section by gluing on the outer most board. I then repeated the same steps to finish the last section. I then moved to the floor and started cleaning up the bottom of each section by sanding any glue squeeze out before switching to the hand planes to roughly flatten the sections.
I had originally intended to run each of these sections back through the jointer and planer, but they were starting to get pretty heavy and my middle section actually ended up a little wider than my jointer.
While planing, I tried to focus on the area around the mortise to try to avoid any gaps once the legs were added. I also checked periodically to make sure the sides and bottom remained square. Once I was happy with the fit between the sections, I took them to the miter saw and cut them to final length which ended up being right at 6'6".
Next, it was finally time to glue up the three section to form the top. I started with the rear and the middle sections first and once those dried, I glued the front section onto the other two.
Before moving onto the legs and stretchers, I routed a groove on the bottom of the top along the front for a board jack or sliding deadman which I'll be adding in a future Instructable. It's just easier to do now to avoid having to flip the bench over again later.
Since assembling the entire base and then trying to get all four tenons to fit in the top at once didn't sound like a lot of fun, I decided to fit each leg first and then attach the stretchers to them in-place. This actually went a lot better than I thought it would.
After a little sanding, the tenons fit nicely, though I should have sanded one a little more as the fit was a bit tight when dry. When the glue was applied later, it required a fair amount of persuasion to fully seat. Once all the legs were dry fit in place, I marked and cut pieces for what would later become the inner half of the short stretchers.
I could then clamp one in place as a spacer and mark the exact length on the outer half of the stretcher. After cutting the outer boards to length, I headed over to the table saw and cut a small bevel on the ends just to make it look a bit nicer. I then took them to the drill press and counterbored two holes on each side. And after clamping them back into place on the legs, I pre-drilled and screwed them into place temporarily just to make the final glue-up go faster.
Next, I repeated the same process with the long stretchers. Starting again with the inner half and using it as a spacer to help mark the outer half. For the long stretchers I made four counterbored holes for each lap joint and again pre-drilled and temporarily screwed the stretchers in-place. Once that was finished, I removed both of the long stretchers and then the legs and short stretchers on the right end to prepare for the first step of this glue-up.
I started the final assembly by applying glue to the mortises and tenons on the right two legs first. Once the legs were in place, I then glued and screwed the outer half of the right stretcher onto the legs. To keep the legs in their proper alignment while the glue dried, I screwed the long stretchers back into place.
This also gave me something to clamp the legs down to as I didn't have a pair of clamps that were quite long enough to go over the entire leg. After the glue dried I repeated these same steps for the left two legs and stretchers except that I went ahead and glued and screwed the long stretchers to the legs as well.
While the glue was drying and before I flipped it over , I eased the edges of the legs and stretchers a bit with a block plane and some sandpaper. I also beveled the bottom of all the feet to help prevent tear-out when the bench is moved around on the floor. Then I applied a little boiled linseed oil to the bottom of the top before flipping it over with the help of a friend. Then I screwed it into place and repeated the process for the remaining stretchers.
Once that was done, I marked and cut the final "inner-inner" stretchers for the left and right sides. This isn't really needed, but I had some leftover pieces so I thought I might as well add. Note that if you wish to add a leg vise, it's best to wait to add these and the shelf until after adding a guide block that will be described in that video. It just makes attaching the guide a bit easier. After gluing them into place I sanded them flush and wiped on more boiled linseed oil.
The next big step was to flatten the bench top, though it was basically just a repeat of what I did for its underside. I started by using my Stanley 5 plane to knock down most of the high spots. Rubbing some paraffin wax on the plane's sole helped quite a bit you can also find it at grocery stores in their canning section. After a while, I switched to my Stanley 7 and just used my longest straight edge at different angles to check which areas needed more work.
If you have a pair of winding sticks or two straight edges you could also check for twist. I'll probably give mine a few more months and then double check it. Once I was happy with the top's flatness completely unrelated to how tired I got , I started drilling out the remainder of the dog holes.
To prevent tear out on the underside, I clamped a small board in place before using a spade bit to finish drilling the holes. To finish the top, I sanded it with 80 grit sandpaper and eased over the dog hole edges a little before applying a coat of boiled linseed oil. I then used a jigsaw to cut out notches in the corners to fit around the legs. After a little test-fitting, I wiped on some boiled linseed oil which darkens the MDF.
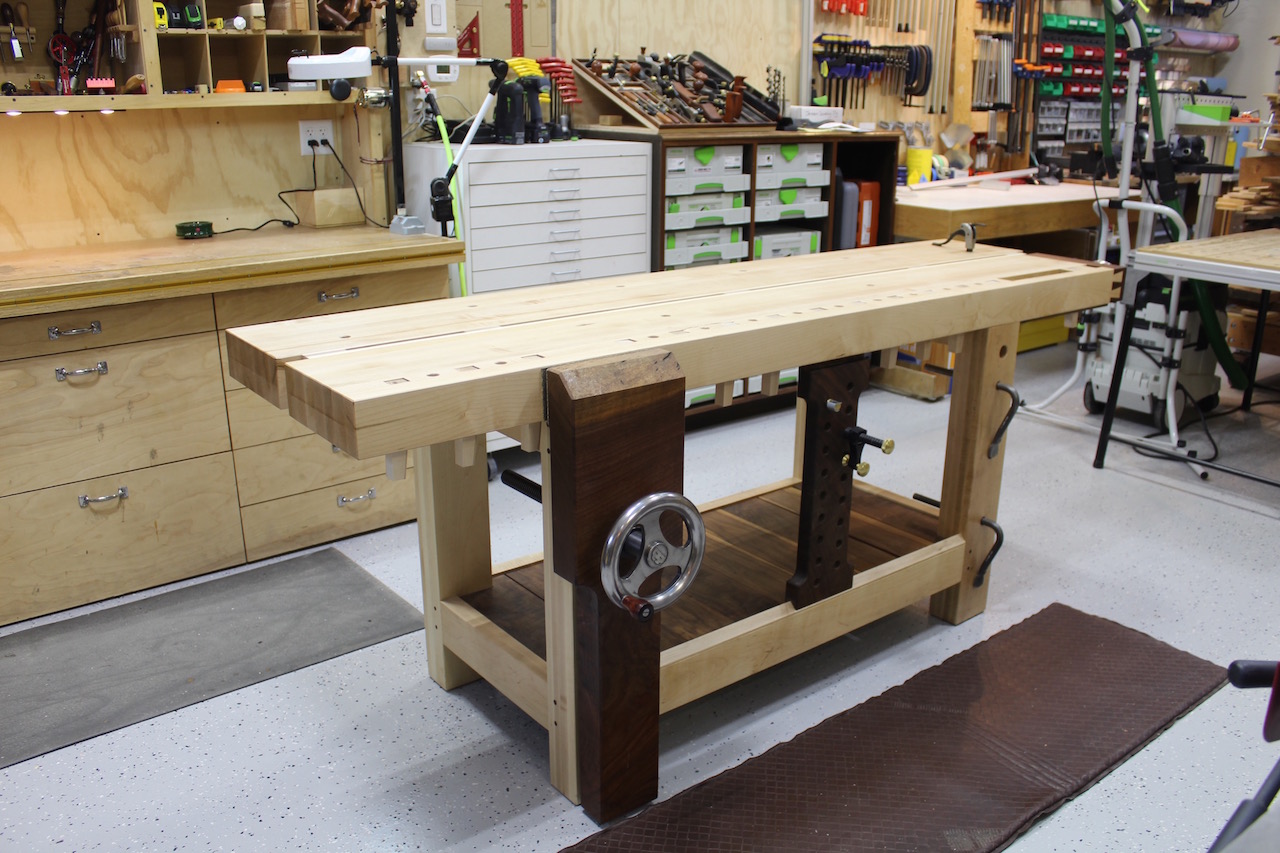
Once that dried I applied a light coat of paste wax and fit it in place on the bench. That completes the workbench itself! So far I'm very happy with the way it turned out -- especially how nice the mortise and tenon joints ended up in the top. In the next few Instructables, I'll cover adding the leg vise and sliding dead-man builds and then install an end vise.
I'll also add a set of Quick Release Plates to share a set of Workbench Casters that I installed on my outfeed table previously. Question 2 months ago on Step 3. What wood did you use; fir or white pine? What wood do you suggest for use in place of more expensive ash or maple?
Reply 2 months ago. Fir and White Pine are probably a bit too soft. It's probably worth using something that'll hold up a bit over the years if you go to the trouble of building it.
You might check something like CraigsList for lumber as well if you haven't tried. Thanks for including the fusion and sketchup renderings. It was really cool to see that behind the scenes process. This is very similar to Jay Bates work benches. Great job on it.
|
Free Wood For Woodworking Pdf Sjobergs Workbench Accessories For Router Cabinet Door Edges Detected Custom Brand Merch |

Kradun
23.04.2021 at 19:44:27
Gulesci_H
23.04.2021 at 19:13:18
PassworD
23.04.2021 at 22:10:57