Slip Tongue Router Bit,Food Safe Salad Bowl Finish 50,Jointer Planer Combo Helical Guide,Japanese Bonsai Tools Uk Store - Plans On 2021
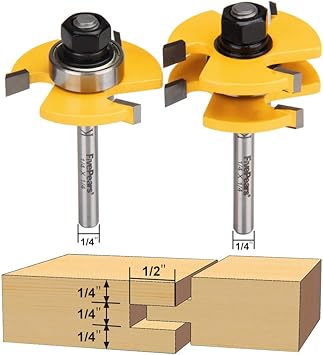
Your goal is to leave the same amount of material on the tongue board as you cut away on the groove board. This will take at least two passes. Once the cuts are made, put the boards together to get a tongue-and-groove joint. Build It. Cut the Groove When cutting joints, make sure the router table is clear of sawdust. Cut the Tongue To make the matching cut, use the Slip Tongue Router Bit Learning bit for cutting the tongue.
Use a Straight Flute Bit to Cut the Joint Optional Specialty tongue-and-groove bits make easy work of creating the joints, but they can be a bit expensive. How to Bend Wood 4 Steps. How to Use a Biscuit Joiner 7 Steps. How to Cut a Lock Joint 3 Steps. Rehab Addict 7am 6c. Rehab Addict am c. Rehab Addict 8am 7c. Rehab Addict 9am 8c. Rehab Addict 10am 9c. Rehab Addict 11am 10c.
Treehouse Masters 12pm 11c. Treehouse Masters 1pm 12c. Treehouse Masters 2pm 1c. Treehouse Masters 3pm 2c. Treehouse Masters 4pm 3c. Treehouse Masters 5pm 4c. Treehouse Masters 6pm 5c. Treehouse Masters 7pm 6c. On Tonight On Tonight Restored 8pm 7c. Restored 9pm 8c. Restored 10pm 9c. It is also the maximum useable thickness for most tongue and groove sets.
The basic design of the Infinity set is very similar to many other tongue and groove sets on the market and this setup procedure will work with most of them as well. If the instructions that came with your bit set differ, use those instructions. While this works, the thickness of the tongue can vary substantially, which makes repeating the setup very difficult.
The process described here takes a little longer the first time but allows repeating the setup later much faster. Both of the Infinity bits feature depth-limiting bearings, installed at the factory.
Using a straight edge, set the face of the fence flush with the bearing on both bits. This automatically controls the depth of the groove and the corresponding length of the tongue so they fit properly when assembled. Use a piece of scrap the same thickness as the work material and large enough to cut a groove in safely. Lay the wood on the router table and adjust bit height so a cutter is centered between or on the two lines.
When satisfied with the adjustment, set the fence and make a cut down one edge of the scrap. Shut the router off, flip the board over and set it against the cutter again. If the cutting edge slips into the groove with the board inverted, the bit height is correct and the groove is centered. If the groove will not slip over the bit, look to see where it is hitting the sample. If the top edge of the cutter is catching on the shoulder the board still upside down , the bit was too high.
Lower the bit an amount equal to one-half of the amount of error you see. Using an un-cut edge of the scrap, make another cut at the new setting, shut the router off, place the wood against the cutter upside down again and check it to confirm the setting. When satisfied with the setup, cut a piece of the final test piece to use as a setup gauge when this bit set is used in the future.
To use the gauge, lay it on the router table and adjust the groove bit height so the cutting edges slip into the groove. A quick test cut in scrap to confirm the setup should be all that is needed.
The Infinity tongue-cutting bit comes with a stack of 0. Note that when taking the top cutter off the shaft, there is a bronze-colored washer between it and the bearing. This washer must be against the bearing at all times. Any spacing washers Slip Tongue Router Bit Value installed below the upper cutter go on top of the bronze-colored one.
First, install the tongue cutter bit in the router table with both cutters installed and the nut snugged down. Lay the groove gauge block made earlier on the router table next to the bit and adjust the bit height so the top edge of the lower tongue cutter is flush with the bottom edge of the groove. If the top cutter is not even with the upper edge of the groove, note the amount of error and install enough spacer washers below the cutter to raise it that amount.


|
Woodworking Show Brisbane 2020 Wood Steam Electric Generator Pdf Kreg Joint Jig Youtube General Finishes Gel Stain Application Video Mp3 |

0f
25.08.2020 at 16:27:33
KISA
25.08.2020 at 16:38:18
KaRtOf_in_GeDeBeY
25.08.2020 at 12:49:57