Rockler Trim Router Circle Jig Youtube,Best Rap Hashtags Kindle,Soft Close Drawer Slides Length Matlab - And More

The jig itself is made of a phenolic material so when I drilled my own holes they looked the same as the pre-drilled factory holes.
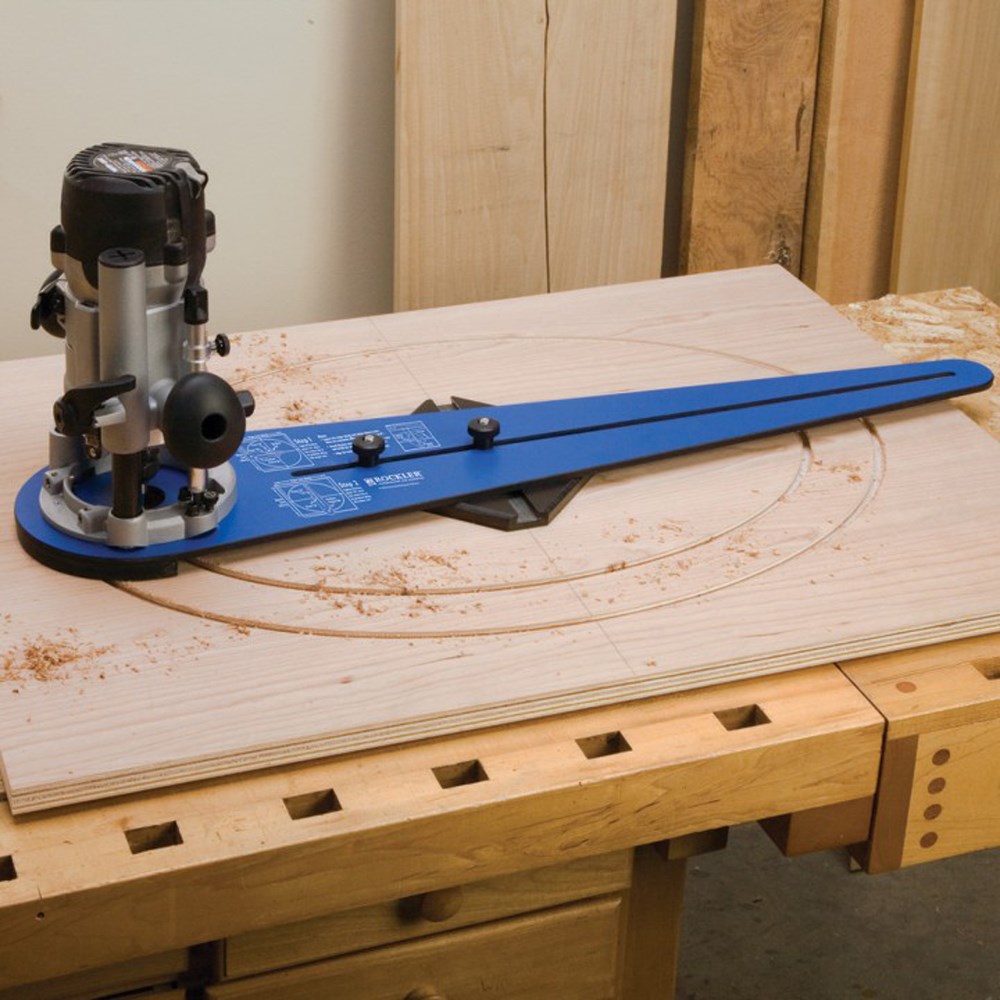
The jig also comes with two centering pivot pins, which are used as a pivot point to route circles or arches. The jig is tightened down with a star knob to hold the pivot pin in place. First I drilled the holes for my router. I did this by removing the clear plastic plate from my router and transferring those hole locations onto the circle cutting jig.
I drilled the holes using a tapered drill bit with an adjustable counter sink collar. The tapered drill bit allowed me to drill the exact size hole for the screws that are used with my router by adjusting the counter sink collar to that location. At this point I attached the router to the jig using the screws for my router and the holes I just drilled. One thing to mention here is that I left the clear plastic plate off when I attached the router to the jig.
This is so that the screws would reach through the jig and screw into my router. The clear plastic piece would have made it too thick for the screws to work. Now that I have attached the router to the circle cutting jig , my next step was to add the pivot pin. This consisted of a t-bolt, a washer, a star knob, and a pivot pin.
The t-bolt slips into the recessed track from the bottom and the washer is added from the top onto the bolt followed by the star knob. I just knew I wanted to get the most out of the panel I glued up. So, from earlier, I found my mark in the center of the panel and placed the pivoting center pin there in a pre-drilled hole. With the pivot pin installed and inserted into the center of the material I loosened the star knob and slid the circle cutting jig to the desired location.
This way if the star knob came loose I could tighten it back up in the same place. The phenolic material this circle cutting jig is made of makes it easy to erase the pencil marks. Actually cutting the circle was easy. Making sure the router and pivoting pin are secure is key to this operation. The first thing is feed direction. If you cut in a clockwise direction, this is known as a climb cut.
When using the router in a router table, for example, you want to feed the material from right to left clockwise. In the video you can see me using the router with the jig in a clockwise motion. I felt comfortable with the cut. Another thing to note while making the cut is to take shallow passes. If you try to take off a lot of material at once you run the risk of burning the wood or even breaking your bit.
Have you ever had a router bit break in the middle of an operation? Not fun. The last thing I want to say is that you might not have a bit long enough to complete the entire cut, for example cutting through an entire 1. The bearing allows the router to ride against the cut you previously made and the cutter will trim anything left behind leaving a flush edge.
This bit has an end guide bearing, so I had to flip the table top to reference the previous cut. I will probably make another table in the future and I will definitely use this jig. I can see where this jig could be useful in other applications like arches.
Leave me a comment below if you have any questions about this jig or about the video. Thanks for stopping by. Outfeed Assembly Table. Modular Shop Storage System. DIY Platform Bed. Stone and Sons content provides how-to videos on YouTube, step-by-step instructional website articles, insightful podcast episodes centered around community and other means of education through online courses and email communications.
Subscribe and listen for tips, advice, opinions, and stories from Shawn and other makers from around the world. Topics range from project ideas, mistakes made, things we learn from, my kids point of view and anything related to woodworking, online content creation or community involvement. Also, please share this post with your friends and family. If you enjoyed this article, please consider sharing it with your friends and family by clicking any of the social media icons below.
The Arched Fluting Router Guide routs flutes and dodos in arches and curves. With the Rockler Ellipse and Circle Jig, you can cut perfect ellipse and circle shapes with your router to any size or proportion you need. Learn more: http Trammel of Archimedes - Wikipedia, the free encyclopedia. A circle-cutting jig for the Festool router. Rather than giant holes, this one is for "medium-sized" holes - holes that are just a bit too big for a For Demonstration of my circle cutting jig for the router.
Enjoy the videos and music you love, upload original content, and share it all with friends, family, and the world on YouTube. Router Buddy System is the fastest and most versatile router system in the world.


|
Pocket Joint Tool 2020 Best Wood Workshop Vacuum Generator Carpenter Ant Wood Damage Images List |

Bad_GIRL
02.01.2021 at 22:57:24
H_Y_U_N_D_A_I
02.01.2021 at 14:29:17