Paint For Small Wood Projects,Cheap Table Saws Uk Review,Soft Down Lid Stay Zip Code,Raw Wood Veneer Suppliers Llc - Reviews

You could glue it onto a shabby-chic frame made out of wood which you could put together yourself. A wooden hanging planter like this one can solve a lot of problems. For example, you could hang it in the kitchen, in front of the window and you could grow fresh herbs in it.
No counter space would be needed, no shelf, just a ceiling hook and some rope or cord. If you want a larger planter, you could build a custom one from scratch. Consider pallet wood. Use some to make a wood pallet hanging planter which you can display both indoor and outdoor. What about small planters, the kind you keep on your desk or table? Those can look super cute and you can make some for your tiny succulents or air plants. These colorful geometric planters are made out of wooden blocks.
Use a drill to shape them and a drill to make holes for the plants. The acrylic paints are great for customization. A wooden magazine holder can really bring a space together. You could build one for your cozy reading corner or you could add one to the living room, by the sofa.
All you need for this project is two rectangular wooden planks of equal dimensions, a ruler and a wood saw. Some sandpaper might be needed too.
A candelabra is a stylish and beautiful accessory and a lovely decoration. Even something very simple like a DIY wood candelabra can look awesome. This particular one is actually pretty easy to make too, which is a great plus. An entryway is not complete without a coat rack but why should it cost a small fortune when there are plenty of affordable options, including some great DIY project ideas.
Speaking of which, check out how easy and fun it is to build this DIY wood coat rack. You only need four wood boards, glue and some hooks. Lamps are a bit trickier than a lot of other home accessories because they have to actually be functional, not just to look good.
A great project to start with could be a wooden block desk lamp like this one. Building outdoor Projects For Small Scrap Wood 75 furniture is pretty fun and easy, mostly because the requirements are small in terms of looks. There are plenty of awesome woodworking projects which can inspire you Small Wood Projects For Valentines Day in this sense. For example, a pallet coffee table on wheels could be an awesome addition to a patio or garden.
Complement that lovely handmade coffee table with a Small Woodworking Projects For Beginners App colorful pallet bench. Finding the right desk with the right dimensions and features can be pretty difficult but luckily you can skip the whole process and just build the desk yourself.
You could make the frame out of pipes and the top out of wood. As you can see there are a lot of great DIY woodworking projects which you can attempt even as a beginner. Building your own awesome furniture and wood accessories is the first step. The second one is to make sure they last and look great for years to come and in order to do that you need to know how to clean and polish wood. Check out our tutorial for more details.
One would be to build a table yourself. You can even make several of them and use them as a group or mix and match them based on your needs. The ones featured on creativeinchicago would be perfect for this purpose. A potting bench is a really thing to have if you enjoy spending time outside in the yard or in the garden tending to your flowers, herbs or veggies. The bench can include a little sink, a counter space and a shelf at the bottom that you can use for storage to keep a few extra pots, some gardening tools and so on.
You can even include a backdrop that you can hang stuff on. Check out thehandymansdaughter to see how you can build this bench yourself. This will seal the wood surface, and help it take the paint better. It will also help the paint show up better, especially if you are using a light color. Allow the primer to dry before moving on. For an even smoother finish, you can sand the first coat of primer, wipe it clean, then apply more primer over it.
Do this a few more times until there no ridges remain. Method 2 of Pour a dollop of acrylic paint onto a palette. Choose a color for the background, then pour out a small amount onto a palette. Acrylic paint dries quickly, so don't pour out your other colors just yet. You can use the cheap, craft-grade acrylic paint that comes in bottles, or you can use the more-expensive artist's grade that comes in tubes. If you are using the artist's grade, dilute it with a few drops of water until it has the consistency of cream first.
You can use small dishes, plastic lids, and paper plates as palettes. Apply a coat of paint over your piece.
Use a foam brush or a wide, flat paintbrush to apply the paint. Let the paint dry, then apply a second coat, if needed.
Let this second coat dry as well. Look for brushes made from taklon, katakana, or sable. Avoid camel hair brushes or stiff, bristle brushes. Don't overload the brush with paint. The paint should come no more than halfway up the bristles. Let the paint dry, then add a second coat, if needed. How long this takes depends on the brand that you are using. Most types of acrylic paint will dry in about 20 minutes, however. If the paint is too thin, add another coat of paint, and let it dry as well.
Take this time to clean your brush s with water. Do not let the paint dry on the brushes. Add your designs and details. You can use stencils or trace designs onto the wooden piece.
You can also free-hand the designs as well. Apply the base color first, let it dry, then add the details. For example, if you wanted to paint a smiley face, you'd paint the yellow circle first, let it dry, then add the smile and eyes. Rinse the brush with water before switching to a new color. Let the paint dry completely.
Refer to the label on you tube of paint for exact drying times. Just because something feels dry to the touch does not mean that it is ready to handle or take on sealer.
Every brand will be different, but you can expect this to take about 24 hours. Apply 1 to 2 coats of sealer. Sealers come in many different finishes, including matte, glossy, and satin; choose one that you like the best. Apply a thin coat of spray-on or brush-on sealer, then let it dry. Apply a second coat, if needed, and let that one dry too. If you are using the brush-on kind, apply it using a wide, foam brush.
Method 3 of Skip the priming if you want to paint a design over bare wood. Instead, consider painting over the entire piece using a wood stain or a sealer. Wait for the stain or sealer to dry, then paint your designs onto the wood. Be sure to seal everything after the paint dries. Add designs using stencils. Buy or make a stencil, then place it over the wood. Paint over the stencil using decoupage glue; this will seal the wood and prevent the paint from leaking under the stencil. Let the decoupage dry, then paint over the stencil.
Peel the stencil away while the paint is still damp. Seal the wood using a spray-on or brush-on sealer. You can use this method over bare, unsealed wood. Use graphite paper to trace designs, then fill them in. Place a sheet of graphite paper over your piece of wood, graphite-side-down.
Draw your design, then lift the paper away. Go over the outline using a thin, painted brush, then fill the design in using a flat brush. You can do it over bare wood, but the paint may not stick as well. If you don't know how to draw, print the design out on tracing paper first, then place the tracing paper on top of the graphite paper. If you are working over a dark-colored surface, make some chalk graphite paper instead: cover the back of a piece of paper with chalk, place it chalk-side-down onto the wood, then trace your design.
Create a tinted stain to show off the wood grain. Apply a thin layer of acrylic paint using a dry paintbrush. Dip a wet cloth in a small amount of paint, then rub it over the wood. This will help blend strokes together without covering up the wood grain. Alternatively, you can paint over the entire piece using watered down acrylics or watercolor paints. Make a DIY chalkboard.
Paint the surface of the wood with 2 to 3 coats of chalkboard paint. Let the paint dry, then paint designs using normal paint onto it, if desired. Allow the chalkboard paint dry and cure completely.
Depending on the strength, the tray can be used to serve anything from water to meals. Old rope pieces have been Best Paint For Wood Projects 5g used to make handles of this tray.
Need a more sophisticated wall rack than the one we built in project 1? Well, you got it here. As you can see, this one also has a storage that can be used to store small items like gloves, pen, knives, etc.
The hooks are also more stylish in this one. This is another small wood project that involves the use of recycled pallet wood. You may need to have basic woodworking experience for this project. The materials used are old wood pallets and some screws or glue. You can also put picture frames or other small items around to give it a more personalized look. A simple wooden box can be used for many purposes, as a jewelry box, makeup box, spice box, etc. This is also very easy to make.
You will have to attach some wood pieces using screws in the shape of a box. After that, you can use a paint to give it the finish or use it in its natural color. Another useful wooden item you can build in just a few hours using old wood scraps. The stool is very easy and inexpensive to build. It can be used next to a sofa as a coffee stool or for any other purpose. My kids just love to drag it around the house.
A beautiful side table constructed completely using scrap wood pieces. A woodworker needs not to be taught how to build this one as the picture itself tells the complete story. Make sure you got all the items before you start working on it. You may need a lot of pallet wood scrap for this one. This project may take more than just a few hours to complete, but the final item would be worth it as you can see in the image.
It is a beautiful entryway table with drawers made entirely from scrap pallet wood. You can make one yourself by following the instructions from the picture. Wall shelves can be used to keep books, picture frames, and other small items. The one you see in the picture makes use of four wood boards. The size and dimensions of the final product depend on the size of the boards.
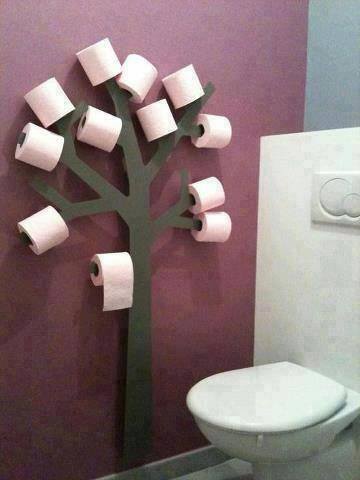
Do exactly as you see in the picture. The horizontal plates can be attached to the vertical one using glue or some screws. And yes, you can build one yourself. It is one of the easy woodworking projects that usually take hours to build. You can use it as a toilet paper or something else. I have one that I am using for Kleenex.
You can even customize that smile you see at the front. Although this is a big product, I still count it as a small wood project since it only took me a few hours to build this shelf. This is a pretty strong shelf that you can use for books and everything else in your house or office.

|
Bottom Mounting Drawer Slides Table Best Type Of Wood Router To Buy Youtube Bulldog Router Table Join |

f_a_r_i_d
24.01.2021 at 23:14:32
Vista
24.01.2021 at 18:50:47
VERSACE
24.01.2021 at 11:13:27