Joiners Workbench Height Set,Weekend Woodworker Router Voltage,Hardwood Timber Products Walsall Zip,Laguna Bandsaw Blades 00 - Reviews
Are you building cedar birdhouses or rebuilding a Chevy V-8 engine? Finally, as good as this bench is, you can make it even more versatile by adding a bolt-on woodworking or mechanic vise.
The more shelves, drawers and tool holders one has, the better. All the nooks and crannies adds up to lots of storage space, and makes it easy to organize, and find, needed tools, supplies, fasteners, etc. Plan for electrical power and lighting. While this article is not about workshop lighting, there are different types of lighting to consider at your workbench.
Proper lighting in your workshop is as important as any tool in your toolbox. Make sure you have ample lighting positioned so that shadows do not occur and compromise productivity or safety.
Most of the light in the workshop should come from overhead lighting. Fluorescent lighting is the least expensive way to light a workshop. These fixtures can be installed with screws, and is no more difficult than installing a regular light fixture. The lights are bright and use very little electricity and are easily replaced.
In some spaces, in addition to the overall lighting, it may be advantageous to place recessed flood or spot lights directly over some of your tools and workbenches. Many tools now come with on-tool lighting. My drill press is one of them. You can purchase after market lighting with heavy duty magnets or just install a simple clamp light. These task lights are a great supplement to your overhead lighting and should not be a replacement for poor shop lighting.
If you have cabinets over a workbench then under cabinet lighting is a perfect solution and location for task lighting the bench. Most studs are laid out and installed 16 inches on center, this works well with plywood sheet stock measurements. Additional studs or supports can be added if needed. The workbench shown here was made of materials left over form a project we worked on. The planks make up the top and shelf and the supports are ripped down plank sections.
Check the floor level in the area where the front legs will sit. Are they level or will your legs be different heights? Make a note and put aside for leg cutting sections.
Note — The workbench top and shelf is a full 2-inch thick staging plank cut to length. The bench top planks were ripped so that three boards fit evenly up against the post and beam horizontal beam. The bottom shelf ended up deeper as it extends to the outer wall of the post and beam building. Cut the bench-top planks to length and rip them for even spacing. Rough cut the shelf planks and put aside. If the legs were not sitting on a level surface keep them longer than the height of the finished bench measurement.
Determine how far in your bench top will overhang your frame supports. You may want to consider vise clearances. Cut enough short supports to be able to install them every 16 inches on center for support and strength.
Draw a level line on the wall [locate wall studs] and install both frames to the wall with two vertical 3-inch screws every 12 inches. Use temporary scrap wood supports if needed. Clamp the legs to the level frame again and mark for notches.
Use a miter saw and handsaw to accomplish this. We don't have any links to project supplies and hardware for this particular project yet, but here are some other products that might be of interest to you. We may receive commission when you use our affiliate links. However, this does not impact our recommendations. Since you are an affiliate, you can use this url to link people to this page and get credited for it:.
Tier Standard Premium unavailable Learn more about our premium plans. To use the stanchions to raise the bench, you lift one end of the bench at a time, allowing gravity and perhaps a little help from your foot to let the stanchions swing down under the fixed leg support base or posts. Reverse the procedure to lower the bench. The bottom line, however, is that no matter which type of bench you choose, it should meet three fundamental criteria.
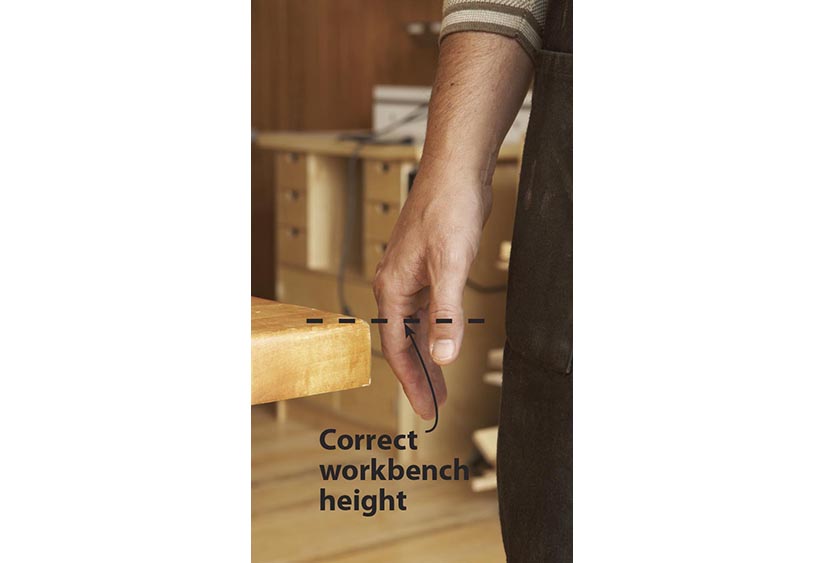
Second: The bench should be sturdy enough to not shake when you plane or saw a board on it. Vibration absorbs energy and slows the process. Third: It should be the right height for the work at hand. Here are some supplies and tools we find essential in our everyday work around the shop.
We may receive a commission from sales referred by our links; however, we have carefully selected these products for Joiners Workbench Height Map their usefulness and quality. By Pop Wood Editors. In Shop Blog , Woodworking Blogs.


|
Triton Tra001 Router Table Editor Router Guides Templates Key |

KRAL_SHEKI
26.09.2020 at 10:32:43
BLADEO
26.09.2020 at 15:40:10
LadyWolf
26.09.2020 at 16:38:25
HULIGANKA
26.09.2020 at 11:21:52