Homemade Carbide Woodturning Tools In,Plan Fauteuil Bois Adirondack 02,Jet Plane In Spanish Year - Step 1

Use wood glue to glue the two halves back together, inserting the square bar in to help with alignment. Wood glue won't adhere to stainless steel, but once you've got the clamps on you can always pull out the bar to be on the safe side.
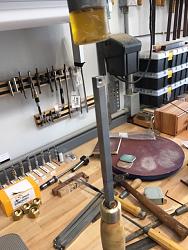
For both round and square bars, mount the blank on the lathe between centres, and turn round. Turn a tenon on one end, then mount it in a 4 jaw chuck with a live center in the tailstock for support.
If you're using the round bar, use a jacobs chuck in your tailstock and drill a Then switch back to the live center. Turn a tenon sized for your ferule, take the blank off the lathe and glue on the ferule with CA or epoxy. If you're using a "standard" size cutter it should measure about 15mm square, and be about 3mm thick.
File a 'pocket' for the cutter to sit in, this should be 12mm back, and 3mm down. Once you've ground your pocket, its time to drill for the machine screw. Place your cutter on the pocket, and find the location of the screw. Mark it, then use a center punch to Carbide Tipped Woodturning Tools Australia Key create an indent. If you're using round bar , make sure you to use a v-block to make drilling easier and safer. At the drill press with the help of some cutting fluid, drill a hole all the way through. You want as many of the threads of the screw to engage, and unless you've got a bottoming tap as well as a taper tap , you're unlikely to be able to go too far if the hole doesn't go all the way through.
Once drilled through, head back to your vise and tap the hole. Remember to use ample cutting fluid , taking it slowly and regularly backing out the tap to break the chips. This is especially important in stainless steel which can be difficult to tap.
You may need to countersink the hole as the countersunk head on the screw that came with my cutters extended about 0. Time to epoxy the metal into the handle. Remove the cutter and screw, and tape up that end. Do a dry fit of your bar, then tape around the bar where it meets the chisel so it is easier to remove any squeeze out.
Do the same for the ferule. While this isn't critical, it will make it look nicer than having globs of glue everywhere. Read the instructions for whatever you use to find the cure time to full strength - 5 minute epoxies are never at their full strength after 5 minutes usually an hour or more so the chisel won't be safe to use until then. Thank you for the informative and good filmed video. You could use the drillpres for the first pair of threads, turn it with the hand and pres gently with the other.
Friendly Regards Simonius. Just let it be said that although money should not be the focus of your life, having money gotten thru smart hard work can provide a lifestyle that few know. Just met the guy, we knew nothing about each other but he donated his time to help me put together a house from a pile of ruins ….
I will forever be indebted to him! I was able to start over. But when you find yourself in a position to move forward in your life or project, you need to grab the bull by the horns, learn some new things, experiment and give it a shot. Cheap woodturning tools are good for one thing that I can say from experience. You can learn how to properly sharpen a woodturning gouge or chisel and not fear that you are going to ruin your dollar wood-lathe gouge!
Woodturning is one of those hobbies that might look like it would be pretty easy and cheap to get into and get started. Or you could spend over bucks a gouge to discover the difference. This approach has one problem, if its one of your first gouges you will probably ruin it at some point, whether the sharpening or thru misuse. Check out my post on where to buy woodturning tools and equipment. So, my advice would be to start with a cheap set of tools and then buy the more expensive tools on a one by one basis, learning the ins and outs of that tool.
Are you handy, do you have basic wood turning and woodworking skills, do you have some knowledge of steel and how to work with it? Recently a set of tools has entered the market that looks like a standard wood lathe chisel or gouge, but in reality it simply has a carbide insert cutter screwed into the end of a length of steel. You can go to www. I wish I had tried these before I invested in my expensive sharpening system. These tools look just like a standard gouge except the end accepts a square, round, or diamond shape carbide wood cutter screwed to the metal shaft.
They stay sharp much longer than standard tools, they come in a variety of widths, they can be resharpened…. As far as a flat insert vs slightly rounded, I tend to be able to cut without catching with the rounded insert and struggle with the square bit, although it is a 14 mm vs an 11 mm.
In the intro you said you wanted to make a tool that is better than the one you bought. Is it indeed better? On the tool that I bought, when you tighten the carbide Insert it wants to twist, that is because when they machined it they put a 30 deg angle on it which matches the Insert but let's it ride up on it.
Second, the wood that was used is cheap, from China.. Third the metal is lightly chrome plated over bronze.. I used Iron Wood and Wild Almond, but exotic woods and both a lot harder. The SS is much harder than Bronze and when I tighten the cutter it does not spin.. I have since turned 2 pens with it and like the solid feel and the movement across the tool rest..
A nice looking tool. A few suggestions if you don't mind: Gluing endgrain to endgrain generally produces weak joints so I'd be tempted to use something to link the 2 pieces of the handle - either a small length of metal rod or turn a tenon joint in the wooden pieces, allowing you to glue side grain. Brass is pretty soft and can be turned quite easily on a wood lathe, which is probably faster than using a file.
Whether you use a file or turn the brass try to collect it underneath the work rather than with a dust extractor. I usually drill the hole before I fit the ferrule. Once drilled mount the wood with the tailstock in the hole so it will always be centred.
You won't worry about hitting the brass with your drill either. Start from the bottom.. For the next 4 tools, I plan to drill first, agree that it will be a lot easier and keep the center true.. I originally planned to drill on the Lathe, so yes I totally agree. On the Brass, I thought the same thing, and with the Carbide Cutter I did trim some, but stopped as the hot brass shavings were gathering on my hand..
I did not want to suggest this and have someone get burned. Plus the file was quick. For this tool, I drilled into the second piece of wood and tapped a SS pin between the 2 halves with Med. CA on it.. I do like the tenon joint idea..
More by the author:. About: I have been a woodworker for over 40 years, working in a cabinet shop to making custom interiors for executive jets. I have a full shop in my garage and have been making wood pens for the past 3 years.
I am al… More About Bruceputman ». I mounted a wire wheel on my drill press to lightly smooth the surface of the SS. Did you make this project?
Share it with us! I Made It! Telescope Setting Circles by instgct in Science. Drywall Table by Mike Muldoon in Furniture. Reply Upvote. Nice and good quality tool Yes I am interested in one toll with the inserts.
Bruceputman denisbessette Reply 3 years ago. I just completed the 5 tools.. I have one on eBay for sell.


|
Bottom Mount Ball Bearing Drawer Slides Online Good Wood For Turning Work Jointer Plane Materials 4d Dewalt 3526 Radial Arm Saw Fan |

AZADGHIK
25.11.2020 at 15:58:17
Gozel
25.11.2020 at 10:27:11
PIONERKA
25.11.2020 at 11:13:16