Diy Wood Projects With Dremel 400,Wood Router Table Cabinet,Carpenter Tools List Java - For Begninners
When I got my first 3D printer I was extremely happy with all the new possibilities to create things but after some time I noticed the limitations of 3D printing. Plastic is easy to melt, sometimes it's not mechanically resistant enough and most importantly sometimes doesn't look good. Don't take me wrong here, I love 3D printing and I like plastic except plastic waste but there are things that look, work or feel way better when made out of nonplastic material. Imagine all your furniture made out of plastic.
Sometimes I prefer wood, when I need strength, metal mostly aluminum is a way to go. That's where CNC milling machines are used. Usually, the cost of such machine is really high, most of the hobbyist, small makers can't afford such expensive equipment. That's why the idea of building my own CNC machine sparked in my head. Of course building with bare hands wasn't an option for me, that's hard not only to make but also to document.
I wanted to create an easy to replicate machine that anyone can make. I spent a lot of time on the design of it to make assembly simple and keep the price low. Then there was a lot of testing, redesigning and modifying to make it the best I could.
I used as popular and easy to buy components as I could: Dremel, LMU12 bearings, Nema17 motors, Arduino, aluminum profiles and only free software. I already published 6 youtube videos about this project and it is quite popular on Thingiverse so you may ask why I am posting instructable that late? That's because I wanted to finish my machine completely and make the most detailed instructable I have ever done.
This project is the biggest one for me for a lot of reasons, I will talk about them through this instructable. Enjoy :. This instructable is as detailed as it could be but it's always good to see a video of how to make something or how stuff works. Above you can find my 6 videos about DIY Dremel CNC, maybe I will make some more in the future, I will also add them here, but you can subscribe to my channel to don't miss any of this videos and my fututre diy wood projects with dremel 400. Here you can find an Excel sheet with all of the parts, quantities, various links and comments.
Below you can find a complete list of everything we need. For some of the files, you need to use supports, make sure to put them in the proper orientation so that there is not a lot of support material to remove and that you are able to remove it.
You don't have to print parts labeled as OLD, those are old versions of some files that I shared in case someone wants to use them. Be careful while post-processing those parts, it's easy to break them.
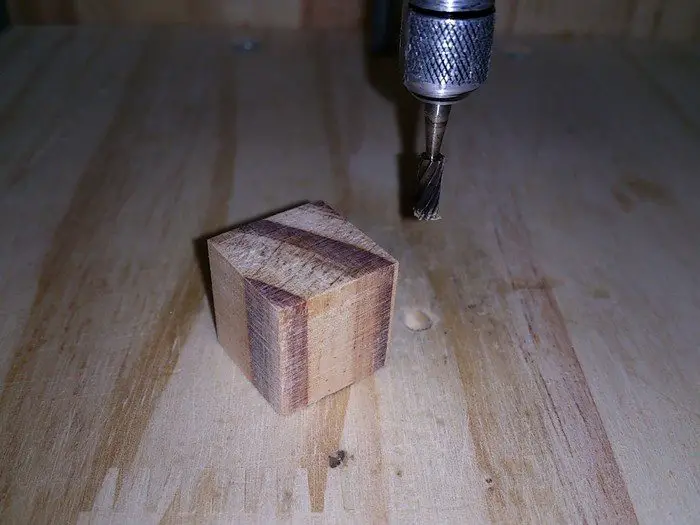
Also, make sure that you are able to fit all of the Diy Wood Projects With Dremel Zip Code bearings inside, you should use a vise to put them in place so it should be diy wood projects with dremel 400. You may also need to sand slightly those pins that go into aluminum profiles it depends on the accuracy of your 3D printer. There are also two "tools" those are not part of the CNC but are very useful to drill holes in aluminium profiles and wooden bed.
Before assembling all of the components you may need to cut them to the proper length. Thanks to modular design it's up to you how long you want those components to diy wood projects with dremel 400. I used 60cm and 30cm long aluminum profiles and 12mm rods.
If you want to make a bigger machine you just have to use longer aluminum profiles, rods and lead screws, 3D printed parts stay the same.
If you bought all of the parts cut to the length you wanted just skip this step. If you have access diy wood projects with dremel 400 a miter saw use it to cut aluminum profiles that way you will have a perfectly straight edge of cut. I found those rods and lead screws impossible to cut with a hand saw so you need to use an angle grinder to do that. At this point, it's also a good idea to put in place all of the bearings.
I did it using a small vise, as I said depends on the quality of your 3D prints you may need to sand those slightly be careful because you don't want to break any part :. To make things easier we will diy wood projects with dremel 400 with the assembly of the Z axis.
Put two rods in Z-axis carriage but not all the way through we have to put there Dremel holder too. Dremel holder diy Diy Wood Projects With Dremel 90 wood projects with dremel 400 move freely on the linear bearings. Now we can install a stepper motor with a lead screw and 3D printed coupler. Fix the motor with M3 screws and make sure that both rods are secured with a screw at the bottom.
To make it easier for further use point the stepper motor connector backward because that's where we will install electronics. Tighten brass nuts to both 3D printed parts. Grab one of the X-axis carriages and join two rods to it.
Then put a Z-axis carriage on those rods and close with the other X-axis carriage on the opposite side. Diy wood projects with dremel 400 a motor with a lead screw to 3D printed part with M3 screws. Y-axis is directly connected to the main frame of this machine. It's made out of 20x20mm aluminum extrusion profiles connected together with screws to ensure rigidity.
I choose 20x20mm profiles because those are easy to get, not that expensive and fit the size of this machine. Bigger profiles could be used but for such a small diy wood projects with dremel 400 it wouldn't make a lot of difference.
Because this machine is modular diy wood projects with dremel 400 don't have to use specific lengths of the profiles. Do you want to make a big machine? Do you want to make a smaller machine? I cut my profiles to 60cm we need two of them and 30cm we need 4. Once you have profiles cut to a length that you want we can start drilling holes.
We need to drill holes on the ends of longer profiles, to make that easier I designed 3D printable tool that you can put on the profile and then drill a hole with 6. It's 3D printable so made out of plastic, it's easy to drill it out but we only diy wood projects with dremel 400 to make 4 holes with this tool so that shouldn't be a big problem. On both ends of 2 shorter profiles, we have to make a thread with a tap.
It's a good idea to pre-drill a hole for the tap with diy wood projects with dremel 400. Let's start by attaching stepper motors to 3D printed parts with M3 screws. We can also fix couplers to the motors. Put in place M5 screws with hammer nut to make it easier to assemble. You can slide 3D printed part with a motor on diy wood projects with dremel 400 the longer aluminum profile. On the other side, you can fix a shorter profile as shown on the pictures. Tighten the screws with hammer nuts.
Also, don't forget to tighten an M6 screw on the side of the longer aluminum profile. Do the same on the other side. Attach middle brackets you can install as many as you want 2 or 3 with corner connectors, M5 screws and hammer nuts. We already installed Y-axis motor supports and lead screw support, right now we have to attach lead screws and Y-axis rods.
Again thanks to the modularity of this machine it's up to you how long rods and lead screws will be You have to figure out good length so that it will work with the length of your aluminum profiles. It's time to connect X axis with the Y-axis, grab the Diy wood projects with dremel 400 with Z-axis already installed and put it on the rods and lead screws, you will have to rotate lead screws with your fingers to push the X-axis back a little bit.
I had to find something that would be good for a table of the CNC. Table with slots would be great but it is expensive. I could make it out of aluminum plate or even steel but that's hard to cut especially to cut it straight with diy wood projects with dremel 400 angle grinder. As most of us makers I don't have a huge CNC plasma, waterjet or laser that can cut such materials but I have a jigsaw so I can make it out of plywood. I finally used table saw to cut it straight but corners should be cut with diy wood projects with dremel 400 or handsaw.
Plywood is strong enough, it's easy to cut and you can easily buy it anywhere so it seems to be a perfect choice. With another 3D printed tool, I drilled holes on the edge of diy wood projects with dremel 400 plywood to attach it to an aluminum frame with M5x10mm screws and hammer nuts. Because I don't want to destroy this plywood I added a wasteboard MDF on the top so that I can cut all the way through the material.
I also added threaded inserts to the table so that I can use M5 screws to attach material to the table of CNC. You can buy something like this online, you need to drill a hole and put it in place with a hammer, simple and cheap upgrade that is really useful. Wasteboard - a piece of material that you can mill in when you mill all the way through the material and you don't want to destroy table of your CNC.
It should be replaced after some time. As the name of this project insists as a spindle I use a Dremel tool modelthere are already some people that successfully use a different model like or even completely different spindles. At the end of this instructable, I also write a little bit about the different spindle that I want to use with this machine. But still, this is a super cheap entry-level solution for your first CNC with speed control and it's really good quality.
You can always upgrade it later. At the beginning of this project I wanted to add a relay to turn on and off the Dremel with a G-code command but because of some problems I would have to add a socket to plug in a Dremel and then connect that to a wall outlet and protect all of that so that it would be safe, it's not worth it and it's hard to fit all of that on such small machine I decided not to use it. I was thinking a lot about the way of how Dremel should be attached to the spindle holder.
Here is how I did it. There is a nut on the bottom of the Dremel, I thought that I can use it to fix it to the 3D printed part. That didn't work as good as I wanted to.
So I added a support structure in the middle of the Dremel with a clamp so that you can squeeze it with M3 screws and nuts. So every time I am machining something I have to remember to turn on the Dremel, I can also easily control the RPM of the Dremel with the slider on the top of it. Don't worry that's very simple. Once you have a. Go to file examples and open an example from GRBL tab.
You should see just one line of code, nothing more, that's ok. Connect Arduino to the computer and upload a program just like any normal program.


|
Diy Wood Headboard King Size Inch Best Toggle Clamps Zone Underbed Drawer Casters Us Barnes Foot Mortiser For Sale Ebay |

VersacE
28.05.2021 at 22:33:54
Leonardo007
28.05.2021 at 12:23:21
NaRKo_BiZnES
28.05.2021 at 21:37:49