Diy Folding Mobile Workbench Plans Point,Makita 23 Gauge Pin Nailer Parts Review,Vintage Wood Lathe Tools Zoom - For Begninners

Finish the frame of your folding workbench by making the smaller storages. Make it as big or as small as you want, but keep the open storage in mind. Leave the frame for now and ready your hinges for installation. Flip the hinges in the opposite direction and countersink the opposite side. One side of the hinge is countersunk so just duplicate that on the other side. Having a jawhorse comes in handy at this point because it helps in holding up awkward pieces. Notch out that section so the hinge can sit into the opening.
You can use a razor to score the outside before chiseling out the unwanted pieces. When installing hinges, a lot of people have trouble keeping the hinge straight while installing the screws at the same time. To make it easier, there is actually a drill bit specifically for the hinge hole. Use that drill bit for the hinge hole and repeat the same process for all the remaining hinges. This project uses four.
With the hinge in place, you can now attach the top. Just set the top in place and again, make sure you keep everything square. Clamp the two sides, get underneath or flip it over, then install Diy Folding Mobile Workbench Plans 64 a few more screws in the exposed hole. Repeat the same process until all your hinges are attached. Flip the top open before installing the remainder of the screws. Flip your folding workbench upside down — the bottom should now be facing up. Install the barrel bolt catch on a small piece of wood.
This should prevent the wood from ripping. Do some pre-drilled holes on the side before attaching it to the sidewall with a few screws. Then, take a barrel bolt and line it up with the hole. You can also make this even tighter by making it off by just a hair.
This should help you force the bolt without worrying about any gaps. Apply some wood glue to the outline of the 2x4s and finally, set the bottom in place. If you want to spice it up, consider painting it or staining the wood. This DIY uses a folding table as a base. Depending on the size of yours, orient the measurements to fit.
You can get creative about storing and hanging things on the wall. This builder used bamboo skewers, made a pegboard, and even drilled supports to hold heavier tools like drills and hammers. Perfect for anyone who wants more space, this project helps you create a basic workspace you can be proud of.
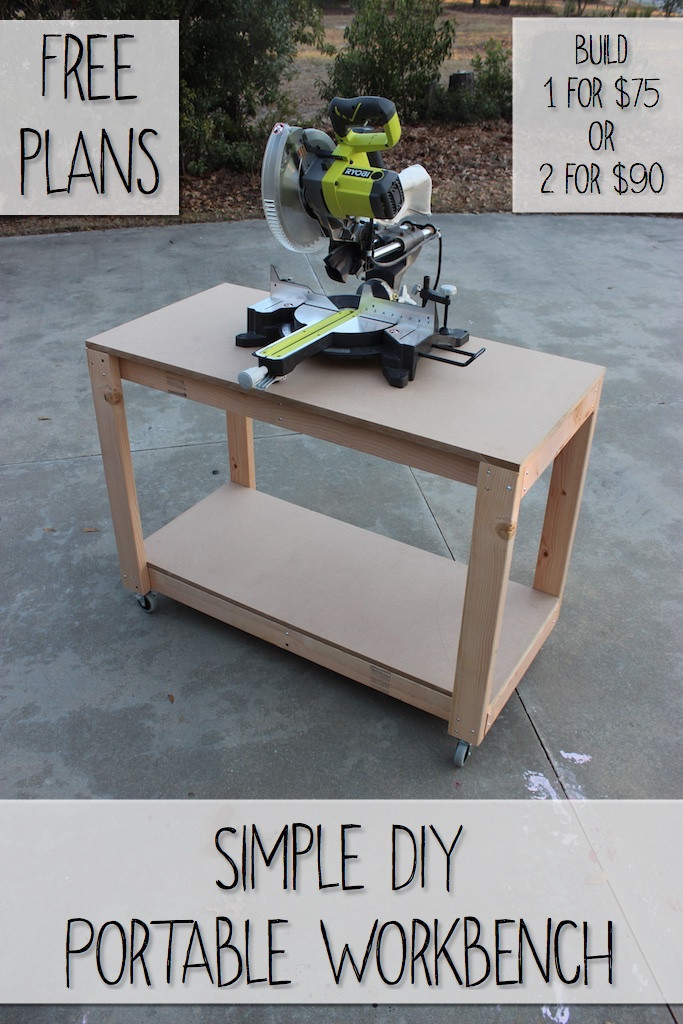
Supplies include adjustable bench legs, plywood, a power drill, sandpaper, polycrylic, and locking casters.
To build, cut your wood, mark the holes, drill the legs into the base, fasten the bench legs, attach the casters, and add finishing touches. This designer just sanded his, but you can paint, stain, or polish yours however you like. As the title states, this is a DIY for a simple work table in seven steps check out a DIY sewing table for something a little different check out a DIY sewing table for something a little different.
This is not the most visually appealing or creative, but it is a strong and sturdy area for you to create things and work on projects. The designer himself is a beginner woodworker and this project is a great way to hone your skills. One poster says that he was pondering creating a garage workbench from a free pdf- he had done a lot of research on YouTube. Luckily, his friend had some kitchen worktop available that he could upcycle into a durable, hardware and countertop for his workspace.
He linked to a FamilyHandyman. They recommend adding pegboard, a bench vice to create a truly comprehensive utility area in your garage. He recruited a friend who was a more experienced woodworker, and who also owned a miter saw, and together they assembled a ruggedly handsome option that eventually would include some shelving. Over at PopularWoodworking. One of the biggest mistakes novice woodworkers make is that they over analyze the types of wood that they are going to use.
The veteran woodworkers over at PopularWoodworking. This makes sense because over time your bench is going to get really beat up and used- this is what makes them look distinctive and full of character. Another common error hobbyists make is that they had too many woodworking vises attached to it. The third common error is that woodworkers will build their bench to do all sorts of bizarre trickery like making it into a pneumatic lift, or making it adjustable on an x, y, z-axis, or even installing a ton of interior shelving.
They say that your focus should be on creating a solid, spacious fat table surface that serves your crafts needs rather than constructing something incredibly complex that defeats the purpose of its simplicity. They advise that you should be comfortable with the fact that the wood moves and not get too caught up in trying to prevent it from happening when designing your bench.
If it gets too bad, they say that it takes less than 45 minutes of work to fix. You should also make sure that you have the proper tools ahead of time- this is one of the biggest mistakes this experienced woodworker sees novice hobbyists commit. On a somewhat unrelated note we also took a look at HomeTipTop. The process of organizing your workshop [or workbench] is both personal and organic.
One of the top organizational hacks is installing peg boards or slatwall. These perforated hardboard Mount on your wall and you can insert hooks and pegs into them to make use of vertical space. Another handy organizing tool is a collapsible sawhorse-if your workbench gets too cluttered and you just need a little bit of extra space to do some supplementary cutting, these temporary table surfaces provide handy storage facility as well as an impromptu work area.
If you have the space, installing some cabinets could be a good idea. Woodworkers advise that you can section off your cabinets so that they are organized by the type of material they contain- this means you have quick and intuitive access to all of your tools and supplies at the drop of a hat. If you have really miniature tools that can fit on the pegboard, you can make a copper tube miniature tool organizer to stick in drill bits and other fine instruments.
If you have a lot of spare miscellaneous cables cluttering up your work area, you can use empty toilet paper tubes to coil them up, insert them inside, and store all of them in a cardboard box- a super simple storage approach.
Another overlooked way to keep your workshop clean and functional is to actually clean it-you can empty everything out of your garage or basement, give it a good vacuuming, mopping up with some Tilex and soap, and then plan how to reacclimate all of your tools and supplies best into the environment- even incorporating some principles of feng shui.
One overlooked option is to tidy up your ceiling. A basement or garage workshop can look somewhat gloomy and uninviting- but if you spend time installing lighting or otherwise making the ceiling look attractive it can pay enormous aesthetic dividends. This is especially important if you have a lot of fine tools and you need the ability to see deep into the crevices to extract exactly what you need at the right moment.
If you have a heap of fine wires around- you can install a wire spool holder to keep them from getting tangled. An alligator clip clothesline can also be used to dangle your alligator clips from to make them easily accessible and organized. Slide out component drawers are a great way to store small electronic parts-especially if you are an electrical engineer they are an ideal storage solution for these microscopic bits.
Another useful hack is to commit to putting your tools away at the end of the day. The guys over at LifeHacker. Save my name, email, and website in this browser for the next time I comment.
Sign in. Log into your account. Forgot your password? Password recovery. Recover your password. Home All Plans. I decided I needed a second workbench that would double as an assembly station and table saw outfeed table. The tricky part was, to maximize space, I also needed the workbench to be collapsible. I asked my Instagram followers for inspiration and was pointed to the Folding Table Base that was featured in a Popular Woodworking Magazine issue in The original base design utilizes basic hardware for the folding movement.
With my workbench, I swapped out the hook-and-eye latches for spring loaded sash locks the kind used to hold a window shut. I was surprised how affordable and easy to install the sash locks were. They hold the joints of the movable members tightly together when locked in place, which helps to add rigidity. The upside of a plywood top is that it is inexpensive and easy to replace when needed. To address this problem, I chose to add alignment dowels.
When the top is lowered onto the base, the dowels help with alignment and prevent lateral movement.


|
Craftsman Pin End Scroll Saw Blades Pdf Cnc Shark Router Table Zoom Table Saw Home Woodshop Tw Best Rap Songs Under 3 Minutes Live |

SPAWN
12.04.2021 at 21:21:47
orxideya_girl
12.04.2021 at 20:33:44